Current timesheet
PERMISSIONS All users who do not have the User is not required to submit Timesheets check box on the Resource Management > Security Tab checked
NAVIGATION My > Timesheets > Current Timesheet
NAVIGATION Left Navigation Menu > Timesheets > My... > Current Timesheet
About the timesheet
The current timesheet covers the work period that includes today. Depending on how your Autotask instance was set up, it may cover a period of one week, two weeks, or half a month.
- Time you enter on the Task and Ticket pages will automatically appear on your timesheet
- You can add task time entries directly on the timesheet, in both Project and Start Stop Time formats
- Ticket time entries can only be added on the timesheet if another time entry for the same ticket already appears there. The first time entry must be made on the ticket itself.
- Regular time can be both added and edited on the timesheet.
The Timesheet has two views with distinct features: List View and Report View. A button at the top of the page lets you toggle between the two views.
The list view
The list view opens by default. Here, you can create and manage time entries, and internal resources can submit their timesheet.
Which buttons are visible on the timesheet depends on the timesheet status and the type of resource or user.
| Button | Description |
|---|---|
|
Save (unsubmitted timesheets only) |
Time entries on incomplete tasks can be edited right in the timesheet table. You can also add hours on additional days right in the table. |
|
New (unsubmitted timesheets only) |
Click the dropdown control and select a time entry type and method.
You cannot select a ticket to enter time on. Refer to Entering time on a ticket. |
|
Get Previous Tasks (unsubmitted timesheets only) |
If you track regular time using the same regular time codes every period, or if you continue to work on tasks or tickets that appear on previous timesheets, you can copy these items into your current timesheet using Get Previous Tasks. Refer to Copying timesheet line items from previous timesheets. |
|
Delete (unsubmitted timesheets only) |
To delete a time entry, do the following:
For the permissions required, refer to Permissions required for editing and deleting time entries. |
|
Submit (unsubmitted timesheets of internal resources only) |
Click Submit to electronically submit your timesheet to your timesheet approvers. The submit date/time then appears at the top of the timesheet. Refer to Submitting your timesheet. NOTE Once the timesheet is submitted, it is locked and can no longer be edited. If you need to make changes after submitting your timesheet, ask your timesheet approver to reject your timesheet to unlock it. |
|
Recall (Un-submit) (submitted timesheets of internal resources only) |
If you submit a timesheet prematurely or you discover an error after you submitted it, you can recall or un-submit it. If it has not yet been approved by a timesheet approver, a Recall (Un-submit) button will appear on your timesheet. Recall is also supported for proxy time entry. If you mistakenly submitted a timesheet on another user's behalf, you are able to recall it in the same way as your own timesheets. To recall a timesheet:
|
|
Refresh |
Updates the timesheet to reflect changes to the ticket or task status, or the approval status of a time off request, or the timesheet. |
|
|
Click to toggle between the list view and the report view of the timesheet. |
|
|
To navigate to an earlier or later timesheet period, click the forward or back arrow. All timesheets can be viewed, but only unsubmitted timesheets can be edited. |
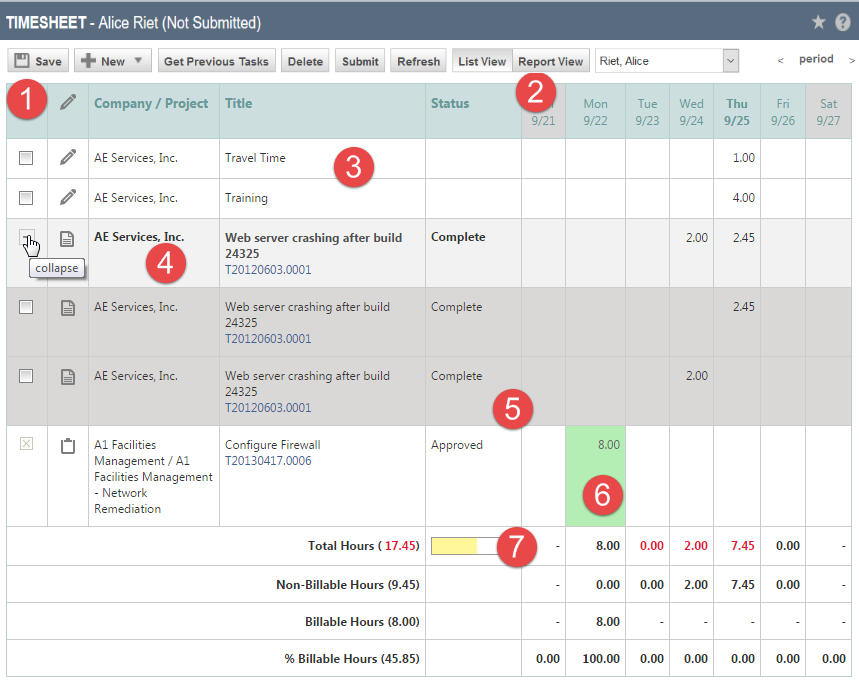
The numbers on the screen capture correspond to the explanation in the table rows.
| Number | Description |
|---|---|
| 1 | The column header row is determined by the color theme you selected in your profile. |
| 2 | A light gray column header indicates a weekend or holiday as defined in the holiday set. Refer to Managing holidays and holiday sets for details. |
| 3 | A white background indicates either a regular time entry, or a task or ticket not yet complete. |
| 4 | Summary rows appear light gray. If there are multiple time entries for a task or ticket, you will see a summary row item for the entry with a gray background and bold text. To view all associated time entries, click the plus sign in the left column. Click the minus sign to collapse the entries. |
| 5 | If a line item appears in a darker gray, the task or ticket status is complete. When all cells are gray, the timesheet has been submitted and can no longer be edited. If a time entry must be edited, the timesheet must be rejected by an approver first. |
| 6 |
Light green time entries have already been approved and posted and can no longer be edited or deleted. If they must be changed, the labor must first be un-posted. Refer to Searching posted billing items and un-posting transactions for details. |
| 7 |
The Total Hours and Total Billable Hours progress bars are white if no progress has been made, red if less than 50% of the goal has been achieved, yellow between 50 and 99% of goal, and green when 100% of the goal has been reached. NOTE Co-managing users will only see the summary of Total Hours. |
The Totals area at the bottom of your timesheet displays timesheet metrics. If you have not reached your goals for Total Hours, Billable Hours, or % Billable Hours, the number of hours (or percentage) will appear in red.
| Timesheet Totals | Description |
|---|---|
| Total Hours | The sum of all hours worked for the timesheet period and for each individual date. This field is equipped with a color-coded progress bar and, for internal resources, a tool-tip that displays the Total Hours goal and percent of progress towards that goal. |
| Non-Billable Hours (not available to co-managing users) | The sum of all non-billable hours worked for the timesheet period and for each individual date. Non-billable hours are determined based on work type. Regular time entries are always considered non-billable. |
| Billable Hours (not available to co-managing users) | The sum of all billable hours worked for the timesheet period and for each individual date. Billable hours are determined based on work type. Hours worked with no work type will be deemed billable. This field is equipped with a color-coded progress bar and a tool-tip that displays the Total Billable Hours goal and percent of progress towards that goal. |
| % Billable Hours (not available to co-managing users) | Billable Hours Worked vs. Total Hours Worked, to date. If you're not certain what your Billable Hours goal is, hover over the total for the day and the tool-tip will display your goal. |
You cannot enter time on a ticket from the timesheet, unless another time entry for the ticket appears already on the timesheet. If there is an existing time entry, do the following:
- On the ticket time entry row, click into a cell.

- The New Ticket Time Entry page opens. Refer to Adding a ticket time entry.
All users:
All users can edit or delete their own time entries, as long as the following conditions are met:
- The entry appears on an unsubmitted timesheet or a timesheet that has been rejected by a timesheet approver
- The time entry you want to edit or delete has not been posted for invoicing. Posted time entries are displayed in a light green cell.
- The time entry is not a time off request subject to pre-approval. Pre-approved time off requests that pull from a bank of hours must be canceled and re-submitted instead. This will prevent users from changing the number of hours that were approved without the Time Approver's explicit consent. You manage them on the My Time Off Requests page. Refer to My Time Off Requests.
Administrators and timesheet approvers:
By default, users can add, edit, and delete only their own time entries. Your Autotask administrator can enable timesheet approvers, or both timesheet approvers and administrators, to enter time and submit time off requests on other users' behalf. For users who have proxy time entry permission, the Proxy Time Entry section and the Resource selector field will appear on all time entry pages, so they can create a time entry for another user. They can also view users' unsubmitted timesheets.
Proxy time entry is enabled through a system setting. Refer to Proxy time entry.
IMPORTANT To enter time, approvers must have permission to view the tasks and tickets in question.
To enter time on behalf of a different user or view their timesheet, click the Resource drop-down selector and select the user's name.
Administrators and approvers can:
- Edit and delete time entries they added on someone's behalf
- Edit time entries the user created, as long as the timesheet has not been submitted
- Delete time entries they themselves created on a user's behalf.
They cannot:
- Delete time entries created by a user
- Edit time entries created by a user and submitted on a timesheet
To edit time entries on the timesheet, do the following:
- To open the page, use the path(s) in the Security and navigation section above.
- If you are using the Proxy Time Entry feature and would like to access another resource's timesheet, select the resource from the Resource drop-down list.
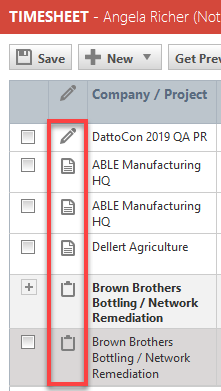
- Click on the icon in the Edit
 column.
The Edit Regular Time Entry, Edit Task Time Entry, or Edit Ticket Time Entry page will open. - The original time entry page will appear.
- Make changes as necessary.
- Click Save & Close.
If summary notes are not required, regular time, and project task and issue time may be edited directly in the table. Refer to the system settings Require user to enter summary notes when entering regular time and Require user to enter summary notes when entering project task time.
-
Click in the appropriate cell and make your changes. Multiple cells may be modified in this manner.
-
Click Save when you finish editing.
If the timesheet with the time entry you want to edit has already been submitted to, or approved by, your timesheet approver (the entire time table has a gray background), the timesheet approver must reject your timesheet. This can be done at any time, even after it has been approved. This will make it available for editing again.
- If the labor you want to edit has already been posted, as indicated by a light green background in the cell, it must be unposted by a user with Administrator security level.
- If the labor was applied to the wrong project task, you can change the task by clicking on the icon in the edit column. Refer to Changing the task the time entry is associated with.
- If the labor was applied to the wrong ticket, the labor entry must be deleted and re-created for the correct ticket. There is no way to transfer labor from one ticket to another.
The report view
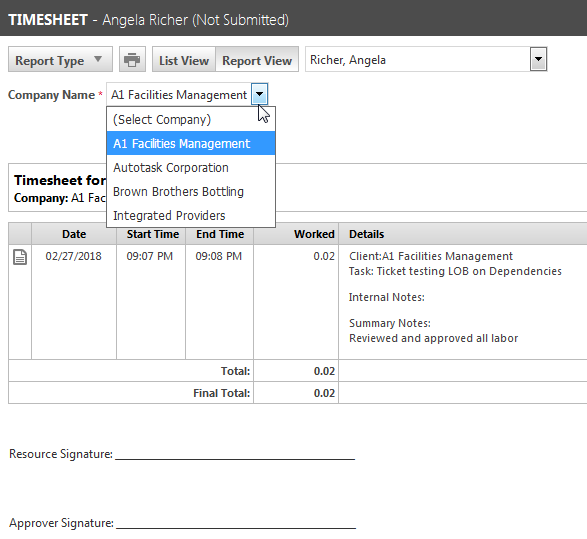
On the report view, you can use different sorts and filters to present timesheet data, display additional billing-related fields, and print your timesheet.
NOTE You cannot edit time entries in report view.
| Button | Description |
|---|---|
|
Report Type |
Refer to Selecting a report type. |
|
To print the currently selected report type, click the print icon. You can then sign it and submit a paper version. |
|
|
Refresh |
Updates the timesheet to reflect changes to the ticket or task status, or the approval status of a time off request, or the timesheet. |
|
|
Click to toggle between the list view and the report view of the timesheet. |
|
Show Billing Data (not available to co-managing users) |
To display the Contract, Work Type, Role, and Total Hours Worked (on the task/ticket) columns, click Show Billing Data. |
The report view defaults to the Timesheet report type.
The following report types can be selected from the drop-down menu:


