Resource Planner guide
 Security and navigation
PERMISSIONS Security level with Admin Feature Access permission to Workforce Management Resource Planner permissions. Refer to Workforce Management permissions.
NAVIGATION Left Navigation Menu > Workforce Management > Workforce Scheduler > Resource Planner
Overview
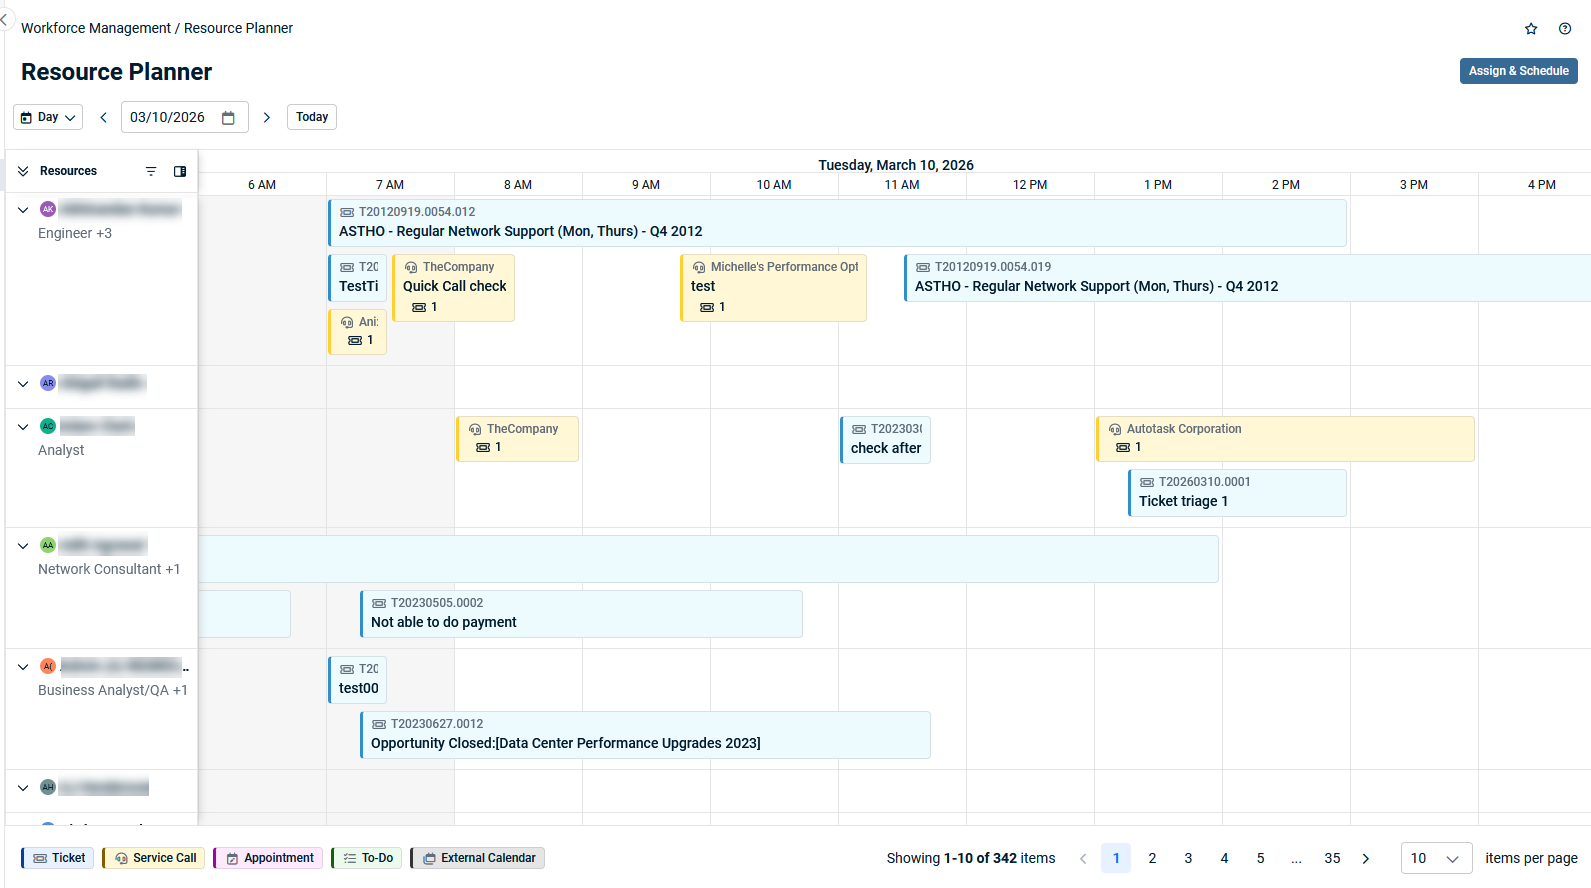
The Resource Planner is part of Workforce Management and provides a calendar-based view of your technicians and other internal resources. It helps dispatchers and managers schedule work, see who is available, and understand how work is distributed across the team.
What You Can Do with Resource Planner
- See each resource’s schedule on an interactive calendar.
- Assign and schedule tickets and service calls.
- Understand which hours are working hours and which are outside of business hours.
- View each user’s schedule in the correct local time, based on their primary internal location.
- Quickly navigate to the current day and move between days as needed.
- Use security and activation settings to control who can access the planner.
- Create service calls, appointments, and to-do's.
-
View approved time off requests and holidays for each resource.
Access Requirements
To access the Resource Planner, the following must be configured within a user's security level:
- Security level permissions:
- The user’s security level must include the appropriate Workforce Management permissions to view and use Resource Planner. Refer to Creating or editing a custom security level.
- Users with limited security roles may be blocked from the planner unless an administrator grants additional access.
If a user does not have the correct activation or permissions, they will not see Resource Planner in the menu and will receive an Access denied message if they try to open it via a saved or shared URL.
Opening the Resource Planner
- From the Left Navigation Menu > Workforce Management > Workforce Scheduler > Resource Planner.
- The Resource Planner calendar opens, showing resources and their schedules based on your current filters and view settings.
Understanding the Calendar
Working and non-working Hours
- The calendar uses your organization’s business hours to determine which hours are working hours and which are not.
- Working hours are shown as white cells.
- Non‑working hours are shown as gray cells.
- These hours are based on each user’s primary internal location, so the calendar matches the business hours defined for that location.
Time Zones
- The Resource Planner respects each user’s primary internal location time zone.
- When you view the calendar, scheduled work is displayed in the correct time zone for your profile and for each resource.
- If a resource works in a different time zone than you, their working hours are translated into your local time so you can see when they are available relative to your day.
Current Day and Time
-
The planner displays a Today button that jumps directly to the current day.

-
A visual indicator shows the current date and time on the calendar.
-
You can move backward and forward through the calendar using the navigation buttons in the toolbar.
Time off and holidays
The planner displays time off records for the resources currently being viewed within the selected date range.
-
Requested time off can be visible so dispatchers are aware of pending unavailability
-
Approved time off is visible so dispatchers can avoid assigning work during confirmed absence
-
Partial-day time off appears with scheduled time boundaries when applicable
-
Full-day time off appears as an all-day absence for the relevant date
NOTE Rejected or canceled time off is not shown.
IMPORTANT Time off visibility in the Resource Planner is read-only. Existing approval and management workflows continue to happen in their current Autotask areas.
Holiday visibility is based on the resource’s primary internal location. Autotask uses that location’s business-hours setup and associated holiday set to determine which holidays apply to the employee.
In practical terms, two technicians in different locations may see different holidays in the planner, even on the same date.
Holidays are shown as all-day availability-impacting events. This gives dispatchers clearer context when scheduling across teams, offices, or regions.
Navigating the Planner
- Use the navigation arrows to move to the previous or next day (or time period, depending on the view).
- Select Today to quickly return to the current date.
- Use available view options (for example, day view or week view) to choose how much time you see at once.
Grid view actionsDay / Week views
The calendar view within the Resource Planner grid can be adjusted to reflect a specific day or a specific week.

The Day view shows a detailed, hour‑by‑hour schedule for a single day.
Use it when you need to:
-
See exactly when each resource is booked or available
-
Adjust start/end times for work with precise timing
-
Quickly respond to same‑day changes, conflicts, or urgent assignments
It’s ideal for fine‑tuning workloads and handling real‑time changes to your schedule.
The Week view shows each resource’s workload across the entire week.
Use it when you need to:
-
See how work is distributed over multiple days
-
Spot overbooked or under‑utilized resources at a glance
-
Plan and balance assignments over the coming days
It’s ideal for short‑term planning and making sure the overall weekly schedule is realistic and balanced.
Date selector

The date selector lets you choose which day or week you are planning for in the Resource Planner.
-
In Day view, the date selector controls which single day is shown on the timeline.
-
Change the date to see past or future daily schedules.
-
Use the next/previous controls to move one day at a time.

-
-
In Week view, the date selector controls which week is displayed.
-
Select any date, and the planner shows the full week that date belongs to.
-
Use the next/previous controls to move one week at a time.
IMPORTANT In Week view, dragging and dropping a ticket onto a resource schedules the ticket at the earliest available time based on that resource’s schedule.
-
Expand / Collapse resource view
The Expand/Collapse
 toggle icons let you change how much detail you see for each resource in the Resource Planner.
-
Expanded
-
Shows more detail for a resource’s schedule (for example, individual assignments or time blocks).
-
Makes it easier to review exactly what a resource is working on and when.
-
-
Collapsed
-
Shows a compact summary of each resource’s workload.
-
Reduces vertical space so you can see more resources on the screen at once.
-
What it does for you
Use expand/collapse to quickly switch between a high-level overview of many resources and a detailed view of a single resource’s schedule, without leaving the planner.
Filter resources
You can filter which resources appear within the Resource Planner grid view.
To filter by Workgroups, Departments, and/or specific Resources:
-
Select the filter
 icon.
icon. 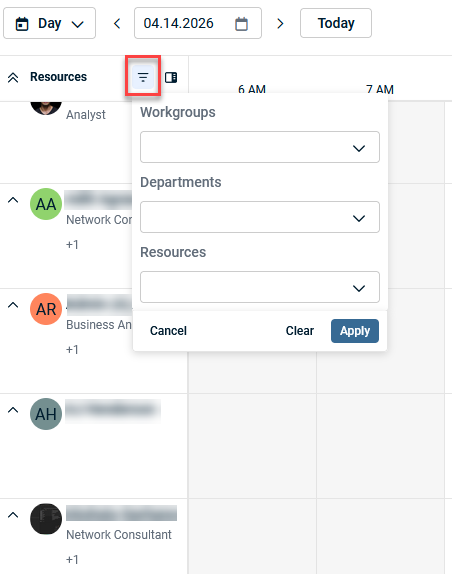
-
Use the dropdowns to select any desired filters.
-
Select Apply to confirm the selections. The Resources row will update the view with resources that match the selected filters.
Not Scheduled work by resource
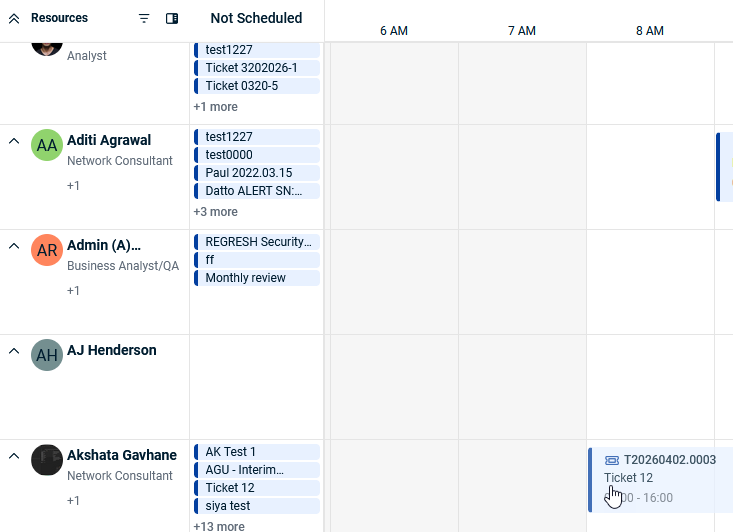
NOTE Not Scheduled work refers to a ticket that has a primary resource assigned but does not have any time scheduled.
To see tickets in the grid view that are assigned to a resource, but not within a scheduled time slot:
-
Select the sidebar view
 icon.
icon. 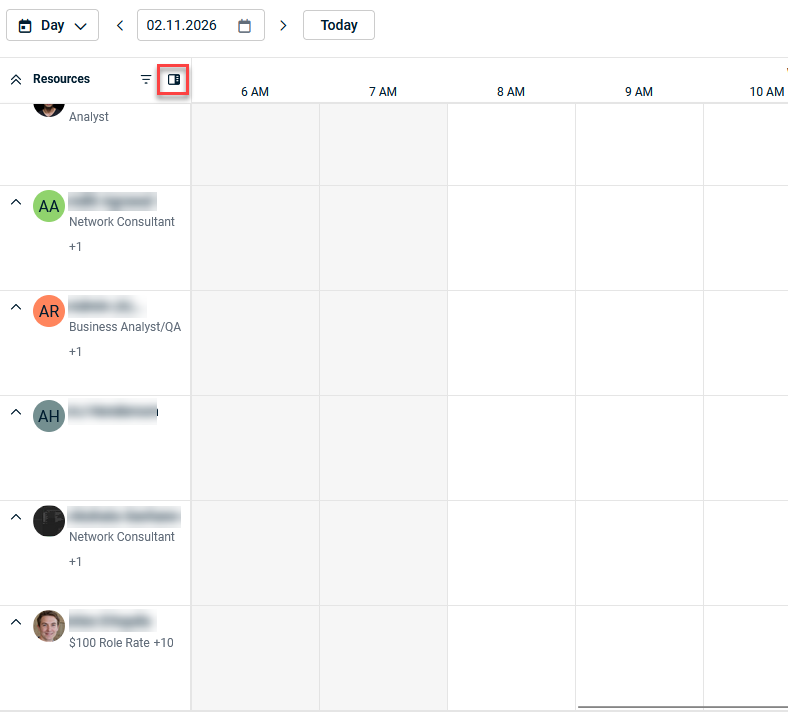
The Not Scheduled secondary panel opens.
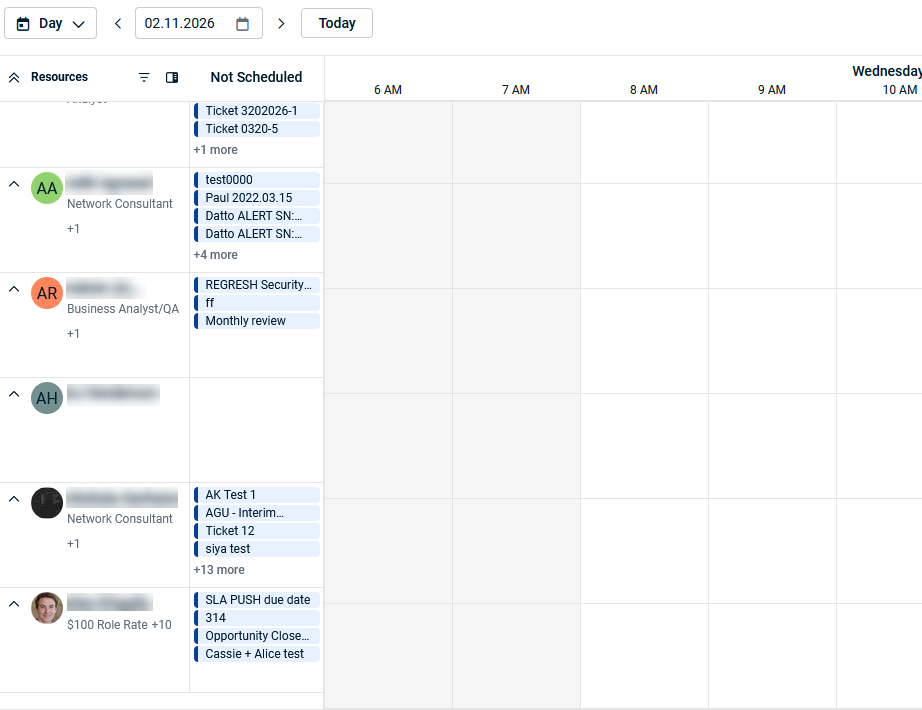
To schedule a ticket:
-
Drag the ticket from the resource's Not Scheduled column to the desired time slot.

-
Drop the ticket into the time slot.
Quick actionsTickets
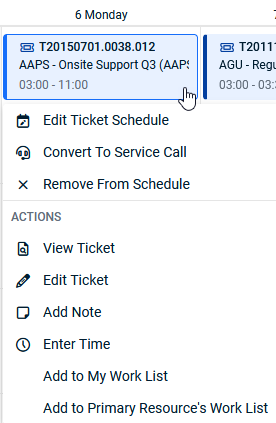
Clicking a ticket within the calendar view displays a set of menu actions that can be performed quickly without leaving the Resource Planner.
| Action | Description |
|---|---|
| Edit Ticket Schedule |
Opens the scheduling controls for this ticket so you can update details such as the scheduled date/time and also change the primary/secondary resource. NOTE Use the Unschedule option to remove the scheduled time from the resource’s calendar. The ticket will remain assigned to the current resource. |
| Convert To Service Call | Converts the scheduled ticket item into a service call so it can be managed as an appointment-style engagement (for example, work that requires a specific visit/meeting window). |
| Remove From Schedule | Removes the ticket’s scheduled time block from the planner while keeping the ticket itself in the system (the ticket is unscheduled, not deleted). The ticket remains assigned to the current resource. |
| View Ticket | Opens the ticket in view mode so you can review details such as status, description, priority, and history. |
| Edit Ticket | Opens the ticket in edit mode so you can update fields (for example, status, owner, priority, or other ticket information). |
| Add Note | Adds a note to the ticket to document updates, progress, or next steps. |
| Enter Time | Creates a time entry associated with the ticket to record work performed. |
| Add to My Work List | Adds the ticket to your personal work list so you can track it as part of your workload. |
| Add to Primary Resource's Work List | Adds the ticket to the scheduled/primary resource’s work list so it appears in their queue of assigned work. |
Service calls
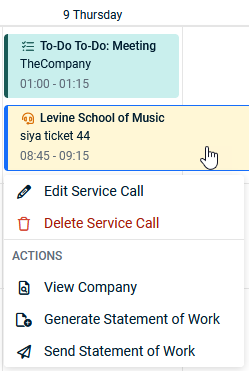
Clicking on a service call within the calendar view displays a set of menu actions that can be performed quickly without leaving the Resource Planner.
| Action | Description |
|---|---|
| Edit Service Call |
Opens the service call so you can update its details.
|
| Delete Service Call |
Removes the service call from the schedule.
NOTE The underlying ticket (if there is one) remains in the system; only the specific service call is deleted. |
| View Company |
Opens the company details associated with the service call.
|
| Generate Statement of Work |
Starts the process of generating a Statement of Work (SOW) for the company. Refer to Viewing and printing a Statement of Work.
|
| Send Statement of Work |
Sends a previously generated Statement of Work to the customer, usually via email. Refer to Sending a Statement of Work via email.
|
Create event
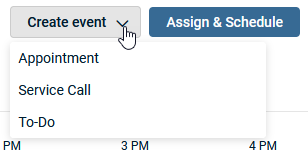
The Create event feature brings event creation directly into the Resource Planner, giving dispatchers and service managers a centralized workflow for scheduling work without navigating away from the planner view.
Available actions
Create Appointment
Schedule time on a resource's calendar for internal meetings, admin tasks, travel, or any non-ticket-related block of time. When creating an appointment, you can set the resource, title, description, start and end date/time, and optionally mark it as all-day. Appointments created in the Resource Planner are immediately visible on the Dispatch Calendar and sync to Outlook, ensuring a single source of truth across all scheduling views.
Create To-Do
Capture follow-up items, reminders, and lightweight tasks directly from the planner. To-Dos can be assigned to a resource and optionally associated with an organization, contact, ticket, or opportunity for context. Once created, To-Dos appear on the resource's timeline and can be marked as complete, edited, or deleted without leaving the planner. This is ideal for tracking quick action items that don't warrant a full ticket or service call.
Create Service Call
Build and schedule a service call end-to-end from within the planner. The service call drawer lets you assign an organization, schedule one or more tickets, add resources, set a location, and define the date and time window, all in a single panel. Dispatchers can also edit service call descriptions directly from the drawer after creation. A new map link icon on service call tiles opens the organization or location address in Google Maps, making it easy for field technicians to navigate to on-site jobs.
Using Assign & Schedule in Resource Planner
What is Assign & Schedule?
The Assign & Schedule feature in the Resource Planner helps dispatchers and managers quickly book work to the right technician, at the right time, directly from the calendar. Instead of jumping between tickets and schedules in different screens, you can see availability and assign work in one place.
NOTE Service calls are not required to schedule tickets.

Use Assign & Schedule to:
- Select a resource (technician or internal user).
- Choose a time slot on the calendar.
- Assign a ticket or task to that resource.
- Schedule when the work should take place.
This combines assignment and scheduling into a single step, so you can see when a technician is available, avoid double booking, and confirm the work visually on the calendar.
For more information about assigning tickets and service calls, refer to Scheduling tickets and service calls in the Resource Planner.
When to use Assign & Schedule
Use Assign & Schedule when you want to:
- Book a specific time for a ticket or task, not just assign it to a queue.
- Make sure the work fits into the technician's working hours.
- Coordinate time-sensitive work, such as onsite visits, maintenance windows, or urgent incidents.
- Adjust a technician's day by moving or rescheduling existing work.
If you only want to assign a ticket without setting a time, use your normal assignment workflow in the ticket itself. Use Resource Planner when the time on the calendar matters.
Accessing Assign & Schedule
To use Assign & Schedule, you must be able to open Resource Planner.
- Left Navigation Menu > Workforce Management > Workforce Scheduler > Resource Planner.
- Verify that the Resource Planner calendar opens and shows resources and their schedules.
If you do not see Resource Planner or receive an Access denied message, contact your administrator. They may need to:
- Update your security level to include Workforce Management and Resource Planner permissions. Refer to Workforce Management permissions.
How Assign & Schedule works on the calendar
Understanding the calendar view
The Resource Planner calendar provides the context you need before assigning and scheduling work:
- Each row represents a resource (technician or internal user).
- The columns represent time (by hour in Day view, by day in Week view).
- White cells are working hours, based on each user's primary internal location.
- Gray cells are non-working hours.
- The calendar respects each resource's primary internal location time zone.
- When you view another time zone, that resource's working hours are translated into your local time.
- The Today button jumps to the current date, and a visual indicator shows the current time on the calendar.
The Assign & Schedule button at the top right opens and closes this panel. From here, you can drag and drop tickets from the panel onto the calendar to assign and schedule them in one step.
Assigning tickets by dragging from Not Assigned
NOTE Not Assigned work refers to a ticket that has neither a primary resource assigned nor any scheduled time.
Use drag and drop from the Not Assigned tab when you want to assign a ticket to a technician and schedule it on the calendar at the same time.
-
Click Assign & Schedule at the top right if the panel is not already open.
-
Make sure the Not Assigned tab is selected in the panel.
-
Use the Filter box or scroll to find the ticket you want to schedule.
-
Click and hold the ellipsis icon
 in the Not Assigned list.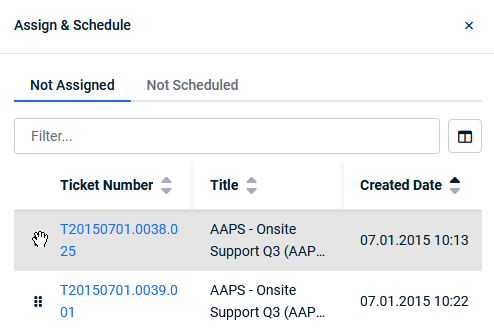
-
Drag the ticket from the panel onto the calendar:
-
Drop it on the row for the technician who will do the work.
-
Drop it at the time slot when you want the work to begin.
-
-
Release the mouse to place the ticket on the calendar.
-
Select a Role for the resource.
-
Select Confirm to assign the ticket.
What happens:
- The ticket is assigned to the resource where you dropped it.
- A scheduled block is created on the calendar at that date and time.
- The ticket is removed from the Not Assigned list because it now has an owner and a scheduled time.
This gives dispatchers a fast, visual way to fill open time on each technician's schedule by dragging work directly from the Unassigned list to the appropriate place in the day.
Scheduling work from the Not Scheduled tab
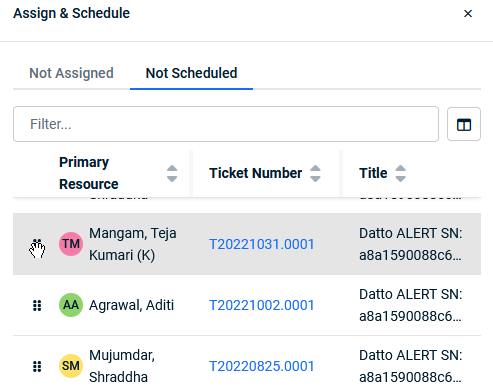
The Not Scheduled tab lists tickets that already have an owner but do not yet have time booked on the calendar. You can drag these onto the calendar to add a scheduled time without changing the assignment.
Open the Assign & Schedule panel and select the Not Scheduled tab.
-
Find the ticket you want to place on the calendar.
-
Click and hold the ellipsis icon
in the Not Scheduled list, then drag it onto the calendar:
-
Drop it on the same technician to add time to their schedule.
-
Or drop it on a different technician if you want to reassign at the same time.
-
-
Release the mouse to schedule the work.
What happens:
- The ticket appears as a scheduled block at the time and on the resource where you dropped it.
- If you dropped it on a different technician, the ticket assignment is updated to that new resource.
- The ticket is removed from the Not Scheduled list because it now has scheduled time.
Rescheduling work by dragging on the calendar
After a ticket has been scheduled, you can move it around on the calendar to change when it occurs.
- On the Resource Planner calendar, locate the scheduled block for the ticket.
- Click and hold the block.
- Drag the block to a new time slot on the same technician's row or to a different day, depending on the view.
- Release the mouse to drop the block at the new time.
What happens:
- The start and end time of the scheduled work are updated to match the new position.
- The ticket remains assigned to the same technician unless you drag it to a different row.
Reassigning work between resources
You can also use drag and drop to move a scheduled block from one resource to another.
-
Find the scheduled block that you want to reassign.
-
Click and hold the block on the calendar.
-
Drag the block up or down to another resource row.
-
Drop it at the desired time on the new resource's row.
-
Select a Role for the resource.
-
Select Confirm to reassign the ticket.
What happens:
- The ticket is reassigned to the new resource.
- The scheduled start and end time are set to the position where you dropped the block.
Adjusting the duration of scheduled work
You can change how long work is scheduled for by resizing the block on the calendar.
-
Hover near the edge of a scheduled block until the resize handle appears.
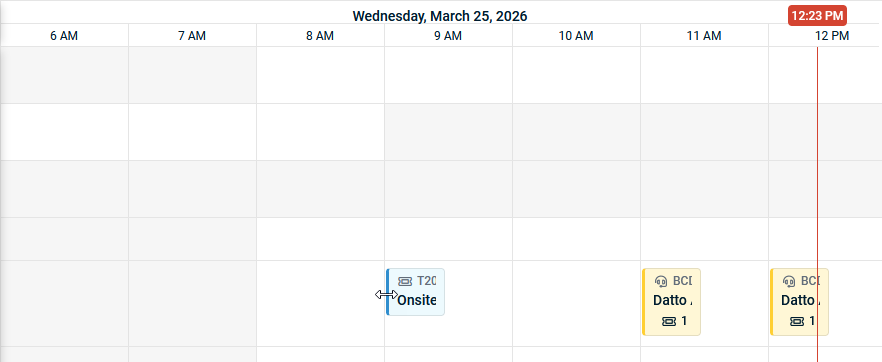
-
Click and drag the edge of the block to lengthen or shorten it.
-
Release the mouse when the block reflects the correct duration.
The calendar updates the scheduled start or end time so that the duration matches the new size of the block.
How drag and drop respects working hours and time zones
The calendar view in the screenshot shows working and non working hours for each resource:
- White cells indicate the resource's working hours based on their primary internal location.
- Gray cells indicate non working hours outside the defined business hours.
- The red vertical line marks the current time on the selected date.
When you drag and drop tickets using Assign & Schedule, the planner uses this same information. You can place work either inside or outside working hours, and the calendar always shows the correct local time for each resource so you can see availability at a glance.
Typical use cases
Dispatcher or service manager
- Review today's schedule in Resource Planner and use Assign & Schedule to fill open time slots.
- Balance workload across technicians by moving bookings and reassigning tickets.
- Coordinate time-sensitive work and ensure that technicians in different time zones are scheduled appropriately.
Administrator
- Verify that internal location business hours are correct so that working and non-working hours are accurate in the calendar.
- Confirm that each user's primary internal location and time zone are configured correctly.
Best practices
- Review internal location business hours regularly to ensure they match your current working patterns.
- Make sure each user has the correct primary internal location and time zone.
- Schedule within working hours when possible, and reserve non-working hours for planned exceptions.
- Encourage dispatchers to use the Today button at the start of their shift to quickly orient themselves on the calendar.
Troubleshooting
Assign & Schedule is not available or Resource Planner does not open
- Ask your administrator to verify that your security level includes access to Workforce Management and Resource Planner.
- If you see an Access denied message when opening a saved or shared URL, you may not have the required permissions.
Scheduled work appears at the wrong time
- Check your user time zone settings.
- Check the technician's primary internal location and time zone.
- Verify that the internal location business hours match your actual working hours.
A resource shows as available but is on PTO
-
Verify the time off request status is Approved and the resource's primary internal location has the correct holiday set assigned.
Security behavior
Resource Planner is protected by the same security model as the rest of Workforce Management, with additional safeguards:
- If Resource Planner is not enabled in Workforce Scheduler activations, it does not appear in the menu.
- If a user’s security level does not include access to Resource Planner, they cannot open it.
- Direct URL access is blocked for users without permission. Even if they type or paste the URL, they will see an Access denied message.
Refer to Workforce Management permissions.


