Smart Accounting Hub for QuickBooks Online (QBO) settings and mappings
PERMISSIONS Security level with the QuickBooks Extension Admin setting enabled and API impersonation permissions.
NAVIGATION Left Navigation Menu > Admin > Extensions & Integrations > Smart Accounting Hub > Settings
IMPORTANT Please review the information in Smart Accounting Hub for QuickBooks Online to ensure the integration is connected before configuring the settings on this page.
Overview
These pages provide comprehensive guidance on configuring item settings and mappings within the Smart Accounting Hub integration for QuickBooks Online and Autotask. It covers how to define naming conventions for various invoice and purchase order line items that are created and synced from Autotask to QuickBooks, including labor, services, product charges, block purchases, retainers, tickets, subscriptions, expenses, milestones, and contract setup fees.
Additionally, this article explains how to map Autotask organizations, vendors, expense categories, lines of business, and custom fields to their corresponding entities in QuickBooks Online. These mappings ensure accurate synchronization of invoices, purchase orders, expense reports, and other financial data between the two systems.
This page is dedicated to configuring the desired naming conventions for invoice and purchase order line items that this integration creates in your QuickBooks Item List. The settings will apply only when syncing new invoices or purchase orders.
NOTE Changes that are saved after a sync has already occurred will not be applied until the next sync.
| Item | Description |
|---|---|
| Labour |
Define the item naming settings for any Labour items created in QuickBooks.
|
|
Services/Bundles
|
Define the item naming settings for any recurring services or service bundle line items created in QuickBooks.
|
|
Charges
|
Define the item naming settings for product charges created in QuickBooks.
|
|
Block Purchases |
Define the item naming settings for Block Hour purchases created in QuickBooks.
|
|
Retainer Purchase |
Define the item naming settings for Retainer Contract purchases created in QuickBooks.
|
|
Ticket Purchases |
Define the item naming settings for Ticket purchases created in QuickBooks.
|
|
Subscriptions |
Define the item naming settings for Subscription items created in QuickBooks.
|
|
Expenses |
Define the item naming settings for an Expense created in QuickBooks.
|
|
Milestones |
Define the item naming settings for Milestones created in QuickBooks.
|
|
Contract Setup Fee |
Define the item naming settings for Contract Setup Fee line items created in QuickBooks.
|
The Customer Mappings and Vendor Mappings pages are dedicated to mapping Autotask organizations and vendors to QuickBooks Online. Customer mappings affect the syncing of invoices and payments. Vendor mappings affect the syncing of purchase orders.
Mapping Autotask organizations or vendors to QuickBooks Online is optional. During syncing, if no mappings are found, the Smart Account Hub will attempt to automatically establish mappings by matching the organization name to a QuickBooks customer display name.
Mappings that are applied on these pages are applied only to new invoices, purchase orders, or payments. They are not retroactive.
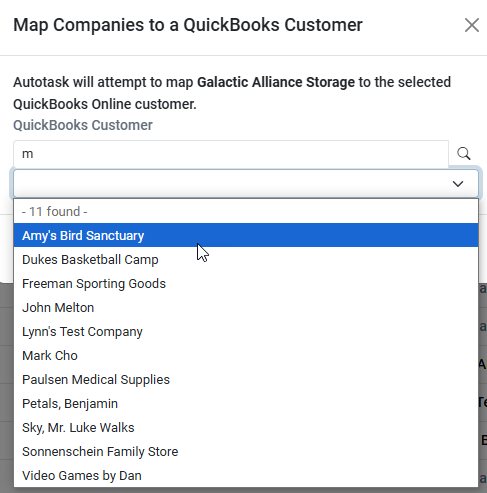
Complete the following steps to manually map an Autotask organization or vendor in the Smart Accounting Hub to QuickBooks:
-
Click Customer Mappings or Vendor Mappings.
-
In the search bar, type the name of an organization or vendor and click Search. The search function will attempt to locate a match based on your text input.
-
Select the checkbox to the left of the organization or vendor that you wish to map to QuickBooks.
NOTE Multiple organizations or vendors can be mapped to a single QuickBooks customer or vendor.
-
Click Map to Customer or Map to Vendor.
-
In the pop-up window that appears, type the name of the organization or vendor. When matches are found, a drop-down will appear with the available options.
-
Select the organization or vendor and click Save.
-
After a selection is saved, the organization or vendor will appear on the mapping page.

To delete a mapping:
-
Navigate to the Customer Mappings or Vendor Mappings page.
-
Locate the organization or vendor under the QuickBooks Customer or QuickBooks Vendor column and click the trash
 icon.
icon.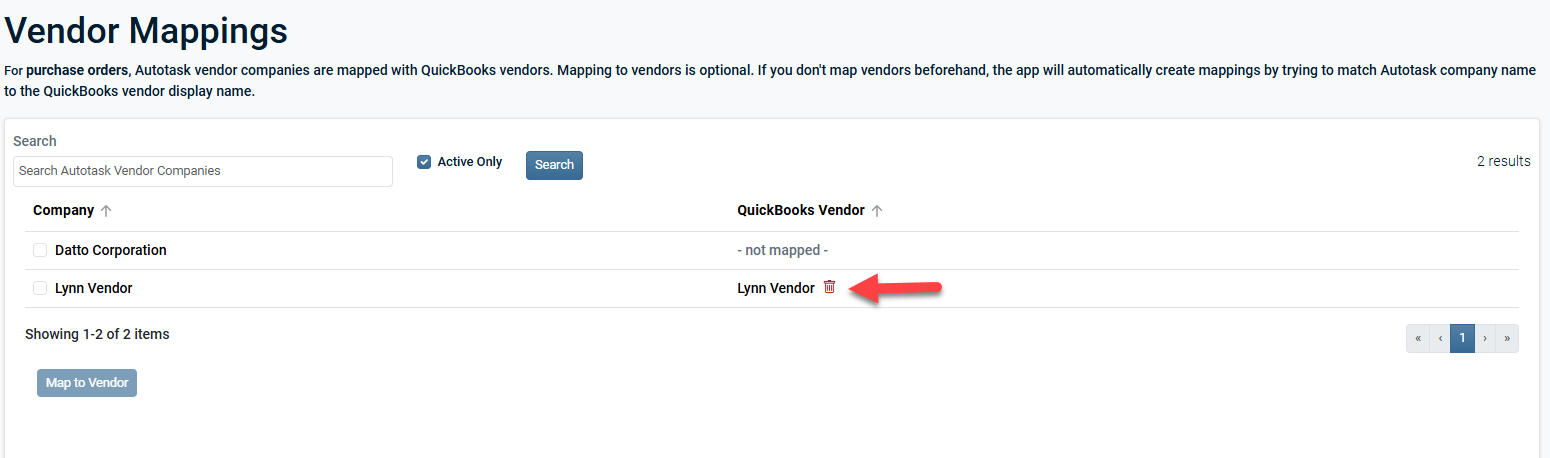
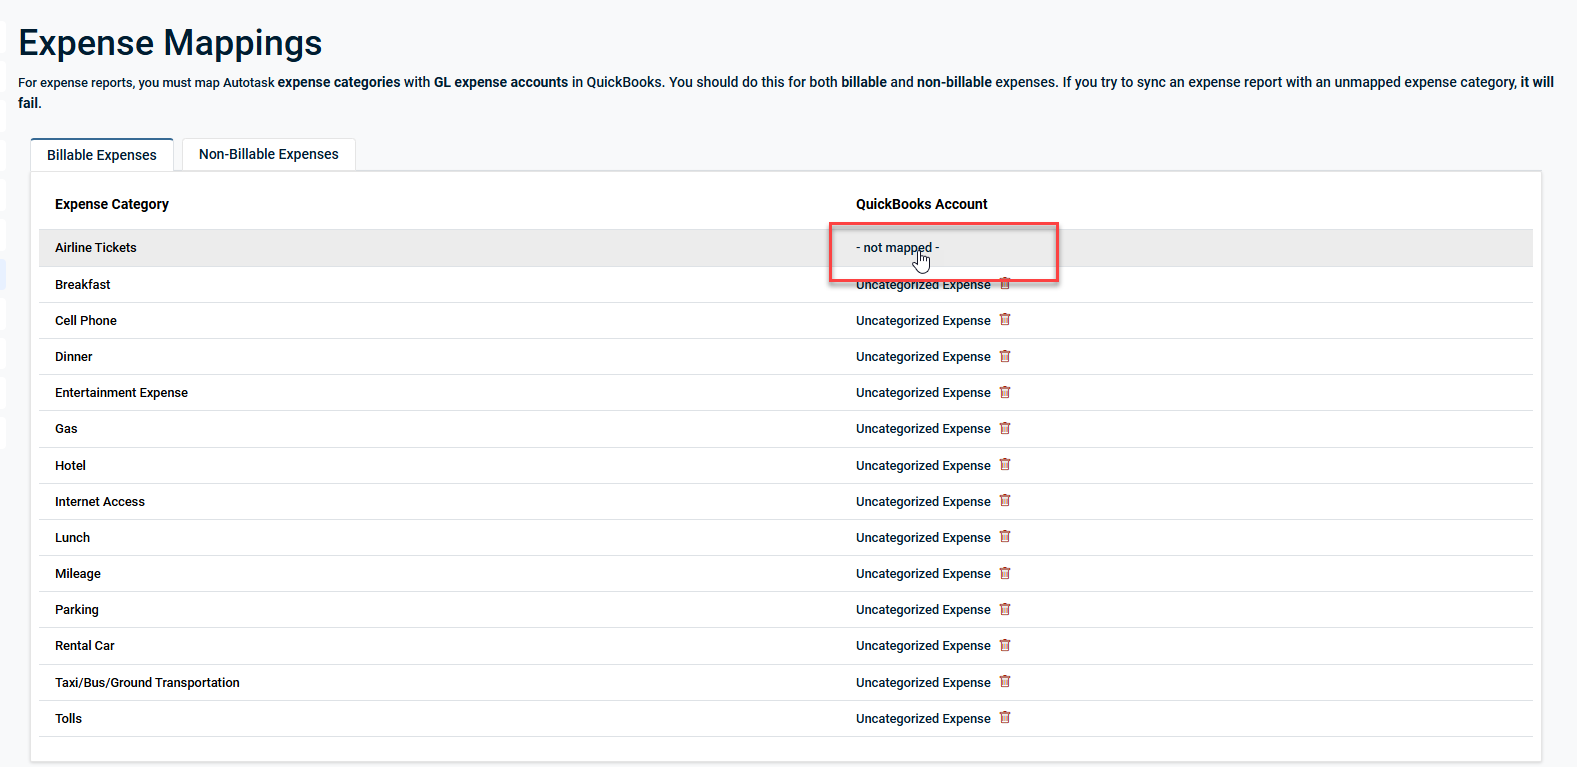
The Expense Mappings page is dedicated to mapping Autotask Expense Categories to QuickBooks Online GL Accounts. Expense Mappings affect the syncing of Expense Reports.
NOTE We recommend mapping both Billable (Reimbursable) and Non-Billable (Non-Reimbursable) Expenses. Unmapped Expense Categories will not sync to QuickBooks.
Mappings that are applied on this page are applied only to new expense reports. They are not retroactive.
Complete the following steps to manually map an Autotask Expense Category in the Smart Accounting Hub to QuickBooks:
-
Navigate to the Expense Mappings page.
-
Click the Billable Expenses or Non-Billable Expenses tab.
-
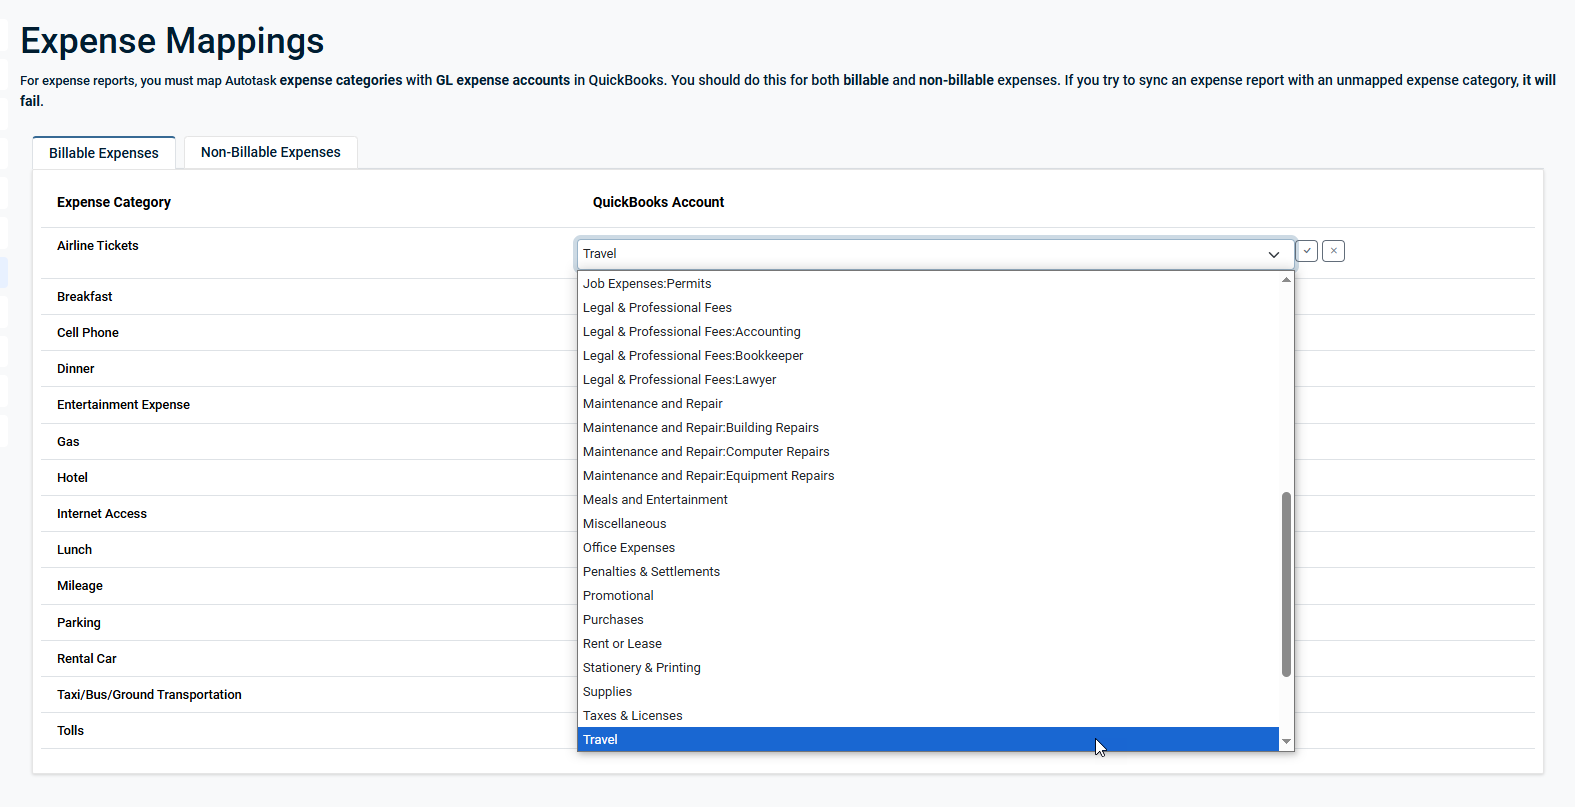
In the QuickBooks Account column, click on the corresponding line item of the Expense Category you wish to map.
-
From the drop-down list, select an available QuickBooks Account.
-
To save your selection, click the check mark
 icon. To remove your selection, click the "x"
  icon.
icon.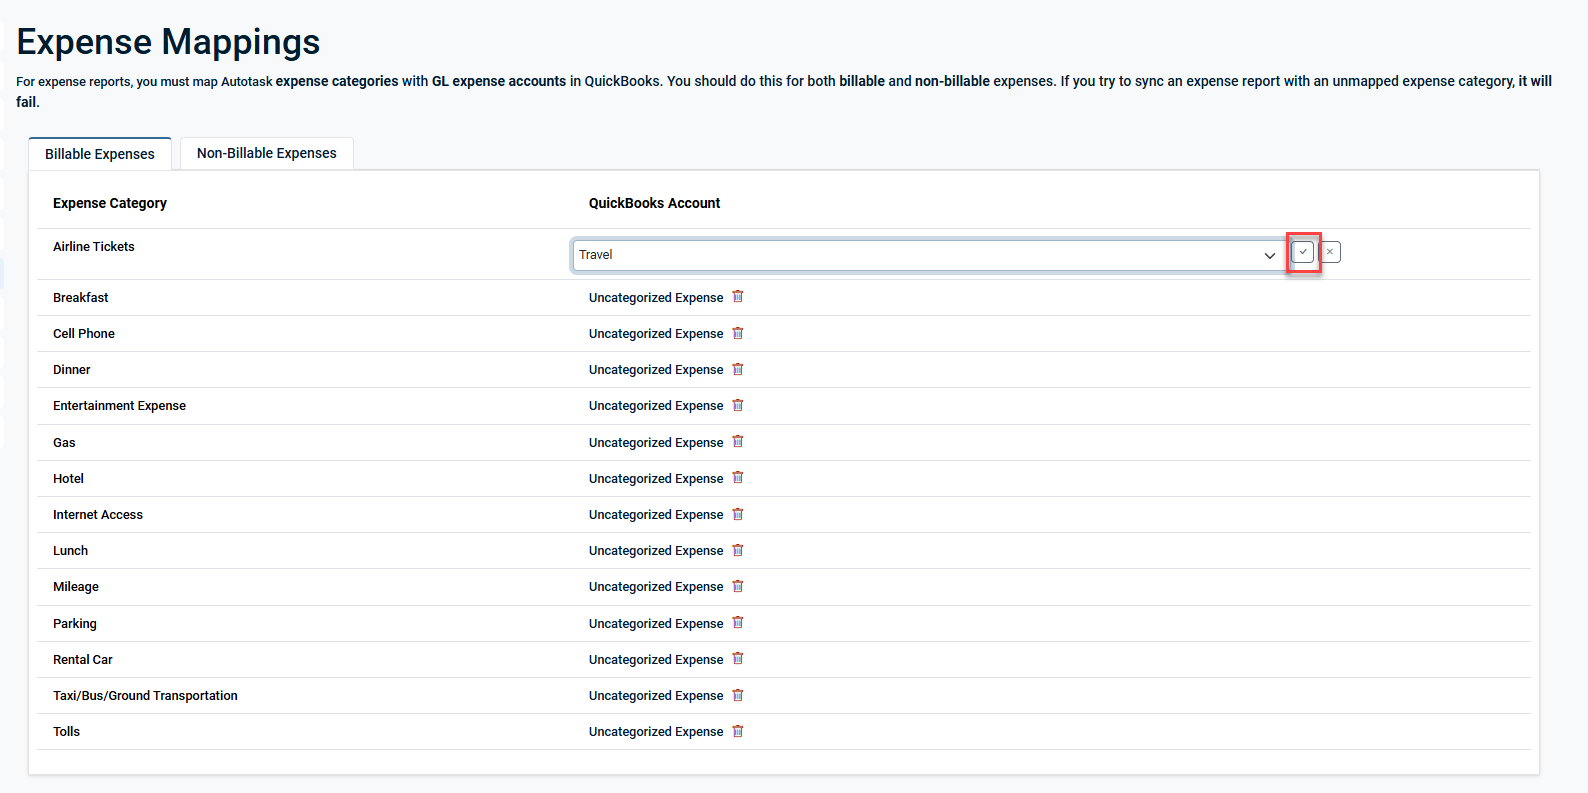
-
Repeat steps 3-5 to map other Expense Categories.
To delete a mapping:
-
Navigate to the Expense Mappings page.
-
Locate the QuickBooks Account under the QuickBooks Account column and click the
icon.
The Line of Business Mapping and Filtering page is dedicated to mapping your Autotask Lines of Business to QuickBooks Online Classes. These mapping selections will control which Autotask transactions (invoices, purchase orders, or expense reports) will be seen and synced by the Smart Accounting Hub.
Mapping lines of business to classes is optional. Mapping an Autotask Line of Business to a QuickBooks Class will force the Smart Accounting Hub to ignore transactions with unmapped lines of business. If no mappings are selected, then all transactions will be available to sync based on any already configured settings.
Mappings that are applied on this page are applied only to new transactions. They are not retroactive.
Complete the following steps to manually map an Autotask Line of Business in the Smart Accounting Hub to QuickBooks:
-
Navigate to the Lines of Business page. A listing of existing lines of business will automatically populate.
NOTE If no Autotask lines of business or QuickBooks classes exists, a message will appear to highlight which is missing.
-
In the QuickBooks Class column, click on the corresponding line item of the line of business you wish to map.
-
From the drop-down list, select an available QuickBooks Class.
-
To save your selection, click the check mark
icon. To remove your selection, click the "x" icon. -
Repeat steps 2-4 to map other lines of business.
To delete a mapping:
-
Navigate to the Lines of Business page.
-
Locate the QuickBooks Class under the QuickBooks Class column and click the trash
icon.
The Custom Field Mapping page is dedicated to mapping your QuickBooks custom fields to Autotask invoice fields.
Mapping QuickBooks custom fields to Autotask invoice fields is optional. This page will only display data if you have created QuickBooks custom fields.
Mappings that are applied on this page are applied only to new invoices. They are not retroactive.
Complete the following steps to manually map a QuickBooks Custom Field in the Smart Accounting Hub to Autotask:
-
Navigate to the Custom Fields page. A listing of existing custom fields will auto populate.
-
In the Autotask Field column, click on the corresponding line item of the QuickBooks custom field you wish to map.
-
From the drop-down list, select an available Autotask Field.
NOTE There are two standard Autotask fields: Invoice Number and Order Number.
-
To save your selection, click the check mark
icon. To remove your selection, click the "x" icon. -
Repeat steps 2-4 to map other custom fields.
To delete a mapping:
-
Navigate to the Custom Fields page.
-
Locate the Autotask Field under the Autotask Field column and click the trash
icon.


