Mapping discovered devices to a contact and contract
PERMISSIONS Users for whom Can access Device Mapping is enabled
NAVIGATION Left Navigation Menu > CRM > Device Mapping > Device Mapping
BEFORE YOU BEGIN The Datto RMM Integration must be enabled for the Device Mapping page to be available. Refer to The Advanced Datto RMM Integration and The Advanced Datto BCDR Integration.
About the Device Mapping page
When Autotask is integrated with Datto RMM or Datto BCDR, RMM and BCDR devices are mapped to Autotask devices. While Datto RMM and Datto BCDR track technical data like memory, CPU, and uptime, contract and billing information is only tracked in Autotask. On the Device Mapping page, you can quickly assign the missing billing contract to each item, and optionally associate a contact.
The Device Mapping page displays all devices that:
- Were discovered by Datto RMM, Datto BCDR, or VSA 10 AND
- Are active AND
- Where the Reviewed for Contract box is not selected. For more information about the Reviewed for Contract check box, refer to Contract review for devices.
How to...
You can filter the list of discovered devices by three criteria: Organization, Organization Location, and Discovered By.
- To open the page, use the path(s) in the Security and navigation section above.
- Click the Organization selection dropdown above the table.
TIP The Organization selection dropdown menu lists all active organizations that have at least one device that needs to be mapped. The number of devices available for mapping is shown in parentheses after the organization name.
- Select an organization with items to map. The list is filtered for the selected organization.
- Alternatively, click the Discovered By or Organization Location selection dropdown.
- Select All, or click Datto RMM, Datto BCDR, or VSA 10. Your selection will return devices with a Datto RMM Device ID, or a Datto Device ID, or a VSA 10 Device ID, respectively.
NOTE The Datto RMM Integration and/or the Datto BCDR Integration must be enabled for Datto RMM and/or Datto BCDR devices to be displayed in the list.
Column descriptions
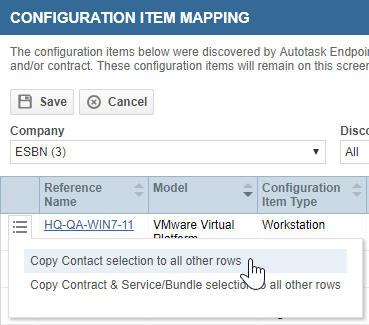
Column Description Context menu icon The context menu contains two options that become available once you have selected a contract or a contract and a service/bundle:
• Copy Contact selection to all other rows
• Copy Contract & Service/Bundle selection to all other rows
Note that if you select either option, all rows on the table will be impacted, even if they appear on a different page.Reference Name Click the Reference Name to open the Edit Device page. Model Displays the Model field from the Device page. Device Type Displays the device type associated with the product to which the device is mapped. Last User Displays the username of the last person to access the device type. Contact Allows you to select the contact the device is associated with. The dropdown list contains all active contacts associated with the device's organization and its parent organization, if applicable. Contract Allows you to select a contract for the device. The dropdown list contains all active and non-expired contracts associated with the device's organization and its parent organization, if applicable.
If the contract you associate with the device has an associated SLA, that SLA will get directly associated with the device. You will not see this happen.
The Contract dropdown also contains a [no contract] option that, if selected, will remove the device from this list without forcing you to assign a contract, and a blank selection which will keep it on the list.Service/Bundle (Available Units) For recurring service contracts you can optionally assign the service or bundle that will cover the device. All services and bundles associated with the selected recurring service contract are listed.
- Click the drop-down menu in the Contact column and select a contact.
- Click the drop-down menu in the Contract column and select a contract.
- To remove the item from this page without assigning a contract, select [no contract].
- For recurring services contracts, optionally select a service or bundle.
- Click Save.
When you click Save, you will see a message that will state the number of devices that have been mapped.
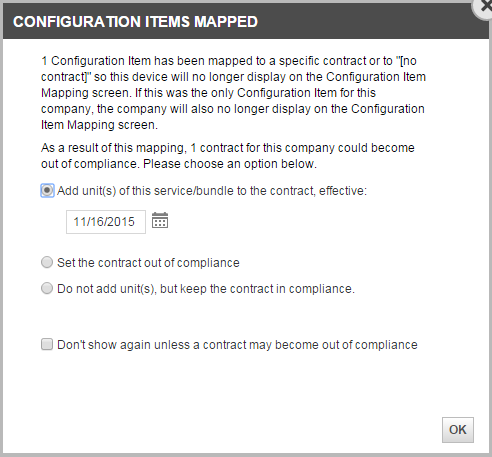
If one or more contracts will go out of compliance as a result of the mapping, you will see a second message that lets you choose how to deal with the compliance issue:
- If you choose Add unit(s) of this service/bundle to the contract, effective: (Date) and select a date, the number of units in the contract will be increased (on the entered Effective Date) so the contracts remain in compliance. The customer will be billed for the additional devices as of the effective date.
- If you choose Set the contract out of compliance, the devices will be added to the contract, but the contract units will not be adjusted and all offending contracts will be set as out of compliance. This selection is best suited to organizations where a billing administrator regularly reviews contracts that are out of compliance.
- If you choose Do not add unit(s), but keep contract in compliance, the devices will be added to the contract, but the contract units will not be adjusted. Even so, the contract will be kept in compliance.
IMPORTANT This last choice means that you will not be billing the customer for the additional units through the Autotask contract, even though the devices will appear and be supported under the contract.
- If you would rather not see this confirmation box every time, select Don't show again unless a contract may become out of compliance.


