Creating and managing billing rules
PERMISSIONS Manager
NAVIGATION Left Navigation Menu > Contracts > Search > Contracts > open a contract > Menu > Billing Rules
On the Billing Rules page, you create and manage the billing rules that generate charges by the contact or by the device. You can set up multiple billing rules for multiple products on a single contract, both per contact and per device.
EXAMPLE Your customer has 10 contacts that fall under your contract. 8 contacts are associated with the "Standard Monthly Enduser" billing product, for which you charge $30/month. 2 are executives who are entitled to extended hour support and license Office 365. They are associated with the "Executive Monthly Enduser" billing product, for which you charge $50/month.
The Billing Rules table
Contract billing rules are accessed from the contract menu by clicking the Billing Rules link. A table displays a list of all billing rules that have been created for this contract.
| Name | Description |
|---|---|
| Task Buttons | |
| New | Click to create a new billing rule for this contract. Refer to Add or edit a billing rule. |
| Column Chooser |
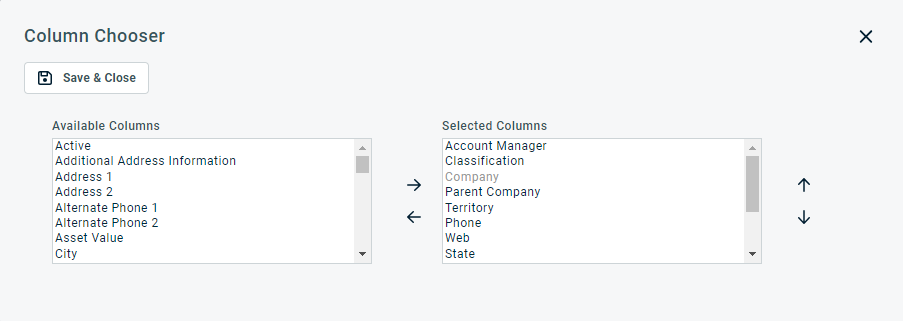
The Column Chooser allows you to customize search results tables throughout Autotask. It determines the following:
NOTE Column Chooser settings on search results tables and some standard reports are part of the user settings stored on the Autotask server. You can log in from any computer and have your column chooser settings applied to your Autotask session. To clear the data stored in your Autotask instance and reset the column chooser settings to the Autotask default settings, click Reset Settings in My > Miscellaneous > Settings. To customize the table, do the following:
Columns appear either in the Available Columns or the Selected Columns panel.
NOTE Top-to-bottom order in the Selected Columns list becomes left-to-right order on the Search Results list.
TIP If the characters + # appear after the column name, then that column may have multiple items returned for some rows. If that occurs, the first item will appear in the row followed by + and the number of additional items returned. To display the list of additional items, hover over the item in the column. |
| Manage Rule Associations | Click to open the dialog to manage the contacts and devices that will be counted by the billing rule. Refer to Add contacts and devices to a billing rule. |
| Context Menu | |
| Edit | All fields and settings can be modified. |
| Copy | Creates a copy of the selected billing rule. |
| View/Manage Associations | Opens the same dialog as the Manage Rule Associations button, but with the billing product of the selected billing rule populating the drop-down menu. Refer to Add contacts and devices to a billing rule. |
| Inactivate / Activate | Inactivating a billing rule will prevent it from generating billable charges for all associated contacts or devices. You do not have to reset the expiration dates of associated contacts or devices. |
| Delete | You can delete a billing rule as long as no charges were created, or the associated charges were deleted first. |
How to...
- To open the page, use the path(s) in the Security and navigation section above. The Billing Rules page will open.
NOTE Billing rules can be added to any contract type, but selecting a Recurring Services or Fixed Price contract will make sure that you don't accidentally bill for tracked labor. We recommend that you use a separate contract for per contact or per device billing. Refer to Best Practices.
- Click New or, on the Billing Rules table, hover over the context menu and select Edit. The New/Edit Billing Rule dialog will open. Complete the following fields:
| Field | Description |
|---|---|
| General | |
| Billing Product |
Click the drop-down menu and select the billing product for this rule. Only active products with a billing type of Per Contact and Per Device are available in the list. However, if you are editing an existing rule and the currently selected product is now inactive, it will still be selected. You cannot have two billing rules with the same product on the same contract. For information on creating billing products, refer to Adding, editing, or copying a product. |
| Active | Billing items (contract charges) will only be created if the billing rule is active on the day the charge is due to be created. Refer to Billing Options. |
|
Start Date
|
The start date establishes the beginning of the first billing period. It is also the first billing date, and it determines the Day of Month for all following billing dates. It must be greater than or equal to the contract start date. EXAMPLE If the start date is January 7, the next billing date will be February 7, and so on.
|
| End Date |
No charges will be created for periods that would have started after the date entered in this field. If you leave the field blank, the creation of charges ends on the contract end date. If you enter a date that is later than the contract end date, a message that includes the contract end date will appear. |
| Description |
You may specify a description for this Billing Rule.
|
| Billing Options | |
|
Determine Units/Create Charges on:
|
Click the dropdown control and select the Day of Month the number of units is counted for the next billing period. The count day can be the same day as the billing day, or an earlier day. The number of units will be counted shortly after midnight on the selected day, using the time zone of your default location.
EXAMPLE You count units and create charges on day 15, and bill on day 31 (or the last day of the month). On February 15, you count the number of devices (41) and create the charges. |
| Minimum Units | You can specify a minimum quantity for the contract charges that get created by this billing rule. If the count of associated contacts or devices is less than the minimum units, the charge will get created with the minimum units as its quantity. |
| Maximum Units | You can specify a maximum quantity for the contract charges that get created by this billing rule. If the count of associated contacts or devices is greater than the maximum units, the charge will get created with the maximum units as its quantity. |
|
Execution Method |
Defaults to the setting selected for the contract system setting Automatically execute Billing Rule instances (When off you will need to execute Rule instances manually. This setting can be overridden at the Contract Billing Rule level.) To override the default setting, click the dropdown control and select another option:
|
| Create Charges as Billable | Specify if the contract charges created by this billing rule should be billable (check box is selected) or non-billable (check box is not selected). This makes it easy to suspend billing for a customer for a limited time. |
| Include covered items in Charge Description for: |
These check boxes determine if the names of the
will be added to the Charge Description field, and therefore be listed on the customer invoice. If an item is pro-rated, "(#days)" is appended. Separate check boxes allow you to include covered items for full billing periods, partial billing periods, or both.
|
| Naming Convention | This field allows you to determine how the covered contacts or devices will be listed on the invoice. You should discuss with your customers which option is the easiest for them to interpret. For contacts, you have the following choices:
For devices, you have the following choices:
NOTE If you are integrating with Datto RMM, both the Device Name and the IP Address are pulled from the RMM device audit table. |
| Price & Cost | |
| Price/Cost Source |
The billing rule inherits the Price/Cost from the billing product, but this setting can be modified.
Tip: to apply the product's Admin prices but protect them from changes made to the Product list in Admin, click Override, but don't change the prices. |
| Period Type | Displays the Period Type Monthly. This is the only available setting. |
| Price/Cost Method | The product's Price/Cost Method cannot be overridden. If the product is tiered then the billing rule will also be tiered, but the unit breakpoints, price, and cost can be overridden on the billing rule. |
| Unit Price, Unit Cost, and Markup % fields | These fields are displayed only if the Price/Cost Method is Standard. |
| Add Tier and Tier Table |
These fields are displayed only if the Price/Cost Method is Volume or Tiered. If the Use Product's Price/Cost radio button is selected, this entire area is read-only, and the Add Tier button and the table's context menu will not display. For information on adding tiers, refer to Setting up volume-based and tiered pricing. |
| Prorating Options | |
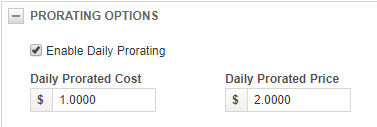
| Enable Daily Prorating | Select this check box if you want this billing rule to create prorated charges for contacts or devices that are added in the middle of a billing period. Note that prorating is by calendar days. Refer to More about prorating. |
|
Do Not Prorate First Period |
This check box is only enabled when Enable Daily Prorating is selected. It deals with the following scenario: If a Billing Rule has proration enabled, and a contact has an association with the selected billing product that is effective before the billing rule's start date, a prorated charge will still be created for it, even though the billing rule is not effective for that period. If you select this check box, this will be prevented. |
| Daily Prorated Cost | Specify the daily unit cost for prorated (partial month) contacts or devices. |
| Daily Prorated Price | Specify the daily unit price for prorated (partial month) contacts or devices. |
- Click Save. The rule will appear on the Billing Rules table.
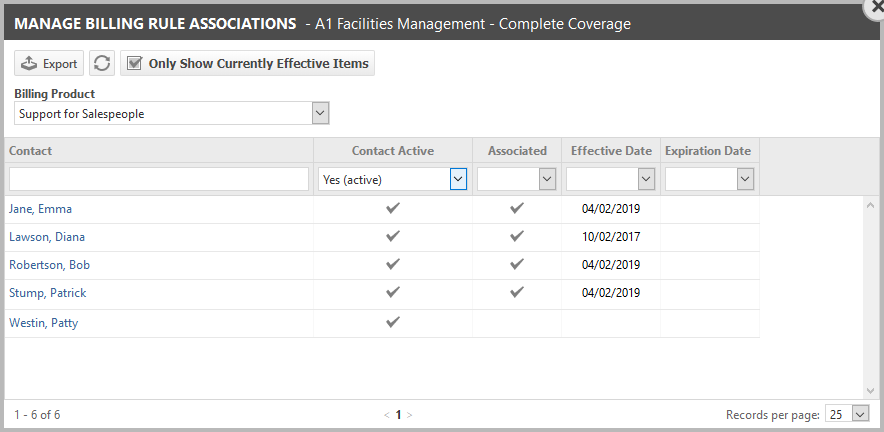
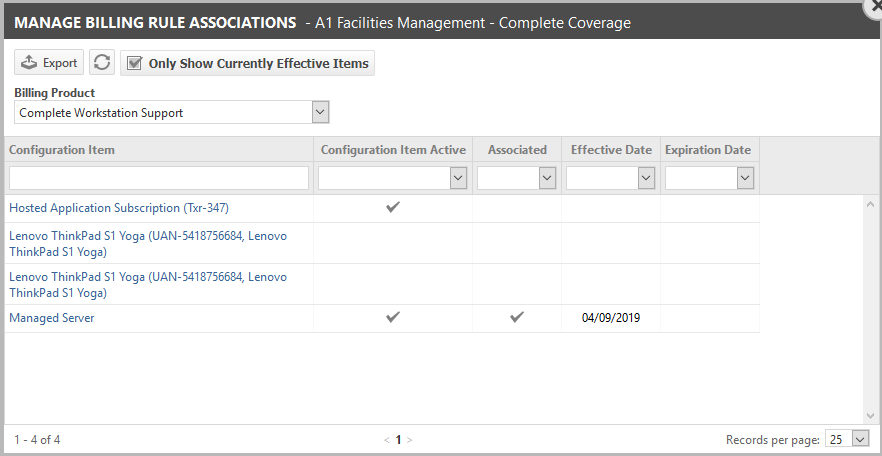
When you click the Manage Rule Associations button above the table or select View/Manage Associations from the context menu, you can view and manage the contacts or devices associated with the contract's billing rules in a dialog (one or the other will be listed based on the type of the selected billing rule).
The associated contact or device will create a charge if all of the following is true:
- The contract is active
- The billing rule is active
- The contact or device is active
- The billing product is active
- The billing date falls between the effective and the expiration date
NOTE All contacts and devices for the organization are listed, but contacts and devices of an organization's sub-organizations are not listed.
| Button, Field or Column | Description |
|---|---|
| Export and Refresh buttons |
PERMISSIONS By default, Export is available to users with Admin security level and disabled for all others. It can be enabled for other security levels. Refer to Can export Grid Data. NOTE When exporting to CSV: To ensure consistent date/time formatting in the CSV output, we strongly recommend that the user’s date/time format settings in Autotask be identical to the Windows date/time format settings of the computer performing the export. This will prevent conflicts in how the software that generates the report interprets the date/time format.
NOTE Note that only the selected columns of the first 5,000 records will be exported. IMPORTANT The export file does not contain all fields that are required to re-import the data using the data import templates, and the data headers do not match. Click the refresh icon |
| Only Show Currently Effective Items | When this setting is enabled, the list will display only items where the date range includes the current date. This setting is enabled by default. |
| Billing Product drop-down selector | If you click Manage Rule Associations, the first billing product listed on the table is preselected. If you select View/Manage Associations from the context menu, the current billing product is preselected. All contacts or devices associated with the contract's organization are displayed in the table. |
| Filter row | Enter filter criteria for all columns, if desired. The date columns offer dynamic date range filters. |
| Contact or Device column | Depending on the type of billing product, the first column will either display all organization contacts or all devices associated with the organization. The contact or device name is displayed as a hyperlink. When you click a name, the Billing Products/Rules page opens. Refer to Manually selecting and reviewing billing products. |
| Contact/Device Active? | Checked if the contact or device is active. |
| Associated | Displays a check mark if the contact or device is currently associated with the selected billing rule's billing product. |
| Effective Date | On the effective date, the contact or device starts being counted towards the charge totals for the billing product. If prorating is enabled, proration will start on this date. If it is not enabled, the contact or device is counted towards the totals on the next billing date. |
| Expiration Date | The last date on which the contact or device is counted towards the totals for the billing product. This field is optional. If it is blank, the end date of the contract is the last date. |
Units are only counted once a month. If you add units one day after the counting day, it will take almost a full month before they are counted, and added to the charges for the next month.
This is where prorating comes in. Unlike regular billing, which tallies the charges for the next billing period, pro-rating catches anything that was missed during the current one.
Let's look at the following scenario:
EXAMPLE
• Counting Day: last day of the month (March 31)
• Billing Date: first day of the month (April 1, for billing period 4/1 to 4/30)
• On April 1, 10 devices are added.
• On April 30, the 10 new devices are counted for the first time, and added to the charges for the next full (May 1 - 31) billing period.
Effectively, you supported 10 devices at no cost for almost a month.
If you enable prorating, the billing rule will look back and check if any items (contacts or devices) were associated with the billing rule after the last count.
Autotask will
- multiply the number of days between that day and the counting day by the Daily Prorated Price
- create an additional charge for that amount
You are now charging the customer for the partial month. Any prorated charges have (prorated) appended to the charge name. This changes our scenario:
EXAMPLE
• Counting Day: last day of the month (March 31)
• Billing Date: first day of the month (April 1, for billing period 4/1 to 4/30)
• On April 1, 10 devices are added.
• On April 30, the 10 new devices are counted for the first time, and added to the charges for the next full (May 1 - 31) billing period.
• On April 30, the Daily Prorated Price is multiplied by 29 (number of days) x 10 (number of devices), and an additional prorated charge is created.
TIP Prorating also works for a first partial month. If the billing rule Start Date is May 1 and the count date is May 15, then Autotask will base the proration for the partial first period on contacts or devices that were effective between the start date and the counting date. Refer to Effective Date.
Best Practices
- For the customer, putting the counting day on the same day as the billing day (or maybe the day before) will be the most transparent method.
EXAMPLE You count on the last day of the month and bill on the first day of the month. Anything missed the month before is prorated.
- If you use rule-based billing, use the same counting and billing days for all such contracts. The contract start dates can vary, because prorating will allow you to bill for items effective before the first counting day. This will simplify managing multiple such contracts for multiple customers.


