Managing Client Portal organizations
PERMISSIONS Security level with Admin permission to configure Client Portal & Taskfire. Refer to Admin security settings.
NAVIGATION Left Navigation Menu > Admin > Admin Categories > Extensions & Integrations > Client Portal & Taskfire > Manage Client Portal Organizations
About the Manage Client Portal Organizations page
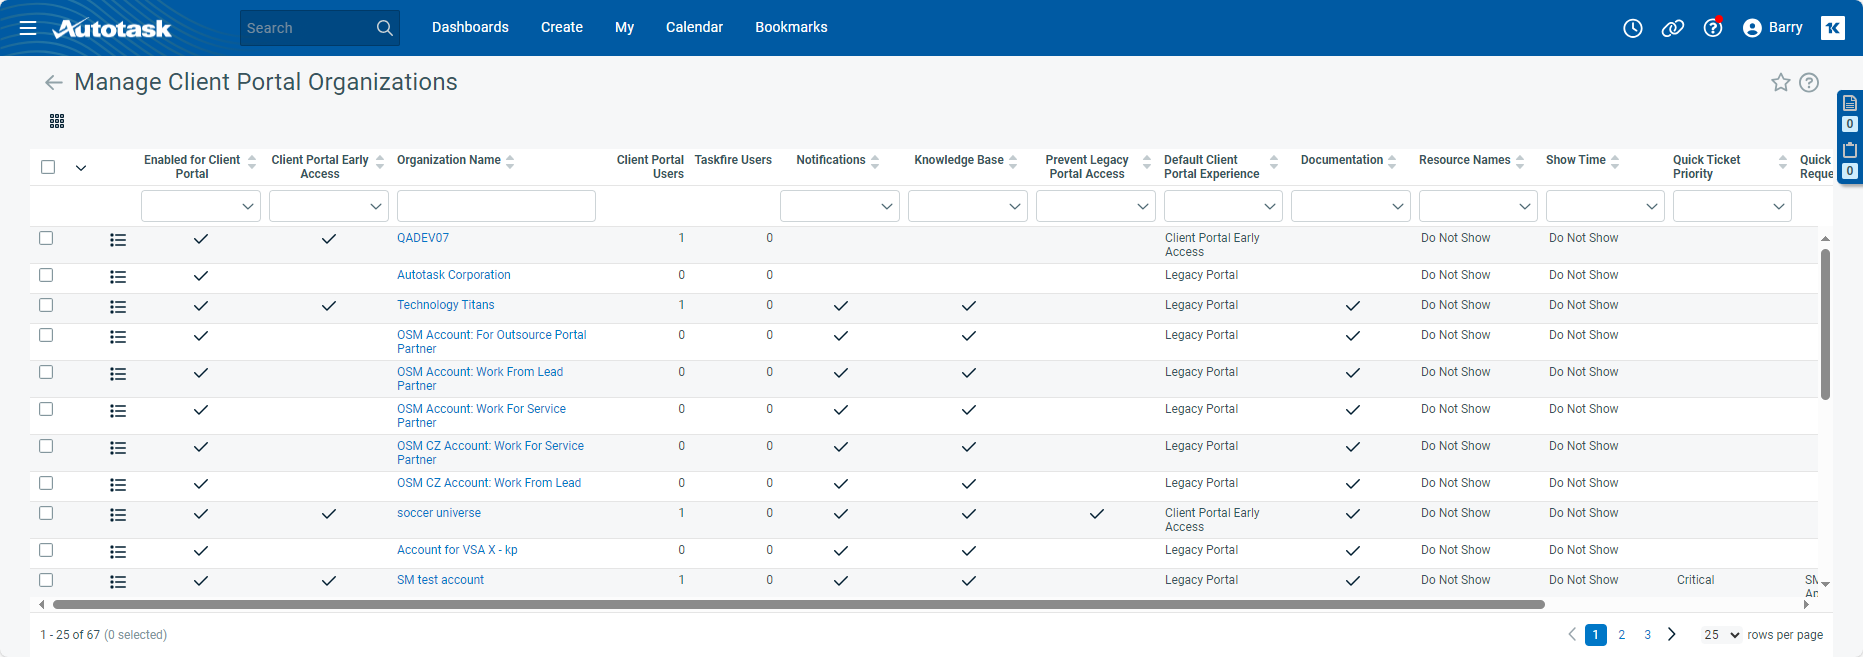
The Manage Client Portal Organizations page displays a table listing all your active customers.

The following features are supported:
Most headers allow you to sort the search results in ascending or descending sort order.
You can search the table for a specific organization, and sort it by clicking any column header. The table displays the following information about each client's portal settings:
| Column | Description |
|---|---|
| Enabled for Client Portal | A check mark indicates that the client has the Client Portal turned on. By default, all organizations have Client Portal turned on and you simply grant users access on the Edit Contact > Client Portal tab. |
|
Client Portal Early Access |
This column appears if you enable the Client Portal Early Access feature on the Activations page. A check mark indicates that early access is enabled for an organization. Refer to Enable Early Access. |
| Organization Name | The name of the client. Clicking on the name opens the Client Portal Client Detail page. Refer to Configuring settings for individual clients. |
| Client Portal Users | The number of customer contacts for whom the standard Client Portal is enabled. |
| Taskfire Users | The number of customer contacts for whom Taskfire is enabled. |
| Notifications | When this check box is selected, email notifications are sent automatically to assigned resources at your local organization when a client is adding notes or completing tasks in the Client Portal. |
|
Knowledge Base
|
A check mark indicates that client users can see Knowledge Base articles marked public and internal articles published to their organization. |
|
Documentation |
A check mark indicates that client users can see Documentation articles marked public and internal documents published to their organization. |
| Resource Names |
Indicates how your resources' names will appear to Client Portal users when viewing tickets, tasks, a ticket's work history, and on the projects summary page:
NOTE Billing organization users will always see the resource names in the end client pages regardless of these settings. For information on billing organizations, refer to Using contracts to bill another organization. |
| Show Time | Indicates how the number of hours on tickets and tasks in the Client Portal is displayed. You can choose not to show any time, to show only hours that have already been billed, or to show the number of worked hours on the task or ticket. NOTE Billing organization users will always see the Billed Hours in the End Client pages, regardless of these settings. |
| Quick Ticket Priority | Indicates the priority that will be used for any quick tickets created by the client. Refer to Managing the Quick Ticket feature |
| Quick Ticket Request Type | Indicates the request type that will be used for any quick tickets created by the client. Refer to Managing the Quick Ticket feature. |
|
Identity Provider (IdP) Settings |
This column shows how the client can log into the Client Portal and provides a link to edit these settings for the specific client.
|
|
Default Client Portal Experience |
This field is enabled if Prevent access to Legacy Client Portal is cleared. Click the dropdown control and select an option.
With this setting, you control the first impression client users will have when accessing the Client Portal. Each individual user can still select their own default option. |
|
Prevent Legacy Portal Access |
If this check box is selected, client users will only log in to and have access to the early access portal. The Default First Time Client Portal Experience field will be disabled and set to the Client Portal Early Access option. NOTE This means that users will only have access to the features that are currently supported in the new Client Portal. |
Below the column headers, a row of filters allows you to search for client organizations using a combination of filters. Enter a search string or make a selection from the dropdown menu.
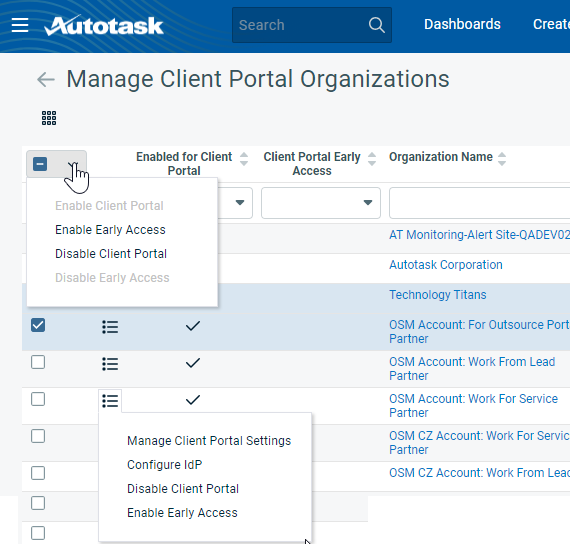
The table features a regular context menu and a column of selection boxes and a bulk menu.
The following options are available:
| Menu Option | Description |
|---|---|
|
Manage Client Portal Settings |
This option will open a page that allows you to further customize global portal settings for a client. Refer to Configuring settings for individual clients. |
|
Configure IdP |
For clients who use an identity provider for authentication, you can configure an integration of their Client Portal with their IdP. The IdP must support the SAML 2.0 protocol. Refer to Setting up a custom Identity Provider. |
|
Enable/Disable Client Portal |
Select or clear the check box to enable or disable the portal for the entire client organization.
|
|
We are gradually rolling out a new version of the Client Portal. If you have enabled this feature on the Admin > Activations page, you can make it available on a client-by-client basis. When you do, the individual client user can choose to remain in the current portal or explore the new one. Refer to Client Portal Early Access Settings. |


