Client Portal dashboards
PERMISSIONS Security level with Admin permission to configure Client Portal & Taskfire. Refer to Admin security settings.
NAVIGATION Left Navigation Menu > Admin > Admin Categories > Extensions & Integrations > Client Portal & Taskfire > Dashboards
About Client Portal dashboards
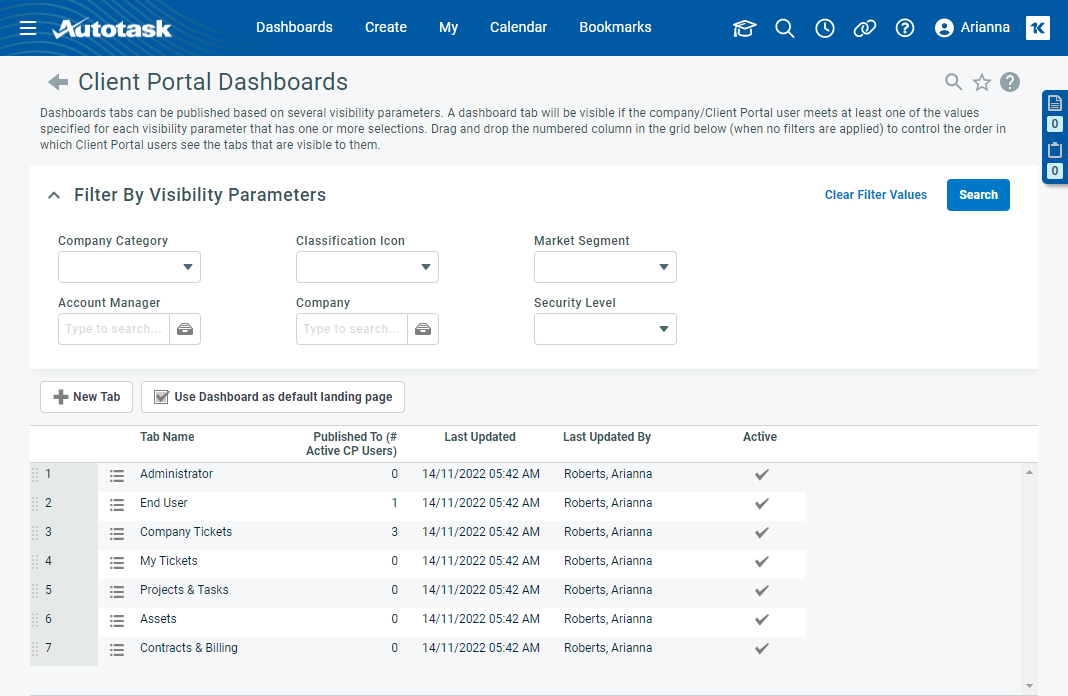
On this page, you create and manage the dashboards your company will make available to your client contacts. To get you started, we have created seven sample tabs that are inactive by default, but can be activated, edited, copied, and published. You can create up to 500 tabs, of which 200 can be active at a time.
Client Portal dashboards are similar to organization dashboards, except that you publish them to selected client contacts instead of internal users.
Limitations
Since Client Portal dashboards are intended for a different audience, the following limitations apply:
- Due to security concerns, HTML widgets are not supported.
- Daily Alert, Timesheet and Inventory widgets are not available, since they apply to MSP-internal matters.
- Only organizations of type Customer have access to the Client Portal dashboard.
Filtering existing tabs by who they are published to
Dashboard tabs can be published based on several visibility parameters. A dashboard tab will be visible to a client contact if they, or their organization, meets at least one publishing criterion.
The tabs can be published to, and filtered by, the following visibility parameters:
| Filter name | Description |
|---|---|
|
Organization Category |
The tab list will show all tabs that have been published to the selected organization categories, classification icons or market segments in your Autotask instance. |
|
Classification Icon |
|
|
Market Segment |
|
|
Account Manager |
The tab list will show all tabs that have been published to organizations assigned to the selected account managers. |
|
Organization |
The tab list will show all tabs that have been published to the selected organization. |
|
Security Level |
The tab list will show all tabs that have been published to any client contact with the selected Client Portal or Taskfire security level. |
Button bar
To add a new tab to the list, do the following:
- To open the page, use the path(s) in the Security and navigation section above.
- Click New Tab. The New Tab dialog will open.
- Enter a unique Tab Name.
- To hide the tab, clear the Active box. You can have up to 200 active tabs at one time.
- Click Save or Save & New.
- If you click Save, the Design Tab page will open, and you can add widgets to the tab. Refer to The Design tab.
- If you click Save & New, the tab is saved without any widgets, and another New Tab dialog is displayed. To add widgets to tabs added in this way, select Design from the context menu.
- If you click Save, the Design Tab page will open, and you can add widgets to the tab. Refer to The Design tab.
By default, the Client Portal opens to the Home page. To make the Client Portal dashboard the default landing page, select Use Dashboard as default landing page. Client Portal users will see the first tab in the list published to them.
If no dashboard tabs are published to the user, the Home page will open.
Context menu
Organization and Client Portal dashboard tabs are managed from a context menu. The following options are available:
| Option | Description |
|---|---|
| Design | Selecting Design opens the Design Tab page. On this page, you create or modify tab filters, tab settings, and widgets. Refer to The Design tab. |
| Tab Settings | On the Tab Settings dialog, you can change the tab name, the Active setting, and the automatic positioning of widgets based on available space. |
| Activate/Inactivate | Toggles the Active/Inactive setting for the tab. You can have up to five active organization tabs, and up to 200 active Client Portal tabs. |
|
Publish (Client Portal dashboards only, Full Access security level required) |
Opens the Publish Tab page. Refer to Publishing Client Portal dashboard tabs. |
| Copy | Opens the Copy Tab dialog window. The tab name of the original is followed by "(Copy)". You can edit all settings. Note that the tab name must be unique. |
| Delete | Opens the confirmation dialog for deletions. Click Yes to delete. Note that system tabs cannot be deleted, only inactivated. |


