Mapping billing codes to QuickBooks financial accounts
PERMISSIONS Admin access to the QuickBooks data file and security level with permission to configure the QuickBooks Extension. Refer to Admin security settings.
NAVIGATION Left Navigation Menu > Admin > Admin Categories > Extensions & Integrations > QuickBooks Extension > Web Connectors > hover over context menu > Manage Mappings (Autotask > QuickBooks) > Billing Code > Account
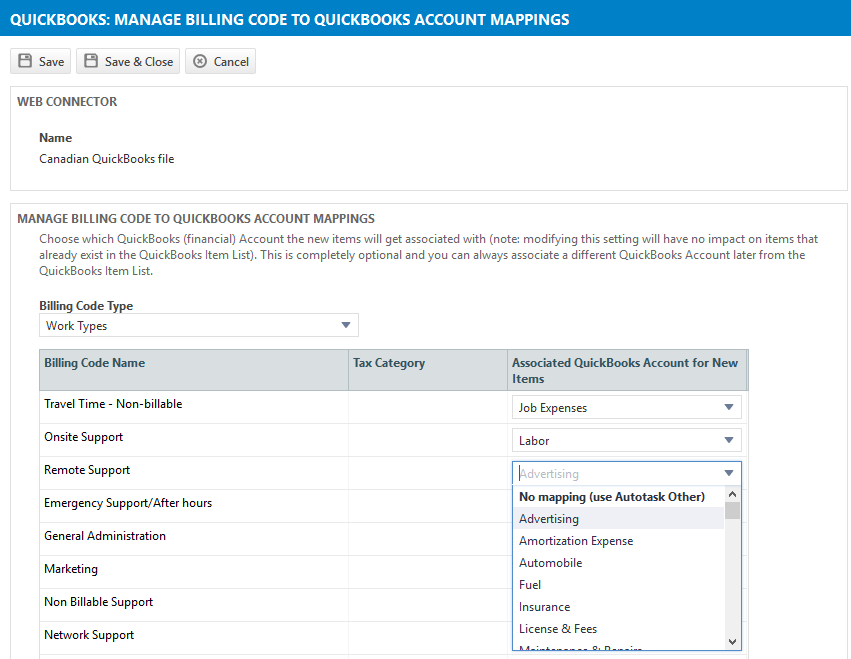
On this page, you map Autotask billing codes to QuickBooks financial accounts.
NOTE This step applies if you are transferring invoices and/or purchase orders to QuickBooks.
 Financial accounts required in QuickBooks
Depending on the integration features you have enabled in Autotask, specific QuickBooks financial accounts are required. The integration will not be able to create these financial accounts in QuickBooks for you. Please add the following accounts to your QuickBooks company file:
| QuickBooks Account Name | QuickBooks Account Type | Integration Feature |
|---|---|---|
|
Autotask Other |
Income |
All |
|
Autotask Income from PO |
Income |
Purchase Order Transfer |
|
Cost of Goods Sold |
Cost of Goods Sold |
Purchase Order Transfer Inventory Transfer |
|
Inventory Adjustment |
Cost of Goods Sold |
Invoice Transfer Inventory Transfer |
|
Inventory Device |
Other Current Device |
Purchase Order Transfer Inventory Transfer |
Autotask Other and Autotask Income from PO are specific to our integration. The last three are standard financial accounts that should already exist in QuickBooks.
Default mapping
Mapping billing codes to a QuickBooks account can be done in Autotask ahead of your first transfer, or after in QuickBooks. You can choose to leave the default settings No mapping - Use Autotask Other. In that case, you can assign a different financial account in QuickBooks, once an item has been transferred.
Mapping new items in Autotask
Once the first web connector conversation has taken place, the list of QuickBooks financial accounts has been transferred to Autotask and is available for mapping. This mapping will be specific to the selected web connector. If you create more than one web connector, you can apply different mappings to a different QuickBooks company file.
IMPORTANT The mappings apply when new billing items are transferred to QuickBooks. They will not override financial account mappings that already exist in QuickBooks.
How to...
- To open the page, use the path(s) in the Security and navigation section above.
- Click the drop-down icon in the Billing Code Type data selector and select a Billing Code Type.
The list of all billing codes of this type you have configured in Autotask will appear. Note that the list may be paginated. - Click the drop-down icon in the Associated QuickBooks Accounts for New Items data selector and select the appropriate QuickBooks financial account.
This setting is ignored if the exact item name is already set up in QuickBooks. Settings in QuickBooks are never overridden by Autotask.
NOTE If a work type name contains a leading or trailing tilde (~), it will be trimmed to avoid fatal errors.
If you are transferring grouped items (not recommended)
For reasons to avoid transferring rolled up items, refer to Invoice template setup for transfer to QB.
Autotask invoice templates allow you to group billing items in a number of different ways, for example, all labor items, or all items associated with a specific contract. Such rolled up items will become line items in QuickBooks and can be mapped to financial accounts like any other.
For naming conventions for rolled up items, refer to Customize Naming Conventions.


