Adding or editing an expense report
PERMISSIONS All Users
NAVIGATION Timesheets > Expense Report
NAVIGATION Left Navigation Menu > Timesheets > Search > Expense Reports > New orLeft Navigation Menu > Timesheets > My > Expense Reports > New
NAVIGATION Left Navigation Menu > Timesheets > Search > Expense Reports > context menu > Edit Expense Report Properties orLeft Navigation Menu > Timesheets > My... > Expense Reports > context menu > Edit Expense Report Properties
TIP If your new expense report is similar to another expense report in your My Expense Reports list, you can copy the existing report and its expense items and edit as needed to create your new report. Refer to Copy an expense report.
Creating a new expense report or editing the properties of an existing one
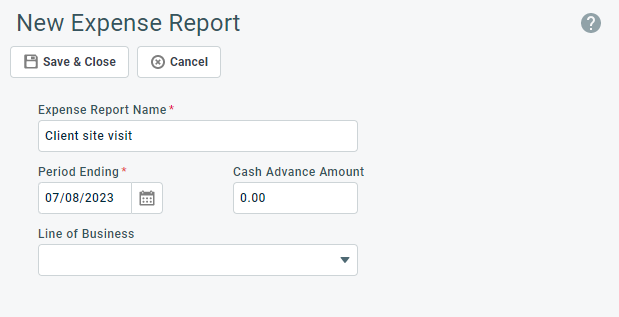
To add a new expense report or edit an unsubmitted one, do the following:
- To open the page, use the path(s) in the Security and navigation section above.

| Name | Description |
|---|---|
| Expense Report Name | The Expense Report Name has a 100-character limit. |
| Period Ending | Enter the last date included in the expense report. |
| Reimbursement Currency | If Multi-currency is enabled, the Reimbursement Currency field is displayed. Your default reimbursement currency is selected. You can select a different reimbursement currency from the list of all active currencies. If you do, the currency indicator of the Cash Advance field changes to the selected reimbursement currency. If the Require all expense reports created by a resource to be reimbursed in the same currency, and prevent a resource's reimbursement currency from being changed (Must be enabled when using QuickBooks integrations) system setting is checked, this field is disabled and set to your default reimbursement currency. NOTE Once you click Save & Close on this window, the reimbursement currency for this expense report cannot be changed. |
| Cash Advance Amount | If you received a cash advance to cover incidentals, enter it here. The cash advance amount will be subtracted from the "To be Reimbursed" total of your report. The cash advance currency is always entered in the selected reimbursement currency. |
| Line of Business | To associate this expense report with a line of business, select one from the drop-down menu. The line of business will be inherited by all expenses in the report. |
- Click Save & Close. The expense report opens to the Expenses tab.
Adding or editing expenses and attachments
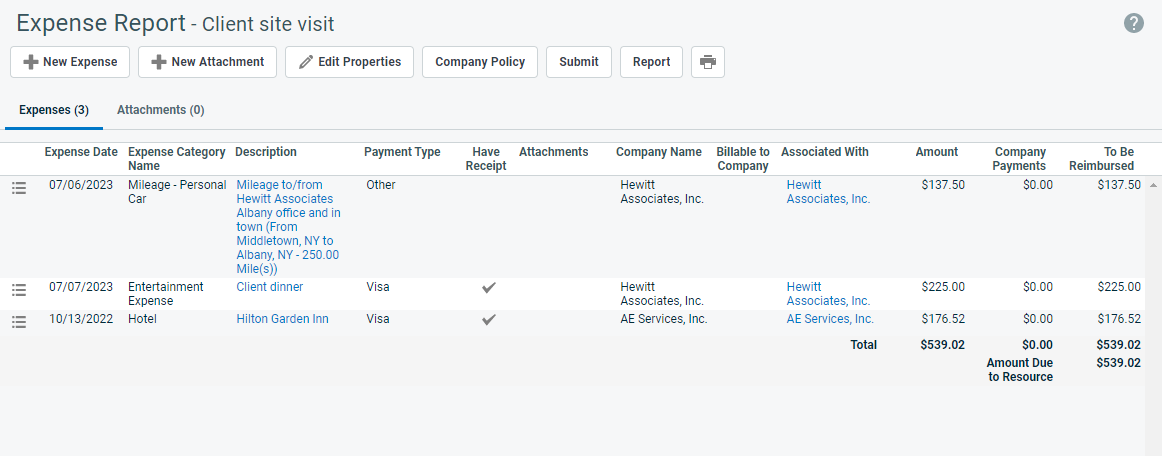
The Expense Report page contains a row of function buttons, the Expenses tab, and the Attachments tab.
The following persistent buttons appear above the tabs:
| Button | Description |
|---|---|
| New Expense | Click to enter a new expense. Refer to Adding and editing expenses. You can add, edit and delete expense line items on an expense report while the status is In Progress or Rejected |
| New Attachment |
If you are submitting expense reports electronically, scan your receipts and attach them to the expense report. Refer to Adding and managing attachments. Attachments added this way are associated with the expense report, but not with an individual expense item. To associate the attachment with an expense item, add it on the New Expense form. Refer to Add New Attachments. |
|
Edit Properties |
Click to open the Edit Expense Report Properties page. This button does not appear if the expense report has been submitted or approved. |
| Company Policy | Click Company Policy to view a list of your company's current expense restrictions. Expense policies add restrictions to expenses by category. Rules may apply to all resources or may be specific to a department or individual resource. Refer to Adding expense categories. |
| Submit | Submits the report for electronic approval. Your Expense Approver will receive an automatic notification of the submission. You will be notified automatically when the expense report is approved or rejected. Once the expense report has been submitted, you can view it on the My > Timesheets > Expense Reports page, but you can no longer edit it. If you notice a mistake, ask your expense report approver to reject the expense report, edit it, then resubmit it. |
| Report | Opens the Report View window. Select week to display the report, and optionally print this view. |
| Print icon | Click the Print icon TIP The printed view has signature lines for manual expense report submission and approval. The name of the submitter and submission date/time are printed below the signature line. If the report has been electronically approved, the approver name and approval date/time appear below the line. For reports approved before the electronic signature feature was released, the submission date is listed. |
The expenses tab lists each expense that is part of this report on a separate row. If the expense is associated with an attachment, it is linked in the Attachments column.
| Field | Description |
|---|---|
| Context menu | |
| Edit or Delete Expenses | If the expense report has not been submitted, use this menu to edit or delete an expense. |
| Summary rows | |
| Total row | 3 columns are totaled: • The Amount column shows all expense items in the currency they were incurred. If Multi-currency is enabled, the total is displayed in the internal currency. • The Company Payments column shows items charged to a company credit card or billed directly to the company. These items are non-reimbursable and show a zero in the To Be Reimbursed column. • The To Be Reimbursed column shows all items the company did not pay for and for which you will be reimbursed. If Multi-currency is enabled, the amounts are shown in the reimbursement currency. |
| Cash Advance |
The amount of the cash advance entered on the New Expense Report page, shown in the reimbursement currency. NOTE You can add a cash advance at any time, as long as the expense report status is not equal to Submitted. |
| Amount Due to Resource | The total amount to be reimbursed to the resource, in the reimbursement currency. |
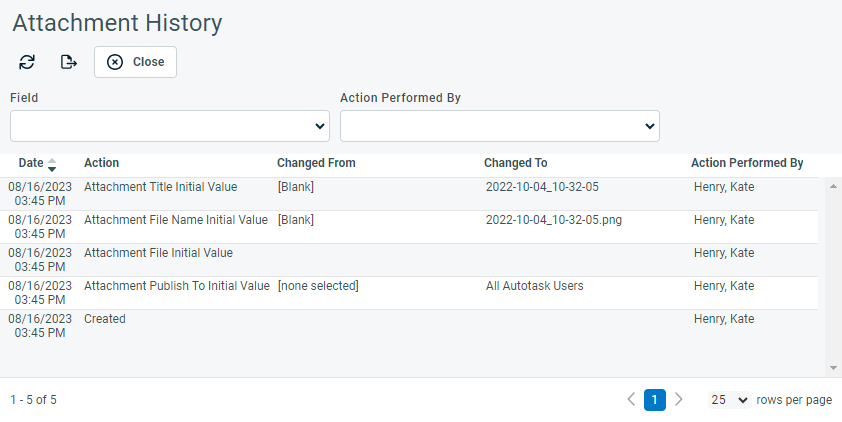
On the Attachments tab, use the button bar and context menu to manage attachments.
Select an item from the button bar to complete one of the following actions:
| Icon | Description |
|---|---|
| Export the list of attachments as a CSV file. The attachment files are not exported, only the list. | |
| Select the columns to display in the table. | |
| Refresh the page. |
Select the context menu on an attachment to complete one of the following actions:


