Adding and editing expenses
PERMISSIONS All Users
NAVIGATION Timesheets > Expense Report
NAVIGATION Left Navigation Menu > Timesheets > Expense Reports > New
NAVIGATION New Expense link on the ticket Quick Add bar or the project Charges and Expenses page
You can add or edit expenses on an expense report while the status is In Progress or Rejected. Refer to Searching and managing expense reports.
How to...
- Open an existing expense report or create a new one. Refer to Adding or editing an expense report. To open the page, use the path(s) in the Security and navigation section above.
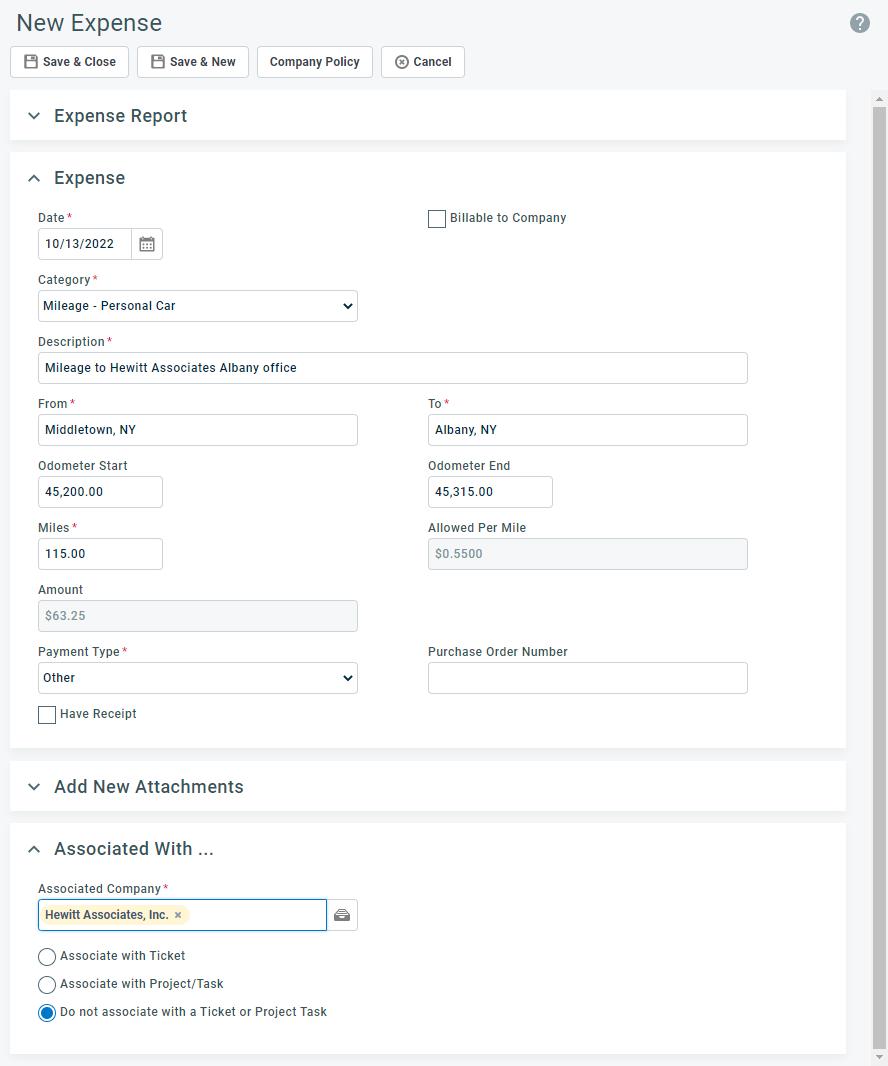
- Click New Expense. The New Expense window opens.

- Complete all required fields. Refer to Field descriptions.
- Click Save or Save & New. The expense item is added to the expense report.
You can add an expense directly from a ticket, task, or project:
- Launch the New Expense window.
- Ticket: On the Ticket page, select Expense (ALT+5) from the Quick Add bar or scroll to the Charges & Expenses tab and click New Expense.
- Task: On the task page, select Expense (ALT+4) from the Quick Add bar or scroll to the Expenses tab and click New Expense.
- Project: Open the project and select Charges & Expenses from the menu. Click New Expense. On the Schedule page, hover over the context menu for a task and select Expense.
The expense page opens, with the Associated Organization, Ticket, Project and Task fields populated.
- Use the radio buttons to select an existing expense report or create a new one.
- Complete all required expense fields. Refer to Field descriptions.
Many organizations have spending limits for certain expenses. These spending limits are established on the Rules tab of the Expense Categories page. Refer to Adding expense categories. If you select a category with rules, the rules will appear below the Amount field.
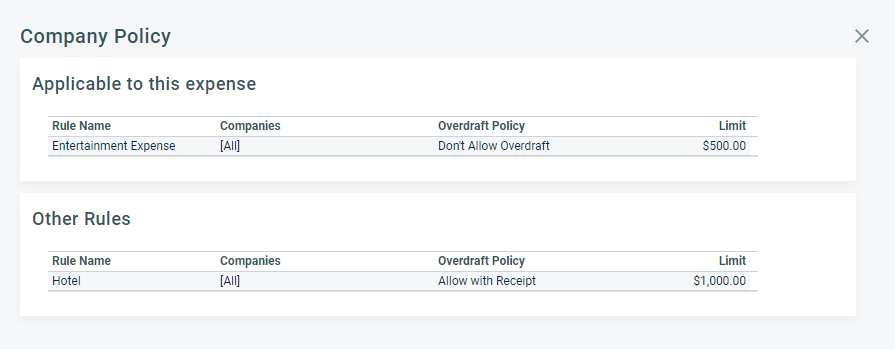
- On the Expense Report page, clicking the Organization Policy button will list all rules:

- On the Expense page, the rule that applies to the selected expense is separated out on the Organization Policy pop-up window.

NOTE If Multi-currency is enabled, values in the Limit column will be displayed in the expense report's reimbursement currency, using the current exchange rate.
| Field | Description |
|---|---|
| Expense Report | |
| Add to new Expense Report / Add to existing Expense Report | Toggle between the following options:
|
|
Expense Report* |
Defaults to the currently selected expense report. To add a new expense to a different report, click the selector icon |
| Expense | |
| Date* | Specify the date when the expense was incurred. You can use the arrow keys, direct entry, or calendar icon to specify a new date. TIP If you have a receipt for the expense, enter the date on the receipt. |
| Billable to Organization | Select this check box to bill this expense to a customer organization. Billable expenses appear in Approve & Post and then in Items to Invoice. Non-billable expenses tied to an organization or project will appear on project profitability reports. |
| Category* | Select the Expense Category that is the best fit for the expense. When you select Mileage or Entertainment, additional fields specific to these categories will appear. Expense categories may have rules that govern spending limits and whether or not an expense requires a receipt. Click Organization Policy to see a list of spending limits for the different categories. If you select a category with rules, the rules will appear above the Receipt Amount field. |
| Work Type |
This field appears only when the system setting Display work type field on New/Edit Expense screen is enabled. When this optional field is visible, you can select a work type to apply to the expense. The Invoice Export XML will then use the General Ledger Account associated with the Work Type to populate the <gl_code /> element. If the work type field is empty, no value will be exported for the General Ledger Account. If you associate the expense with a ticket or project task that is associated with a Work Type, that Work Type will populate the field. You can edit it if you wish. The Work Type General Ledger Account is exported in the Invoice XML only. The Expense Export Report XML continues to use the General Ledger Account associated with the Expense Category. |
| Description* | Type a description for the expense (character limit 128). If you are not sure how much detail is required, check with your expense report approver. EXAMPLE If the expense was paid to a specific merchant, include the merchant's name in your description. |
| From and To* (only if expense category = Mileage) | Enter the starting and ending point of your trip, for example, From: Office - To: [Organization Name] site. |
| Odometer Start and Odometer End (only if expense category = Mileage) | If your customer requires you to record the odometer readings at the beginning and end of your trip, you can enter them here. The miles will then be calculated automatically. If you enter the odometer start or end value and the miles, the missing value is calculated, as well. |
| Miles*(only when expense category = Mileage) | Enter the total number of miles for the expense. When you enter the number of miles, the expense amount is automatically calculated based on the per mile/kilometer rate set in the expense category by your Autotask administrator. Refer to Adding expense categories. |
| Allowed per Mile | A read-only field that displays the mileage reimbursement rate in the internal currency. |
| Location* (only if expense category = Entertainment Expense) | Enter the name of the establishment where the entertainment occurred. |
| Currency | This drop-down menu only appears when Multi-currency is enabled, and displays the list of active currencies. It defaults to the reimbursement currency selected for the expense report, or the user's default reimbursement currency if this window is accessed from outside a specific expense report. If you incurred the expense in another currency, select it from the list. The currency you selected will be displayed in the currency indicator of the Amount field. Refer to Multi-currency expense reports. |
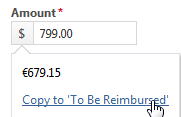
| Amount* | Enter the amount of the expense. If Multi-currency is enabled, the currency indicator will show the currency you selected in the field above. Click the currency indicator to display the amount in the reimbursement currency and copy the converted amount into the To Be Reimbursed field. TIP If there are expense category rules or spending limits associated with the selected expense category, the rules that apply to you appear below this field. If there are additional rules for the category that don't apply directly to you, you'll see a + followed by the number of additional rules. NOTE Rules that apply directly to you override department rules, and department rules override organization rules. |
| To Be Reimbursed (only displayed if Multi-currency is enabled) | You can populate this field by clicking the currency indicator of the Amount field and copying the converted amount into the To Be Reimbursed field, using the stored exchange rates in your Autotask instance. You can also manually enter the To Be Reimbursed amount. Exchange rates fluctuate, and the amount that appears on your credit card statement may include conversion fees. This field remains editable so you can enter the actual expense you incurred. If you select a non-reimbursable payment type such as a company credit card, the value in this field is set to "0" and the field is disabled. |
| Organization Policy Text | If there is an organization policy for this expense category, it will be displayed below the Amount field. For information on setting expense policies, refer to Adding expense categories. |
| Payment Type* | Select a payment type for this expense. The options available in the list cannot be changed. If you choose either Company Check or Company Credit Card, the amount you enter will not be reimbursable. |
| Purchase Order Number | Optionally, enter a Purchase Order Number (PO Number) or edit the current number. The purchase order will appear on the invoice, and a separate invoice is created for each PO Number. If you associate the expense with a ticket, project, or task with a PO Number, that number populates the field. For additional information, refer to Working with purchase order (PO) numbers. |
| Have Receipt | Select this check box if you have a receipt for the expense. The selected expense category might have a rule that requires a receipt. Rules appear below the Receipt Amount field. TIP If you have a receipt, you can scan it and add it to the expense report as an attachment. |
|
Attachments |
|
|
The Add New Attachments section is always collapsed. When it is expanded, the New Attachment dialog box will open automatically. Attachments added here are automatically associated with the individual expense. Complete the New Attachment dialog box. As you save each attachment, it will appear on the Attachments table. Refer to Adding and managing attachments. |
|
|
Attachments |
Uploaded attachments will appear in a separate Attachments section. |
| Associated with... | |
| Associated Organization |
NOTE Expenses can be associated with organizations of type Customer, Partner, and Vendor. If you associate an expense with an organization, ticket, project or task, you can factor expenses into your profitability calculations, and optionally invoice them to your customer. If you do not specify an organization, the expense is tied to your organization. To associate this expense with an organization, begin to type the organization name in the field and select the correct organization. If you are unsure of the organization name, click the data selector icon and search for the organization. NOTE CRM Organization level security permissions apply. In order to view organizations in the organization selector you must have View Organization permission for All or Mine, or you must have permission to "Display ALL organizations in organization picklists and data selectors". |
| Radio buttons |
If you select an associated organization, you can optionally select a ticket or project task. Doing this will increase the accuracy of your Profitability reports by allowing you to easily factor in expenses. This is true whether the expense is billable to the organization or not. |
| Associate with Ticket |
If the Associate with Ticket radio button is selected, the Ticket data selector will appear. To associate the expense with a ticket, click the data selector icon and search for the correct ticket. |
| Associate with Project/Task |
If the Associate with Project/Task radio button is selected, and your security level includes permission to view Projects, the Project and task data selector fields will appear. To associate the expense with a task, you must first select the project the task is associated with, then select a task from the Task field menu. If your security level does not allow you to view Projects, only the Task field appears. The Task menu displays all open tasks assigned to you that are associated with the selected organization. The task name is followed by the project name. |
| Do not associate with a Ticket or Project Task | Selecting the Do not associate with a Ticket or Project Task radio button is equivalent to entering no value in either the Ticket or Project Task fields. |


