Managing dashboard tabs
PERMISSIONS Security level with the Can add and edit Dashboard widgets/tabs enabled
NAVIGATION In Autotask, click Dashboards in the top navigation bar and click the name of the tab you want to display.
To open a different dashboard tab, click the tab name for that dashboard.
If the dashboard tab is in a different tab group, first select the appropriate tab group.
BEFORE YOU BEGIN Before you begin to create tabs, refer to About dashboard tabs.
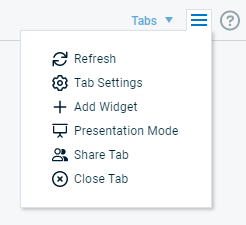
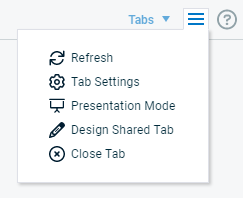
You manage the currently selected tab from the tab menu![]() . Menu options will depend on whether the tab is a personal tab (one you created or copied), or one that was shared with you.
. Menu options will depend on whether the tab is a personal tab (one you created or copied), or one that was shared with you.
Adding a tab
Click Dashboards and select Add Tab.
- From the Add New Tab page, select one of the following options and then click Next.
| Option | Description |
|---|---|
| Start with a blank tab | Opens a tab with no content. |
| Start with a copy of an existing tab | Opens a duplicate of the tab you select from the menu. |
| Start with a copy of a system tab | Opens a duplicate of one of the Autotask system tabs. If you already have the tab selected, (Copy) will be appended to the tab name. NOTE The widgets on any system tab will display only the data available to your security level. |
| Display (re-open) existing tab | Opens a previously closed tab that you select from the menu. |
- Edit tab settings as needed. Refer to Edit tab settings to add a tab-level filter.
- Add, edit, or delete dashboard widgets as needed. Refer to Managing dashboard widgets.
- Save & Close.
- Click the + sign in the tab strip.
- On the Add New Tab page, select Display (re-open) existing tab.
- From the menu, select the tab you want to display.
- Click Next.
The tab returns to the tab strip in the last place on the right.
Tab menu
You manage tabs from the tab menu![]() next to the help icon. The following options are available:
next to the help icon. The following options are available:
| Menu option | Available on shared tabs? | Description |
|---|---|---|
| Refresh |
|
Dashboard tabs refresh automatically every 5 minutes. You can also click the tab context menu icon |
| Tab Settings |
|
Refer to Editing tab settings. |
| Presentation Mode |
|
Refer to Running the dashboard in presentation mode. |
| Share Tab |
|
Available to users who have Can add and edit Dashboard widgets/tabs enabled. Refer to Sharing an existing personal tab. |
|
|
Closed (deactivated) tabs are hidden from view and do not count towards your limit of 20 active tabs per tab group. You can display the tab again as needed, as long as you have fewer than 20 tabs in your tab group.
|
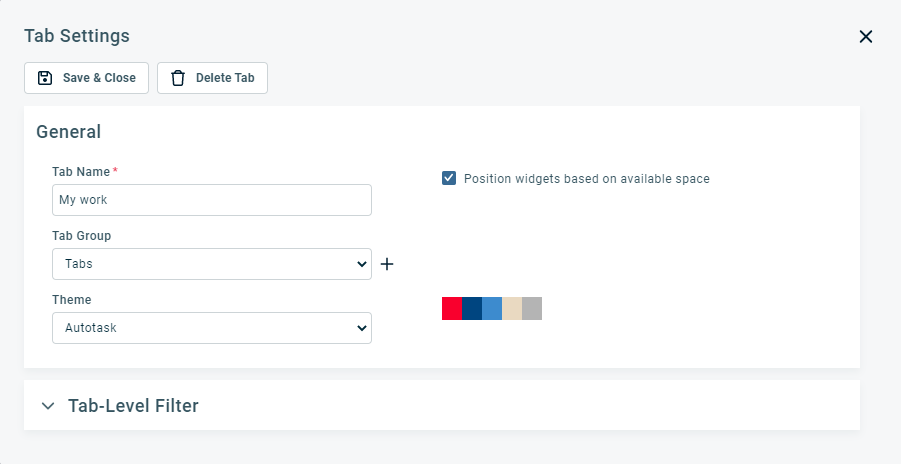
To edit settings on personal and shared tabs, do the following:
- Click the label of the tab you want to edit to display that tab.
- From the dashboard context menu
 , select Tab Settings.
- Edit settings as described below and click Save & Close.
| Field | Available on shared tabs? |
Definition |
|---|---|---|
| Delete Tab |
|
Click to delete the entire tab and all widgets. Deletion is permanent. |
| General section | ||
| Tab Name* |
|
Edit the name as needed. It should be short and descriptive. You cannot leave this field empty. |
| Tab Group* | Select a tab group for the tab. Click |
|
| Theme | Select a color scheme from the menu. When you select an option from the menu, the color graphic to the right displays the colors in the scheme. | |
|
Layout |
Select a layout for the tab.
Fixed: A static four column layout for consistent widget placement, regardless of screen size.
Standard: A linear layout that maximizes space while keeping the widget order.
Advanced (personal tabs only): Ability to adjust a widget's height and width with an optimized dynamic layout. |
|
| Add widgets to first available position |
|
Select the check box if you want your widgets to be automatically placed on your dashboard according to the available space. Clear the check box to manually position widgets. |
| Tab-Level Filter section | ||
| Tab-Level Filter | Refer to Tab settings and tab-level filters. | |
When you select Presentation Mode, the current dashboard tab will expand to fill the screen (even a large screen monitor). You can choose to display just the dashboard tab that is open when presentation mode begins or you can select an option to switch tabs. If you switch tabs, the first dashboard will display for one minute, then cycle to the next dashboard. The presentation will continue to cycle through all dashboards in the open tab group at one-minute intervals. If you are using tab-level filters, you can also cycle through tab-level filter values as described in the table below. Widget drill down is disabled during presentation mode.
TIP If you want to run your dashboards in presentation mode for public display regularly for long periods, consider a Dashboard User license. Refer to Configuring a dashboard user account.
IMPORTANT If you run the presentation mode on a public or shared computer, any user with access to the computer keyboard or mouse can access all dashboard features. If these controls are available to any third parties, we strongly recommend that, if you do not have the Dashboard User security level, select the check box This is a shared/public computer (you will be logged out when exiting Presentation Mode). This will prevent third parties from drilling into your data by exiting presentation mode.
| Check box | Description |
|---|---|
| Every minute, automatically switch: | Select an option below to cycle through dashboard tabs at one-minute intervals or remain static on one tab. Tab-level filter value, but not tab: available only if the tab has a tab-level filter and the filter operator is Equal To. Select this option to cycle continuously through the tab-level filter values of the current tab at one-minute intervals. The tab will not cycle. Tab, but not tab-level filter value: selected by default. Select this option to cycle continuously through all dashboard tabs at one-minute intervals. Tab-level filter value, then tab: available only if at least one tab has a tab-level filter and the tab-level filter operator is Equal To. Select this option to cycle continuously through all tab-level filter values on one tab, then cycle to the next tab and cycle through all filter values on that tab, and move continuously through all tabs. Nothing (do not switch tab-level filter value or tab): select this option to display only the tab that appears when starting presentation mode. |
| This is a shared/public computer (you will be logged out when exiting Presentation Mode) |
Select this check box to lock down a monitor operating from a computer that is running in a public area and is vulnerable to unauthorized access. All widgets are visible, but viewers cannot manipulate scroll bars or other features. In regular presentation mode, all dashboard tab features are active and available to anyone that can access the computer's keyboard or mouse controls. NOTE This setting does not appear when the logged in resource has the Dashboard User security level. It is enabled (selected) by default. All widget security is in place, but the user will not be logged out when exiting Presentation Mode. For details on the Dashboard User security level, refer to System security levels. |
- Click Enter Presentation Mode.
To exit presentation mode, click Esc or click the exit icon in the upper right corner of the screen. If you do not have the Dashboard User security level, and you selected the shared/public computer option when entering presentation mode, you will be logged out of Autotask.
Other tab management tasks
When you copy a tab, the new tab will have the name (followed by (Copy)), the color scheme, and all widgets from the original tab.
NOTE You cannot copy shared tabs published to you.
- Click Dashboards and select Add Tab.
- In the Add New Tab dialog box, select Start with a copy of an existing tab.
- From the menu, select the tab you want to copy and click Next.
- Edit tab settings as needed. Refer to Edit tab settings to add a tab-level filter.
- Click Finish.
IMPORTANT When you delete a tab, you permanently remove it along with its widgets.
NOTE Shared tabs cannot be deleted. To remove them from your view, you can close them. Refer to Close tab.
- Select the tab you want to delete.
- Click the dashboard tab menu
 and select Tab Settings.
 - On the Tab Settings page, click Delete Tab.
- Confirm deletion.
TIP Instead of deleting a tab, you can close it. It will be hidden from view until you choose to display it again. When a tab is closed, it does not count towards the limit of 20 active tabs. Refer to Close tab.


