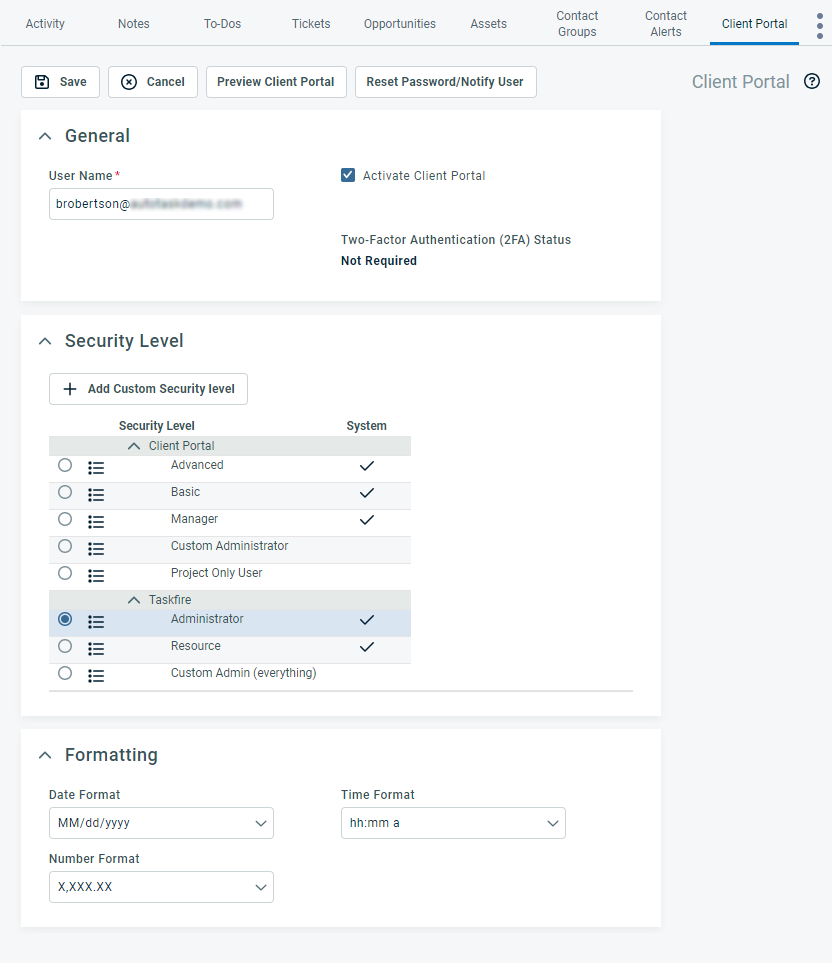
The Client Portal tab
PERMISSIONS Security level with access to CRM, and Edit All or Edit Mine permission for the associated organization. Service Desk object permissions to add and edit tickets. To edit settings, security level with Can edit Client Portal User Settings on Contact Edit/Detail page permission. To preview the client portal, security level with Can preview Client Portal permission.
NAVIGATION Left Navigation Menu > CRM > Search > Contacts > Contact (Last Name) or Contact (First Name) or Contact (Email) > click a contact
BEFORE YOU BEGIN All active customer organizations are enabled by default. However, the contacts are disabled by default.
The Client Portal tab appears on the accessory tab bar of the Contact page. On this tab, you activate the Client Portal and configure the Client Portal settings for an individual client contact.
As a service provider, you can save time by setting up one contact at each client site with the security level of Manager or Taskfire Administrator. These security levels allow contacts to manage users for their organization through the Client Portal. Refer to Adding or editing Client Portal security levels.
To activate the Client Portal for a client contact, do the following:
- Open the Contact page. To open the page, use the path(s) in the Security and navigation section above.
- On the accessory tab bar, click the Client Portal tab.
- Populate the following fields:
- Uppercase and lowercase English letters: a-z, A-Z
- Numerals: 0 through 9
- Characters: ! # $ % & ' * + - / = ? ^ _ ` { | } and ~
- Period character: .
-
Configured: 2FA is required and has been configured.
-
Not Configured: 2FA is required and has not been configured.
-
Not Required: this contact is a regular Client Portal user, and 2FA is only required for Taskfire users.
- Client Portal users who will simply enter tickets should be assigned a standard Client Portal security level.
- Only users who will be editing and managing internal tickets should have a Taskfire security level.
- Users who are assigned the Manager or Taskfire Administrator security level can enable and create other users in their organization, so you may want to create them first, and allow them to set up other users at the organization.
| Field Name | Description |
|---|---|
| General | |
| Activate Client Portal | Select this check box to enable Client Portal for this contact. |
| User Name (required) |
This field becomes active when you select Activate Client Portal. The user name defaults to the user's email address, but can be edited. It must be unique. The user name must be between 4 and 200 characters and can contain: NOTE The period cannot be the first or last character, nor can it appear consecutively. |
|
Two-Factor Authentication (2FA) Status |
This read-only field will display one of the following statuses: The field is hidden if both the Client level and Global level are set to Not Required. |
| Security Level | |
|
Add Custom Security Level |
If there is no suitable security level for this user, users with Admin permissions to Client Portal & Taskfire can create a new custom security level by clicking the Add Custom Security Level button or by clicking the action menu and selecting Edit next to an existing custom security level. Refer to Adding or editing Client Portal security levels. |
| Security Level
|
The security level gives the client contact the permission to perform specific actions in the Client Portal and Taskfire. Hovering over the security level name will reveal the permissions associated with each security level. For more information about security levels, refer to Managing Client Portal and Taskfire security levels. IMPORTANT Only Autotask Administrators (not client administrators) can assign Taskfire Security Levels. This action triggers a billing event. On the security level table, click on a radio button to assign a security level to this client contact. |
| Formatting | |
|
Date Format |
The Date, Time, and Number Format fields will reflect your default settings, but you can modify them for client contacts in different locations. Refer to Settings. |
- Click Save. The client contact will receive a welcome email with a link allowing them to set up a password. This link is valid for 14 days.
Once the Client Portal has been activated for a user, the following additional functions are available on the button bar:
| Button Name | Description |
|---|---|
| Preview Client Portal |
Click this button to log into the Client Portal as the selected user. IMPORTANT This option will be unavailable to users who do not have an appropriate security level. For more information, refer to Creating or editing a custom security level. |
| Reset Password/Notify User |
When you click this button, the user will receive an email that contains the Reset Password link. The default notification template associated with the Email: Reset Password event is used. Refer to Adding or editing notification templates. The link is valid for one hour. TIP Users can easily change their password to something easy to remember once they log in the portal. Direct them to the Change Password link in the My Settingsmenu at the top of any portal page. |
|
Reset 2FA |
When you click this button, a message will open.
|


