Adding and editing recurring ticket templates
PERMISSIONS Permission to add tickets and view/add/manage recurring tickets (recurring ticket templates)
NAVIGATION Left Navigation Menu > Service Desk > Search > Recurring Ticket Templates > New
NAVIGATION Any ticket table with a New button > New > Recurring Ticket
The recurring ticket template is not itself a ticket. It is a template from which recurring tickets (instances) are created.
Recurring tickets can only be created for organizations with an organization type of Customer.
Populating the recurring ticket template tabs
- To open the page, use the path(s) in the Security and navigation section above.
TIP If you create multiple recurring ticket templates that use the same data to populate multiple fields, you can set up Recurring Ticket form templates to quickly populate those fields. Refer to Adding and editing form templates.
The New Recurring Ticket Template opens to the General tab.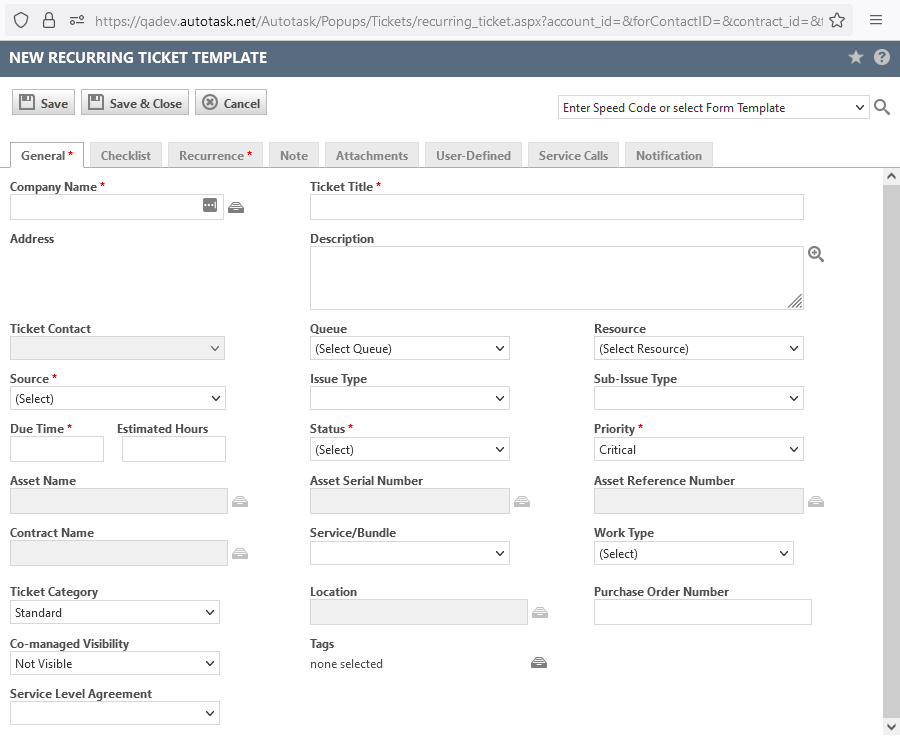
- Enter a speed code, or select a form template, or manually populate the fields on the following tabs:
General tab
Field Description Required Fields On the General tab, complete all required fields:
- Ticket Title: This field tells the user what the ticket is about. It is most often used for ticket searches when the ticket number is not known.
- Source: This field appears on tickets. The source is how the customer contacted you.
- Due Time: The targeted time to complete a workflow. Enter a valid time. This field may be populated by defaults set for the ticket category or form template, but it can be edited.
- Status: The status indicates how far the entity has progressed in a particular process. Status examples are New, In Progress, Ready to Bill, Complete, Active, etc. On the recurring ticket template, all instances will be created with the status you select here.
- Priority: Priority is defined as the impact and urgency of the ticket compared to other tickets. It may be populated by defaults set for the ticket category or the form template used to create the ticket, or by the mapping of impact and urgency to a specific priority. Priority is always required.
Select a Priority. Be aware that if your customers are using Client Portal, this field will be visible when they review their tickets.NOTE You also must select either a Queue or a Resource.
For additional field definitions, refer to Adding, copying, and editing tickets.
IMPORTANT All information entered into the fields on the General tab will appear on all instances (tickets) created from the recurring ticket template. You can edit the recurring ticket template after, but changes will only apply to instances scheduled for the future.
NOTE The recurring ticket template does not have a Ticket Due Date field because each ticket instance will have a different due date.
Ticket Category IMPORTANT The Recurring Ticket Template Category field does not behave like the Ticket Category field when creating or editing tickets.
The ticket category specified on the recurring ticket template does not apply default settings to the recurring ticket template. It specifies the ticket category that will control the display of the recurring ticket instances, but not the default ticket settings. To provide default settings for the recurring ticket template that will be carried over to the recurring instances, apply a Form Template to configure the Recurring Ticket Template. Refer to Form templates.Co-managed Visibility
This field determines the visibility of the instances to co-managing users. The recurring ticket template is visible to co-managing users, but only instances that are set to Visible will be seen.
Tags
Tags can be added to the recurring ticket template using the tag selector icon. This opens a new window for you to select the tags you want to add to any instance created from this master.
On the Associate Tags window, click the tag selector icon. On the Select Tags dialog box, filter the list by Tag Group or Last Used to narrow the list or search by Label/Alias (the name or nickname for the tag). Select the tags and click Save & Close and then click OK to add them to the recurring ticket template.
Refer to Tagging for more information on tags.
Service Level Agreement
Select the SLA that will be applied to all tickets.
IMPORTANT The SLA time frames will be based on the Create Date of each ticket instance. If you apply an SLA, we strongly recommend that you allow Autotask to create each ticket x number of days before its due date. If you create them all at once, they will all come due on the same date, and will all be unachievable. Refer to Creation.
NOTE Recurring ticket instances are created using the Service Request ticket type.
Recurrence tab
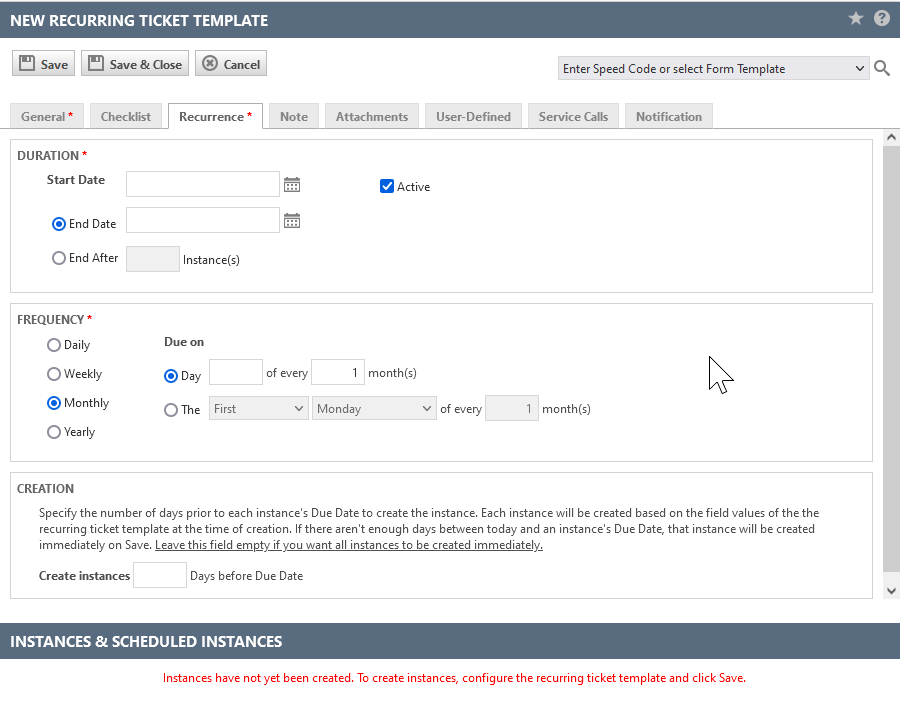
On the Recurrence tab, you define the duration and frequency of the recurrence, which in turn will determine the number of instances (tickets) that will be created, and their due dates. You'll also specify the number of days prior to each due date that the instances will be created.
Field Description Start Date The Start Date will be used as the due date of the first ticket in the series. Once the recurring ticket template is saved, any changes will only impact instances that have not yet been created. End Date / End After Enter the date of the last recurrence or the number of instances. NOTE The number of instances must be less than 400, and the last instance cannot be more than 10 years after the start date.
Active This active state applies to the recurring ticket template search only. Select the Active check box if you want this recurring ticket template to be available in the Recurring Ticket Template search when you search by All or Active.
NOTE Inactivating the recurring ticket template will not delete any ticket instances that have already been created, but tickets will not be created after it is inactivated. If it is then reactivated, all scheduled instances for that day or earlier will be created instantly and future instances will be created as scheduled.
Frequency Select a Frequency option. The Start Date selected in the Duration section will populate the Due every or Due on day, but can be modified.
NOTE Until the recurring ticket is saved, changing the start date will update the Due on day.
This is a required field, and the default is Monthly. Each selection has corresponding configuration options that are displayed when the option is selected.
TIP To set up a recurring ticket with Quarterly frequency, select the Monthly radio button and enter a due date every 3 months.
Enter the number of days before the due date you want each instance (ticket) to be created from the scheduled instance. The maximum number of days you can enter is 365 days.
This just-in-time creation of the instance ticket avoids having to use workflow rules to keep future recurring tickets out of your ticket queues or skew the number of pending tickets.
If you leave this field blank, all instances will be created immediately when you save the recurring ticket template.
Note tab
When a note is entered on the Note tab of the recurring ticket template, the note is attached to all recurring instances of a ticket, but is not saved in the recurring ticket template itself. The only way to access such notes is by opening an individual instance.
Refer to Using notes in Autotask.
Fields Description Publish To
The Publish type determines who can view notes or open attachments created by a resource (system notes visibility is determined by the viewer's security level). It is either inherited from the note type (but can be edited), or selected outright from the Publish To dropdown menu. The following options are available:
- All Autotask Users: The note or attachment can be viewed by internal and co-managing resources, as well as customer contacts with Client Portal access to the parent entity. Refer to Adding or editing Client Portal security levels.
- Internal Only: (not available to co-managed security levels when adding attachments) The note or attachment can be viewed by internal resources, except those who have a co-managed security level. Some entities where this is the only option have an Internal only check box.
- Internal & Co-managing(tickets and ticket notes only): The note or attachment can be viewed by internal resources and resources who have a co-managed security level. Refer to Co-managed Help Desk (system). The following system note types default to this Publish To setting:
- Absorbed Another Ticket
- Copied to Project
- Duplicate Ticket Note
- Forward/Modify Note
- Merged Into Ticket
- If a co-managing user is sending an email and the mailbox configuration is set to Internal Only, it is published to Internal & Co-managed, regardless.
- Project Team(project notes only): The note can be viewed by internal and client team members of the project.
Attachments without a Publish To selector inherit the visibility of the parent entity.
EXAMPLE When you add an attachment while editing a ticket note, the ticket note's Publish To option is applied to the attachment.
Note Type
Note types are categories applied to notes. They organize notes based on their parent entity, function, and who they are published to. Refer to Note types for more information.
The Global Notes Search can be filtered by the Note Type field. Refer to Running a global notes search.
On entities where you have a choice, accept the default or select a different Note Type from the drop-down list.
Title
Creating titles using key words will allow you to find notes later in lists and searches. A setting on the General tab of the category will determine if a note title is required for task and ticket notes. Refer to Note Titles.
Enter a Title for the note.
Description
On entities like ticket, task, note, and to-do, the Description field is a core part of the data record. Wherever it is available, it tracks essential information about the record.
Enter the note text (up to 32,000 characters, 1 Million characters for task and ticket notes) into the Description field. For longer notes, you can re-size the field by grabbing the bottom right corner and dragging it down.
Remaining tabs: Checklist, Attachments, User-defined Service Calls, Notification
Tab name Description Checklist
Click the dropdown selector and choose from any active library checklist that is associated with the Ticket, or the Task & Ticket entity. As new tickets are created, the checklist will be added to the ticket.
If you are editing the recurring ticket template, selecting a checklist will have no impact on existing ticket instances.
If the selected checklist is inactivated, it will remain associated with the recurring ticket template, and will continue to be applied to ticket instances.
If the selected checklist is deleted, it will no longer be associated with the recurring ticket template, and will not be applied to ticket instances.
Attachments Add an attachment that is added to all instances of the recurring ticket. Attachments, like notes, are not saved to the recurring ticket template, only to the instances.
Refer to Adding and managing attachments.TIP To complete the attachment upload, you must save the recurring ticket template.
User-Defined A * on the tab title indicates that there are required user-defined fields. User-defined fields populate all instances of a recurring ticket during initial ticket creation. If you edit the UDFs after, the changes will only apply to instances scheduled for the future.
Refer to Managing user-defined fields.NOTE Recurring tickets do not support multi select UDFs.
Service Calls If your Autotask administrator has enabled the Dispatch Calendar, you can create recurring service calls to automatically schedule your recurring ticket. Refer to Creating service calls on the recurring ticket template. Notification Select the role-based email recipients, contacts, and other resources who will receive a notification email. Refer to Role-based notification recipients.
NOTE All recipients will receive one notification email, regardless of the number of instances created from the recurring ticket template.
- Save the recurring ticket template:
- Save: Saves both the recurring ticket template, instances that were created, and instances scheduled for the future. All appear in the Instances & Scheduled Instances section at the bottom of the page.
- Save & Close: Saves both the recurring ticket template, instances that were created, and instances scheduled for the future, and closes the page.
Editing the recurring ticket template
Aside from the Organization Name, all fields on all tabs can be modified after the recurring ticket template has been saved and instances have been created. The following rules apply:
- Any changes you make will apply to instances that have not yet been created. Future instances that have been created will not be updated.
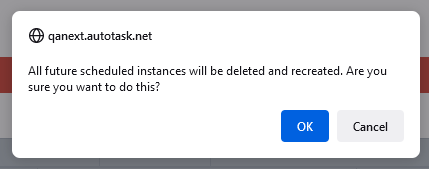
- To update future instances that have been created, you must delete them first, and then extend the end date or increase the number of instances by the number you deleted. You will receive a message that all future instances will be deleted and recreated using the updated information.
- Instances will only be created in the future, never in the past.
Managing instances and scheduled instances
All instances, and instances scheduled for the future, appear in the Instances & Scheduled Instances section at the bottom of the page. 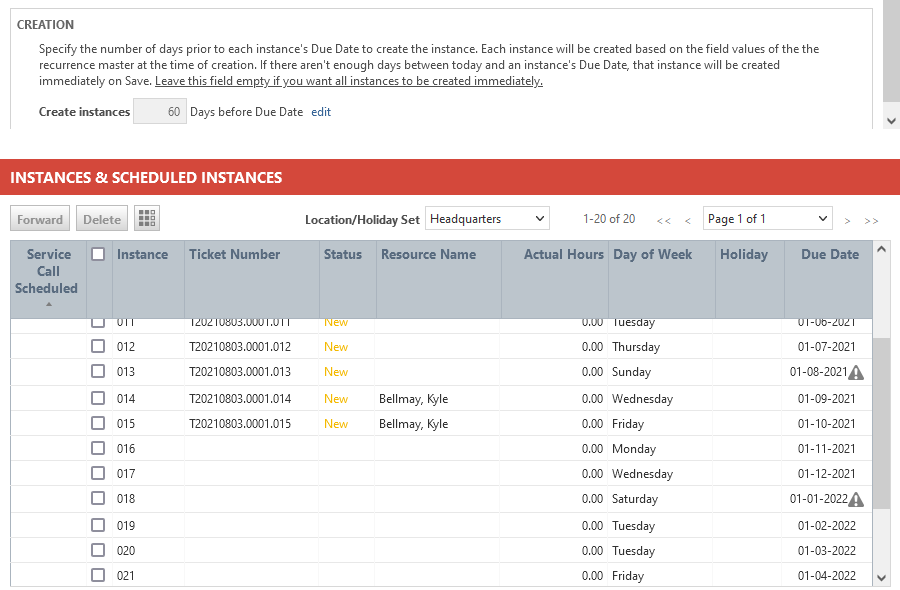
- Instances show a Ticket Number and other ticket information. They can be found on the Ticket Search page by searching for the ticket number without the instance number, and can be managed like any stand-alone ticket.
- Scheduled Instances contain an Instance number and a Due Date, but the ticket has not been created yet. The ticket for the instance will be created the number of days you specified in the Creation section on the Recurrence tab.
Ticket instances belonging to a recurring ticket template can also be managed on the Instances & Scheduled Instancestable of the recurring ticket template.
| Button/Field | Definition |
|---|---|
|
Forward (Instances only) |
Select at least one created instance to activate the Forward button. This button will launch the Forward/Modify page. Refer to Forwarding and modifying tickets. |
|
Delete |
Select at least one created or scheduled instance to activate the Delete button. You can delete instances and scheduled instances with due dates in the past or future, as long as no labor has been tracked on the ticket. Instances with a due date in the future and scheduled instances can be re-created, but past instances cannot be recreated. |
|
Column Chooser |
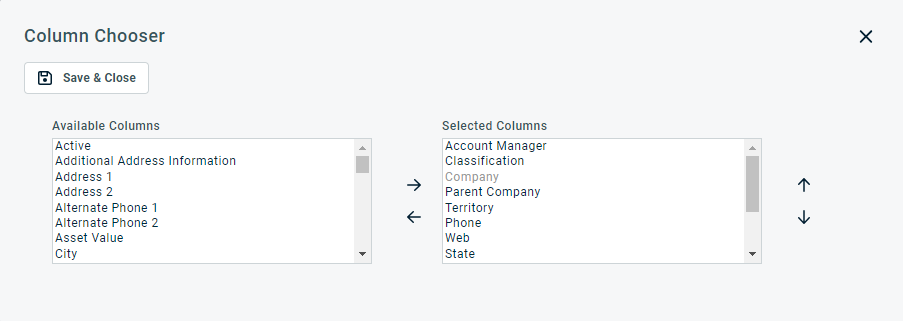
The Column Chooser allows you to customize search results tables throughout Autotask. It determines the following:
NOTE Column Chooser settings on search results tables and some standard reports are part of the user settings stored on the Autotask server. You can log in from any computer and have your column chooser settings applied to your Autotask session. To clear the data stored in your Autotask instance and reset the column chooser settings to the Autotask default settings, click Reset Settings in My > Miscellaneous > Settings. To customize the table, do the following:
Columns appear either in the Available Columns or the Selected Columns panel.
NOTE Top-to-bottom order in the Selected Columns list becomes left-to-right order on the Search Results list.
TIP If the characters + # appear after the column name, then that column may have multiple items returned for some rows. If that occurs, the first item will appear in the row followed by + and the number of additional items returned. To display the list of additional items, hover over the item in the column. |
| Location/Holiday Set |
The selected internal location and its associated holiday set allow Autotask to identify the due dates that will fall on a Saturday, Sunday or holiday. Those due dates are identified with a warning symbol Your organization's default internal location will appear automatically, but you can select a different one from the drop-down menu. |
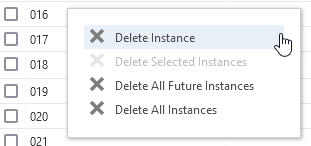
To manage one or multiple instances, optionally select one or more check boxes, then right-click to open the menu. The appropriate options will be enabled.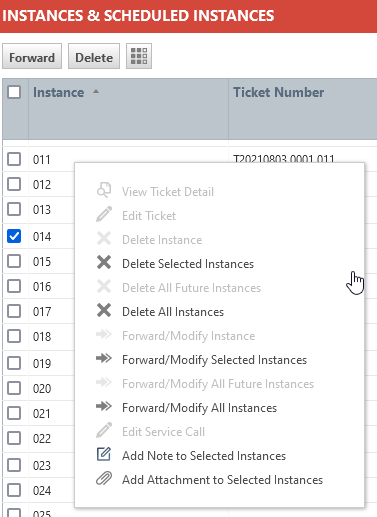
| Option | Description |
|---|---|
| View Ticket Detail | Click to open the Ticket page for the instance. |
| Edit Ticket | Click to open the Edit Ticket page. You can make any changes you can make to a stand-alone ticket. |
|
Delete... |
Users with security permission to delete tickets can delete a single instance, multiple selected instances, all future instances, or all instances of a recurring ticket. Only instances that do not have labor applied will be deleted. |
| Forward/Modify... | Users with security permission to edit tickets can forward/modify a single instance, multiple selected instances, all future instances, or all instances of a recurring ticket. TIP Workflow rules are not applied retroactively to existing tickets, so any workflow rule created after the ticket instances are created will not be applied to newly created tickets unless they're edited in some way. You can use the Forward/Modify function to update the tickets and make them available to existing workflow rules. Select Forward/Modify All Instances, then click Save & Close on the Forward/Modify page (actually modifying the tickets is not necessary). |
| Edit Service Call | Opens the service call the instance is associated with. This menu item is hidden if no service call is scheduled, and grayed out if any instances are selected. |
|
Add Note to Selected Instances, Add Attachments to Selected Instances |
These options only appear if you have selected one ore more instances. Select one of the options to add a note or attachment to the selected instances. NOTE This will not impact future scheduled instances. To add notes and attachments for those, use the Attachments or Notification tab on the recurring ticket template. |
