Integration Center
PERMISSIONS Security level with Admin permission to configure Other Extensions & Tools. Refer to Admin security settings.
NAVIGATION Left Navigation Menu > Admin > Admin Categories > Extensions & Integrations > Other Extensions & Tools > Integration Center
About the Integration Center
The Integration Center page is a tabbed page that displays a list of Autotask integration vendors on the Vendors tab, and API users who have made one or more API calls in the last 30 days on the API Users tab. The Security Levels button above the tabs opens the list of API security levels.
To appear on the list, vendors must meet all of the following conditions:
- The vendor must have joined the Datto Developer Program. Vendors can sign up at www.datto.com/developers.
- Vendors must use a version of the Autotask API that allows Datto to generate a Vendor Tracking ID for them. Refer to The API tracking identifier.
- Search tables
- LiveReports
- Dashboard widgets
- Dashboard tab-level filters
- Data Warehouse
- Workflow rule conditions
- You can also assign a specific ticket category to tickets created or edited via the API, leveraging the power of ticket categories. Refer to API-only Categories.
- Datto must approve their integration(s) and publish their name to the list.
Vendors who have been approved by the Datto Developer Program receive a vendor tracking ID that is referenced on tickets, devices, organizations, and contacts created or edited via the API. This allows Autotask and you, the service provider, to identify the vendor.
Why is this a good thing for you?
It lets you display, filter and group by integration vendor on:
Additionally, it lets Autotask identify the vendor who is responsible for a slowdown that impacts all customers, and lets us take targeted action.
TIP If a vendor you use is not on this list and you are missing the advanced integration features, encourage them to sign up at www.datto.com/developers.
The naming convention is Vendor Organization Name - Integration Name.
Since Autotask cannot know which third party integrations your company will be using, all vendors are initially set to inactive. Use the context menu to activate any vendor integrations you will be using.
NOTE Inactive vendors still show on the Integration Vendor drop-down list in the API Tracking Identifier section of the Add API User page, but only active vendors will show on widgets, lists, and reports.
The Vendors tab
The Vendors tab lists all approved Autotask integration vendors.
| Column | Description |
|---|---|
| Integration Vendor Name | The organization name of the integration vendor, followed by the name of the integration. Active integrations are listed first, followed by inactive integrations Vendors are listed alphabetically by Integration Category and Integration Vendor Name. |
|
Integration Category
|
Vendors are listed with only their primary category. The following categories are available:
|
| Associated API User(s) | Displays the name of the resources (sorted alphabetically) associated with this Integration Vendor, separated by a comma. The tracking identifiers of associated API users can be used to access your Autotask instance via the API. |
| Active | Active vendors are listed on top of the list, before any inactive ones, and are available on the Add API User page, and as filters and sorts on lists, tables and widgets. |
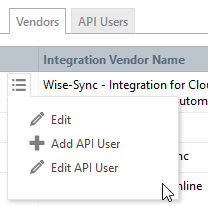
Integration vendors are managed from the context menu. You have the following options:
| Option | Description | |
|---|---|---|
|
Edit |
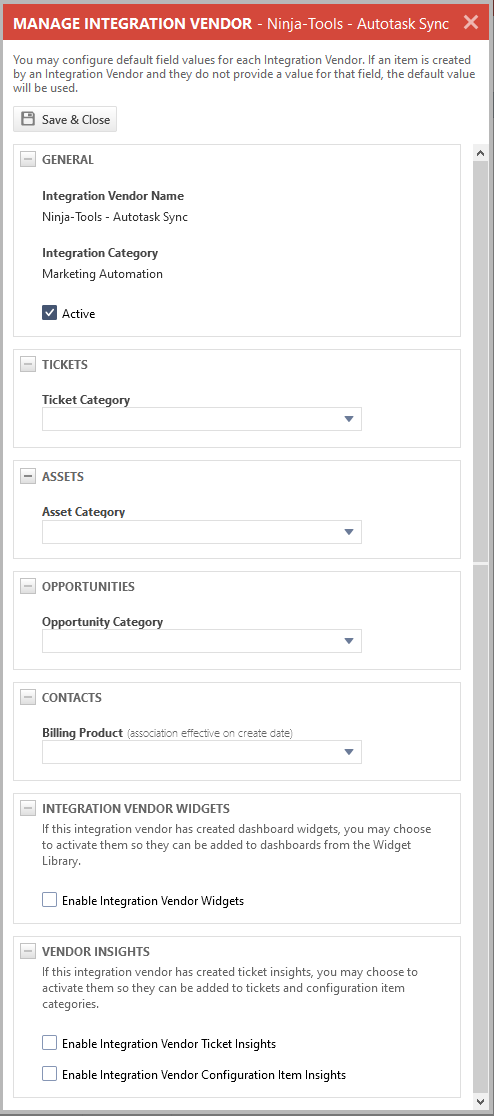
This option opens the Manage Integration Vendor dialog window. Here, you configure default field values for each integration vendor. If an item is created by an integration vendor and they do not provide a value for that field, the default value will be used. Refer to Managing integration vendors. |
|
|
Add API User |
This option allows you to create an API user for the selected vendor. Refer to Adding or editing an API user. |
|
|
Edit API User |
If you select this option on a row with multiple API users, you must choose the user you want to edit. Refer to Adding or editing an API user. |
|
- To open the page, use the path(s) in the Security and navigation section above.
- Hover over the context menu and select Edit. The Manage Integration Vendor dialog window appears.
- Modify the default settings for the following fields:
| Setting | Description |
|---|---|
| General - Active | The Integration Vendor Name and Integration Category cannot be edited. Only the primary category for the integration is listed, unlike in the Help, where vendors can be listed under multiple categories. Select Active to make the vendor available on the Add API User page. Refer to The API tracking identifier. NOTE Inactivating the vendor will not automatically inactivate API users associated with that vendor. It also won't block API traffic from API users associated with that vendor. If you wish to inactivate the integration, be sure to also inactivate the related API User. |
|
Tickets - Ticket Category |
Creating a ticket category for an integration lets you configure the appropriate default and required settings as well as picklist options. On the Ticket Category page, such ticket categories can be flagged as API-only, so they do not appear in the UI. Refer to API-only Categories. If a ticket created via the API does not supply a value for Ticket Category, it will default to the value selected here. If this field is blank, the system default category will be applied. NOTE On the Manage Integration Vendor dialog, the RMA ticket category is available. |
|
Tickets - Automatically assign tags to tickets created through this integration based on Title and Description Datto RMM only |
For the Datto RMM integration vendor, select this check box to automatically assign tags to tickets created through Datto RMM. Tags are created based on the ticket title and description. This will connect the RMM alert with any documentation and possible solutions offered through the Autotask tagging feature. |
|
Devices - Device Category |
If you would like to specify the default device category to be set on devices created by the integration vendor, select the category. Only API-only categories show on the list. |
|
Contacts - Billing Product |
If you would like to automatically start billing for devices or contacts created by this integration vendor, select a billing product of the appropriate type. The effective date will be the date on which the device or contact was created. There will not be an expiration date.
A contract with a billing rule that includes the selected billing product must be created (or such a rule must already exist) before any contract charges will get created.
|
|
Opportunities - Opportunity Category |
If you would like to specify the default opportunity category to be set on opportunities created by the integration vendor, select the category. |
| Vendor Integration Widgets offer a way for integration partners to include external content on Autotask dashboards. Select Enable Integration Vendor Widgets to activate integration vendor widgets. When this is selected, widgets from this vendor will appear in the Widget Library and can be used on dashboards. For more information on adding widgets to dashboards, refer to Managing dashboard widgets. |
|
|
Vendor Insights
|
Vendor Integration Insights offer a way for integration partners to include external content on Autotask tickets and devices. Select one or both of the options below to make insights from this integration vendor available for ticket categories or device categories.
Selecting these options will add the vendor insights as an option on the entity category pages. To be visible on the ticket and device pages, they must to be added to the associated categories first. For more information on adding insights to categories, refer to Adding and editing categories. |
- Click Save & Close.
The API Users tab
The API Users tab contains much the same data as the Vendors tab, but organized by API User. 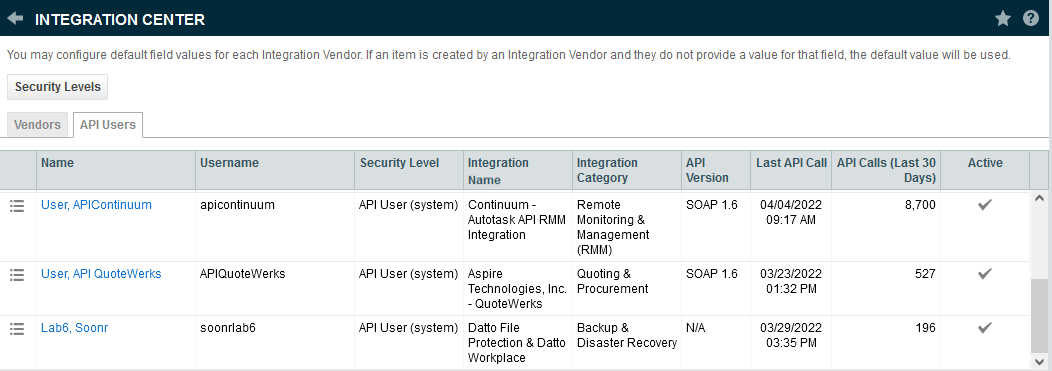
- API users and resources with API permissions who have made one or more API calls in the last 30 days will appear.
- The same API user could appear on multiple rows if they have used more than one API version or if they are associated with more than one integration vendor.
- The table is sorted by Name. The following additional columns are displayed:
- Username
- Security Level
- Integration Name
- Integration Category
- API Version
- Last API Call
- API Calls (Last 30 Days)
- Active
- The context menu allows you to edit, as well as activate or inactivate the API user or resource. Refer to Adding or editing an API user. Resource Editing permission is required.
Clicking an API username will open the API Activity by Hour report filtered on that specific API user (the second column will be the API User). 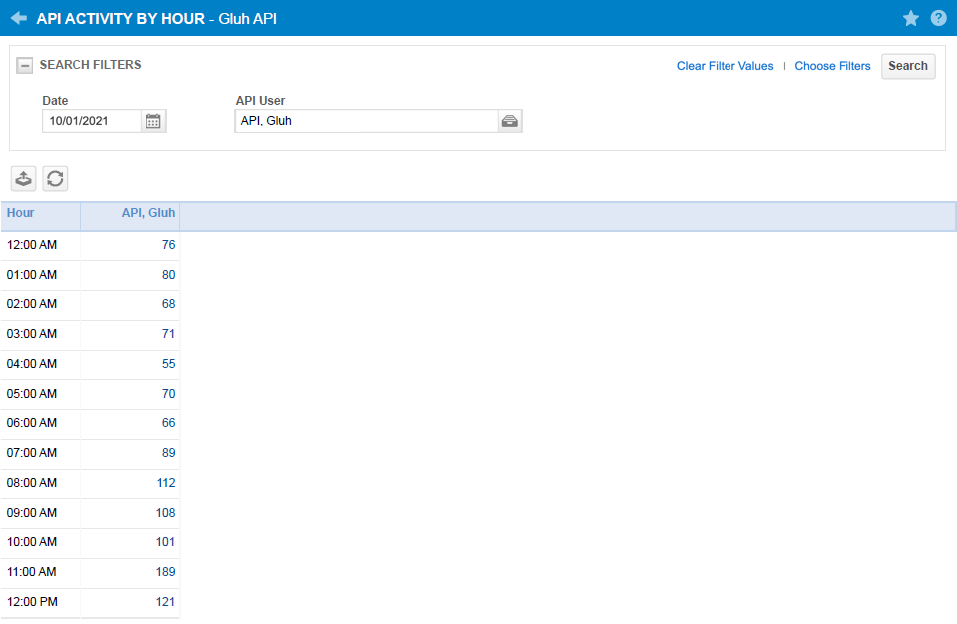
Clicking on a cell will open the log, which shows each call in a separate row and indicates the entity for each call, for that specific API user, for that hour.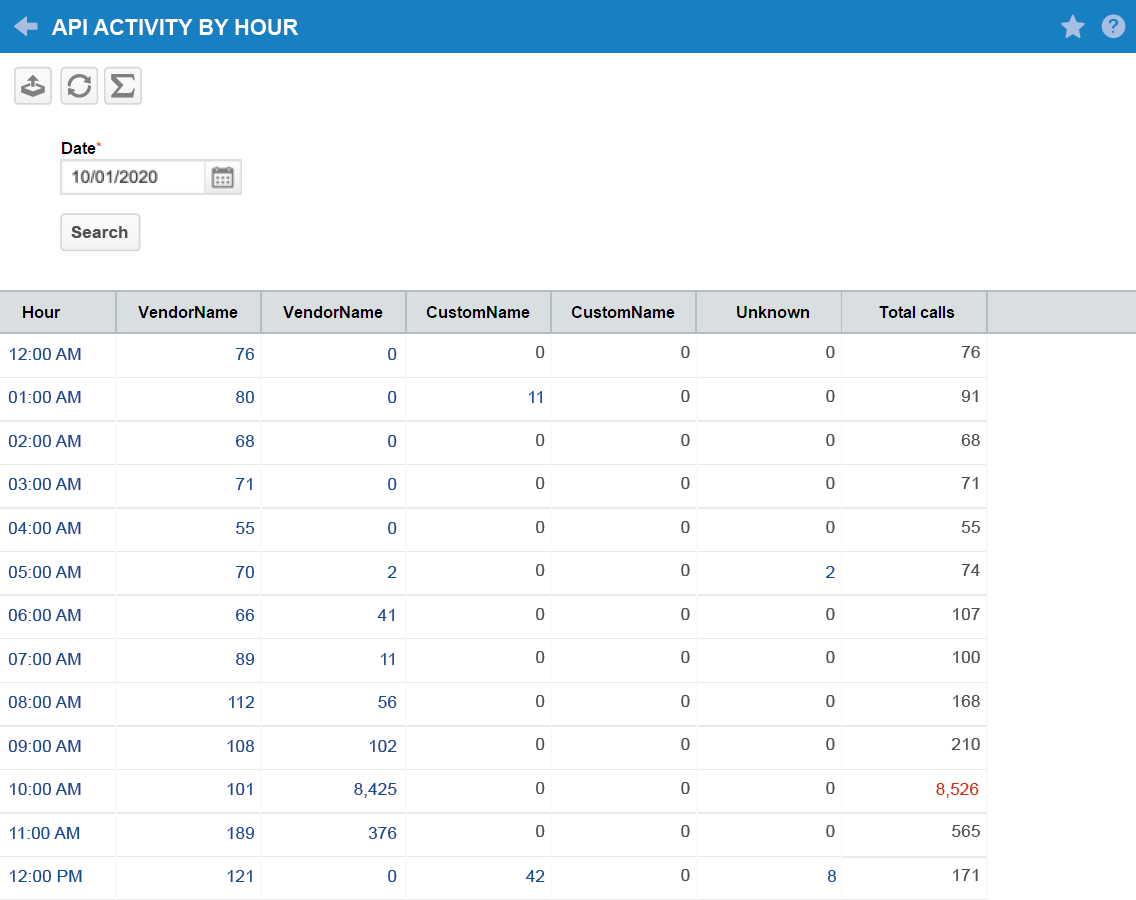
| Icon or column name | Description |
|---|---|
|
Export |
Export the current table to a comma-separated values (CSV) file. |
|
Refresh |
Apply any applicable filters and refresh the current table. |
|
Method |
This value represents the type of action the selected application requested. Common methods are getUDFInfo, getFieldInfo, getEntityInfo, Create, Update, Query, Delete, GetAttachment, and CreateAttachment. |
| Entity | The name of the entity that received the request appears in this column. |
| Request Return Count | The total number of records returned by each call appears in the Request Return Count column. |
| Integration Name | If Autotask is able to detect the integration vendor's name, it will appear here. |
| Resource / API User | The Resource / API User column reports the name of the API user from whom the API call originated. |
|
Execution Start |
This value represents the time and date that the API received the request. |
|
Execution Time (ms) |
The Execution Time column records the time, in milliseconds, that the API spent executing the requested task. |
|
Threshold Exceeded |
A check mark in this column indicates that the activity by the integration exceeded the 10,000 calls per hour activity threshold. For more information about API activity thresholds, refer to our REST and SOAP articles in the Autotask Developer Help. |
|
Client IP Address |
This column records the origination IP address of the API request. |
