Creating a contract
PERMISSIONS Security level with access to Contracts
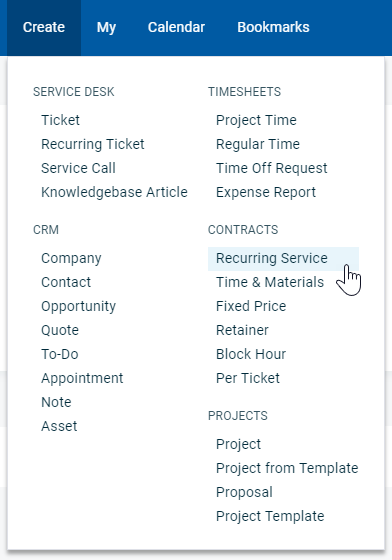
NAVIGATION Create > Contracts > [select a contract type]
NAVIGATION Left Navigation Menu > Contracts > Search > Contract > New
BEFORE YOU BEGIN Block Hour, Fixed Price, Per Ticket, and Retainer contracts may be hidden in your Autotask instance because they have been deactivated. If so, you can activate them on the Left Navigation Menu > Admin > Admin Categories > Activations page. Refer to Activations.
Overview
There are three ways to create a new contract:
- You can create a new contract by copying an existing one. Refer to Copying an existing contract.
- The same or a similar contract can be created for multiple customer organizations at once, using the Contract Creation Utility. Refer to Creating multiple contracts with the Contract Creation Utility.
- You can manually create a new contract using the New Contract Wizard.
The contract wizard
To create or edit a contract using the wizard, do the following:
- To open the page, use the path(s) in the Security and navigation section above.
- Select the type of contract you would like to create. For help with selecting a contract type, refer to Business cases and contract types.
The contract wizard for the selected type opens. - Complete all required pages and fields that apply to the selected contract type.
- Click Finish.
NOTE Not all pages and fields appear on all contract types.
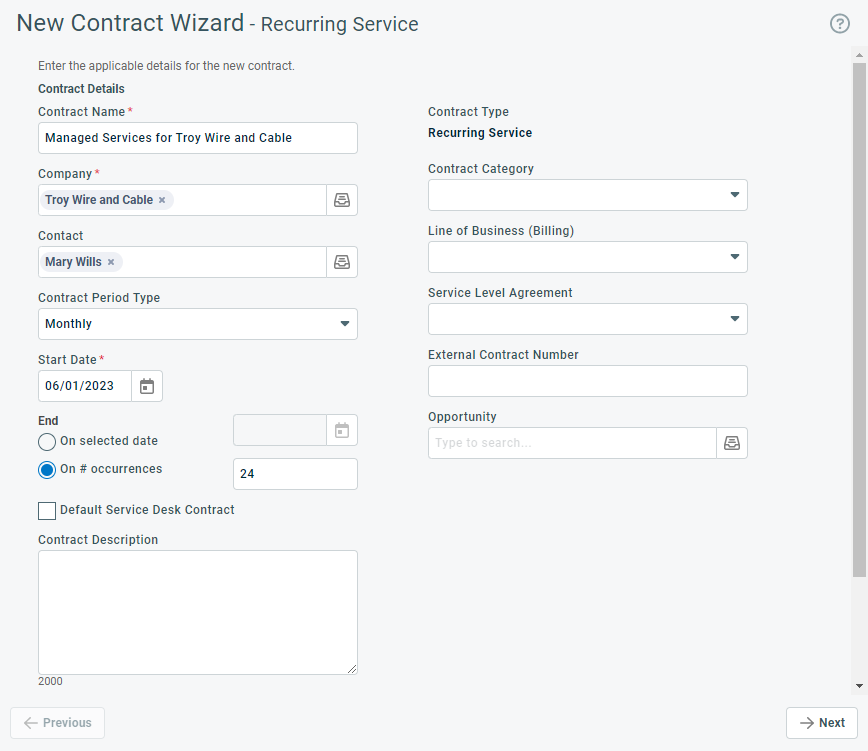
On this page, you name the contract, associate it with an organization, set the contract start and end dates, and provide additional general information.
| Field Name | Applies to contract types | Description |
|---|---|---|
| Contract Details | ||
| Contract Name |
All |
Enter a descriptive contract name. You may have multiple contracts set up for a customer, and the name should make it easy to select the right contract. If you copy the same contract to many organizations, make the organization name part of the contract name. |
| Organization | All | Begin typing the name of the organization in this field. The typeahead will suggest existing organizations from which you can select. Alternatively, click the icon to the right of the field to open the organization selector. Because contracts require a customer type organization, only customers appear in the selector. TIP Before you click the icon, enter the first few letters of the organization name to narrow your search. Once created, the contract cannot be transferred to another organization. If you created the contract for the wrong organization, use the Copy Contract Wizard. Refer to Copying an existing contract. |
| Contact | All |
Optionally, select an individual as the contact for this contract. The drop-down list contains all active contacts associated with the selected organization.
|
|
Contract Period Type |
Recurring Service |
The Period Type field appears on entities where you can set the time increment between payments. It determines the billing frequency. On recurring service contracts only, select from: Monthly (default), Quarterly, Semi-Annual, and Yearly. IMPORTANT You will not be able to change the Contract Period Type after you save the contract. |
| Start Date |
All |
Enter the first day of the date range when the entity is active or valid. It will default to today's date but can be modified. Contracts The start date of the contract becomes the billing date for all items billed under the contract. EXAMPLE If the Start Date is the 21st of the month, billing for all contract billing items will recur on the 21st. If you want your billing date to fall on the beginning or end of the month, but pro-rate services for the remainder of the current month, refer to Billing for a partial first month. NOTE If the Start Date is on a date not in the current period (for example, the start date is on the 31st and the next month only has 30 days), the last day of the month will be used for the billing event. IMPORTANT You cannot edit the Start Date for a recurring service contract once the service/bundle period has been added and the contract has been saved. Opportunities Start date is used to calculate the number of days the opportunity is in the pipeline. Projects The start date for all phases, tasks, and issues must be >= Start Date. Billing Rules The start date is the start of the first billing period and the first billing date. It also sets the schedule for all following billing dates. It must be greater than or equal to the contract start date. EXAMPLE If the start date is January 3, the next billing date will be February 3. If you enter a date of day #29, 30, or 31, and a month does not have that many days, the start date of that period will be the last day of the month. If you enter a day that is the last day of that month, we will use the last day of every month following that month. Each period's charge is created using the most recent unit count, which is established by the date entered into the Determine Units/Create Charges on: field. The count date can be the same date as the billing date, or an earlier date. If there is no unit count on the start date of the first billing period (because the day number selected to determine the unit count is greater than the day number of the start date), Autotask will do a unit count when the rule gets created to use for that first billing period. |
| End Date |
All except Recurring Service |
Enter the end date of the contract, which should be the last day of a billing period. If the end date is not the planned last day of a billing period (you have a partial last month), the charge for the last billing period will be prorated. |
|
End |
Recurring Service |
NOTE When you create, edit, copy, or renew a recurring contract, the contract length cannot be more than 20 years. You must set the duration of the contract by choosing On selected date and setting a date, or choosing On # occurrences and specifying a number of occurrences (how many contract periods should occur before the contract ends). When selecting On # occurrences, the contract end date is calculated by multiplying the length of the contract periods by the number of occurrences. The last period's end date becomes the contract's end date as well. The contract end date controls when the last billing event happens. If you extend the contract, additional recurring service billing items are created, if you shorten the contract, already created billing items will be deleted. If you extend the contract and the billing date for the first month's extension has already passed, no billing item will be created for that month. Only items for months that are to come are created. |
| Default Service Desk Contract (check box) |
All |
Every customer can have a designated default contract that will automatically apply to all tickets created for the organization within the contract date range. Refer to Automatically assigning a contract.
Select the check box to make this contract the default. If the organization already has a default contract with an overlapping time frame, click OK to make the new contract the default, or click Cancel. The new contract will become the default for all new tickets. NOTE The check box is disabled for Recurring Contracts if another default contract for this organization already exists. |
| Contract Description | All |
The Description field appears on many Autotask entities. On entities like ticket, task, note, and to-do, the Description field is a core part of the data record. Wherever it is available, it tracks essential information about the record. This field is often prefaced with the entity name. For example, Quote Description. Enter a detailed description of the entity instance, the issue with which the customer needs help, or the service that they requested. |
| Contract Type | All |
The contract type is selected when the contract is created, and cannot be edited. On all entities it appears, it is view-only. Contract types are used to support different billing needs. Options are Block Hour, Fixed Price, Per Ticket, Recurring Service, Retainer, Time & Materials, and Umbrella. For examples of when to use each contract type, refer to Business cases and contract types. |
| Contract Category | All |
Contract categories are completely customizable, and their use is optional. They are used for displaying, filtering, and grouping in LiveReports, and filtering on the Items to Invoice page. Refer to Contract categories. |
| Line of Business (Billing) | All |
Line of Business lets you classify finances and segment data. This field is displayed when Organizational Structure (Line of Business) is activated and enabled. It is available on the following entities: Contract, Opportunity, Sales Order, Project, and Ticket. Refer to Introduction to Line of Business. If a contract is associated with a different line of business than the ticket or project, billing items always inherit the line of business from the contract, not the parent entity. Refer to Line of business inheritance rules for dependent entities. Select a pairing of Business Division > Line of Business. |
| Service Level Agreement | All |
Click the dropdown control and select a service level agreement (SLA). The selected SLA will be the default for all projects and tickets associated with the contract. For more information on SLAs, refer to Introduction to service level management and Applying service level agreements. NOTE You can edit an individual ticket if you do not want to apply the contract SLA to that ticket. NOTE The SLA will not be applied to tickets created under the contract before the SLA was added to the contract. |
| External Contract Number | All |
This field is optional and can be edited. It is available on multiple entities and can provide a cross-reference to an external numbering system. |
|
Opportunity |
All |
An opportunity is a potential sale you have identified. This field appears on entities that are associated with a sales opportunity. Depending on permissions, the opportunity name or a link to the opportunity is displayed. Select an opportunity or click the plus icon to add a new opportunity. You must select an organization first. All active opportunities associated with an organization are available. CRM notes and To-Dos:
CRM notes and to-dos created from the organization or contact entity can optionally reference an active opportunity for the organization. When you add a note from the Opportunity page, the Opportunity Name field is defaulted in. Contracts: If the contract is created while running the Won Opportunity or the Won Quote wizards, the opportunity is referenced here. Projects: You can associate an opportunity with the project and do the following:
Quotes:
Select an active opportunity, create a new opportunity, or allow the opportunity to be automatically created. If the opportunity is created automatically, it will have the same name as the quote, and the remaining fields will default to the values described in Default values for auto-created opportunities. Sales orders:
If Procurement is enabled, sales orders are automatically generated from opportunities when the Won Opportunity wizard is run. The field is read-only. Tickets:
An opportunity will appear in this field if the Won Opportunity wizard was run and Associate this ticket with this opportunity was selected, creating this ticket in the Post Sale queue. |
|
Contract Status (Edit Contract only) |
All |
The contract status determines whether a contract is active.
IMPORTANT To stop billing for future services, you must change the contract's end date to the date of the last billing event. |
| User-Defined Fields | ||
|
User-Defined Fields |
All |
If your Autotask instance has one or more contract user-defined fields, the wizard displays those UDFs below the Contract Details section. User-defined fields (UDFs) are custom fields set up by your Autotask Administrator that capture information that is unique to your business. They can be one of the following field types:
You are able to see and update this information based on your security permissions. If you do not have permission to view or update the data, it will be masked with asterisks. If you can view but not edit the data, editing will be disabled. Refer to Viewing protected data. Also review Managing user-defined fields. You must complete any required UDFs before you can save the entity. |
This page allows you to specify the revenue you expect the contract to generate, configure settings for approving and posting labor, and set the time reporting method.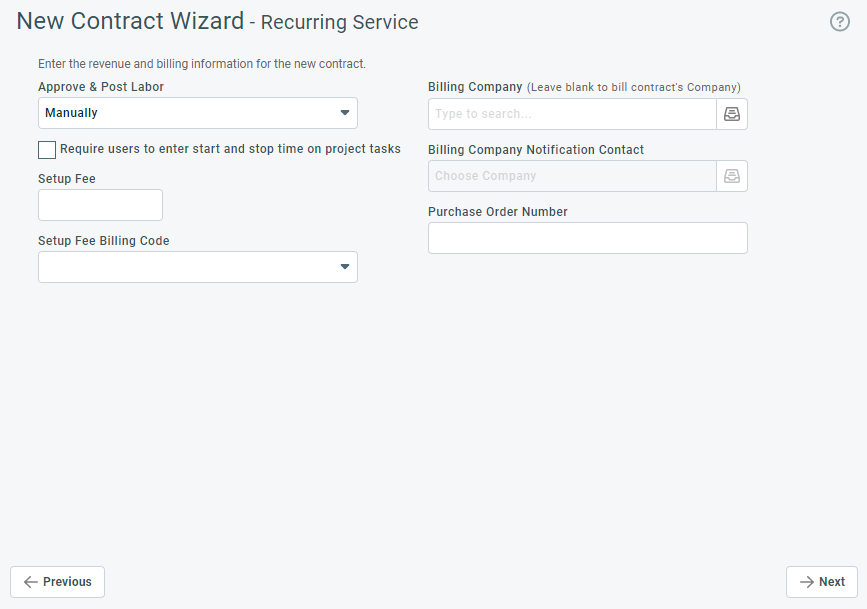
NOTE If Multi-currency is enabled, currency fields display a Currency indicator, and are shown in the customer currency. Click the currency indicator to display the currency fields in the internal currency.
| Field | Applies to contract types | Description |
|---|---|---|
| Approve & Post Labor |
All |
This field determines whether you approve and post labor manually, on timesheet approval, or immediately on time entry. NOTE Only the Manually option will allow you to go through a separate billing approval stage for labor, correct mistakes, make adjustments, add missing information, correct spelling, etc. We therefore strongly recommend that customers use the Manually option. This field cannot be edited for per ticket contracts. The Billing Setting for per ticket contract labor is always Manually. This billing setting allows all time entries to remain in Approve & Post until the ticket status is set to complete, ensuring that the ticket purchase remains available until all ticket work is completed. Refer to Billing settings for approving labor. |
| Require users to enter start and stop time on project tasks |
All except Per Ticket |
Select the check box to change the time entry method for projects that use this contract from decimal time (flat number of hours) to Start/Stop time entry.
|
|
Estimated Revenue |
All except Recurring Service |
The amount of revenue you expect to generate. We strongly recommend that you populate this field, because many reports compare estimated revenue, actual revenue and costs. If you leave this field set to 0.00, these reports will not generate useful information. |
|
Estimated Cost |
All except Recurring Service |
The amount you expect the contract work or project charges to cost. If you do not have permission to view internal cost data, this field is not visible. NOTE If you import quoted product charges from QuoteWerks, the quoted amount will be imported into this field. |
|
Estimated Hours |
All except Recurring Service |
The number of hours you estimate it will take to complete the work. Project Tasks: Estimated (h) and another field, Per Resource (h), are interdependent.
NOTE Estimated hours on tickets and tasks populate the Workload Availability report. Phases: The total estimated hours specified for all tasks in the phase. |
| Setup Fee |
Recurring Service |
A setup fee is a one-time administrative fee for a recurring contract. It will appear as a separate line item (dated the same as the contract's start date) to be approved, posted, and invoiced to the customer. Once posted, the setup fee cannot be edited. |
| Setup Fee Billing Code |
Recurring Service |
This field is disabled if the Setup Fee field is set to 0 or is left blank. This is a recurring contract service code used to charge tax on the contract setup fee. Make sure this billing code is associated with the correct tax category. Refer to Tax categories. NOTE If the contract organization is tax exempt or the selected code is not associated with a tax category, no tax will be charged. NOTE On the Edit Contract page, this field will become read-only once the fee has been approved and posted. |
|
Enable Overage Billing (check box) |
Block Hours |
Select this check box to enable the Overage Billing Rate field. |
|
Block Hours |
On Block Hours contracts, this hourly rate will be used when all available block hours have been consumed. If enabled, this field is required and will always create a contract charge of 0.00, or the amount entered. NOTE If you would like to cap charges for a block period, enter an overage rate of 0.00 . Once the block hours are consumed, labor will be performed at the 0.00 overage rate. NOTE The overage billing rate set will override any set work type multipliers. |
|
|
Overage Per Ticket Rate |
Per Ticket |
On Per Ticket contracts, this rate will be used as the flat fee contract charge once all ticket purchases have been consumed. This field is required and will always create a contract charge of 0.00, or the amount entered. NOTE If you do not add any purchases to the contract, you can use the overage rate to create one-off tickets to bill the customer. |
|
Amount Already Received |
Fixed Price |
If you have received a deposit, up-front payment, or down payment, enter the amount of the payment. Autotask will create a milestone and mark it as approved, posted, and invoiced. NOTE The Posted Date and Invoiced Date for the initial contract payment for Amount Already Received will be the contract Create Date, not the Contract Start Date! |
|
Amount To Be Invoiced |
Fixed Price |
If you have not yet received a payment and your customer needs an invoice for the first payment, enter the payment amount here. The information will appear in Approve & Post and you can generate the invoice inside of Autotask or in your accounting software. |
|
Default Milestone Code |
Fixed Price |
Milestone codes apply billing categories to revenue from Fixed Price Contracts. Click the dropdown control and select a default Milestone Code for this contract. The selected milestone code is applied to each milestone as it is created, but can be overridden. The use of Milestone Billing Codes is optional. For additional information on Milestone Billing Codes, refer to Milestone codes. |
|
Retainer |
The Charge tax... check box appears if your instance of Autotask has the Retainer Tax installed module. This module allows you to deduct not only labor and charges from the retainer purchase, but also the taxes applied to them. The module must be enabled by Datto Support. For details on how this feature works, refer to Adding tax to retainer contract items. Click to select the check box if you want to deduct tax (for eligible labor, charge, and expense items) from retainer purchases in this contract. |
|
| Billing Organization |
All |
If you would like to send the invoice for billing items generated by this contract to be sent to a third party other than the parent organization for this customer, select it here. Any organization in your Autotask instance can be selected. Revenue and costs are tracked against the organization the contract is set up for, but all approved and posted items for the contract will be invoiced to the billing organization. |
| Billing Organization Notification Contact | All |
This role-based notification recipient at the Billing Organization is an individual who can receive workflow rule notifications when automatic repurchase of blocks, retainers, and tickets is enabled. |
| Purchase Order Number | All |
This field appears on entities that are part of the billing workflow, and is applied to labor and charges.
Refer to Working with purchase order (PO) numbers. |
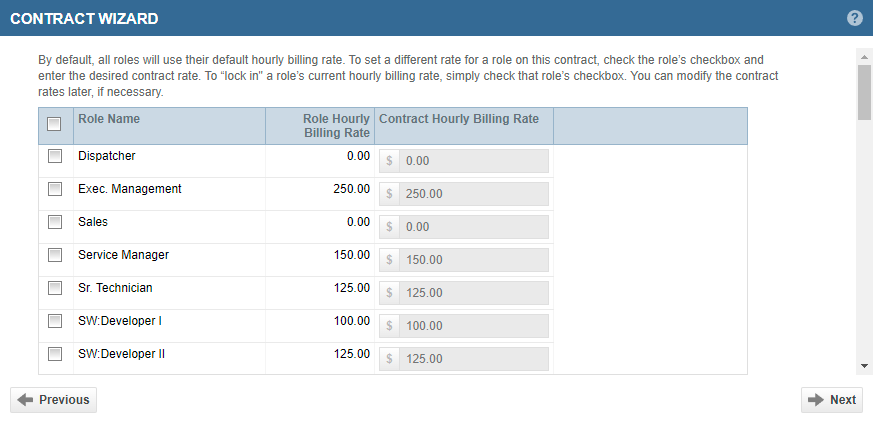
This page displays a list of all roles in your organization and the default billing rate for each role. Here, you can lock in a role's current hourly billing rate or specify a different Contract Hourly Billing Rate for each role.
Select the role rates that will be lowered, raised, or locked in when your standard billing rates change. All other roles are still available for use, but will continue to be billed at the standard rates. Contract rates appear in the Rates page that you access from the Rates option on the contract menu.
- Select the check box for all role rates that will be changed or locked in under this contract.
- For roles that will be billed at a different rate, enter the new rate in the Contract Hourly Billing Rate field.
- Click Next.
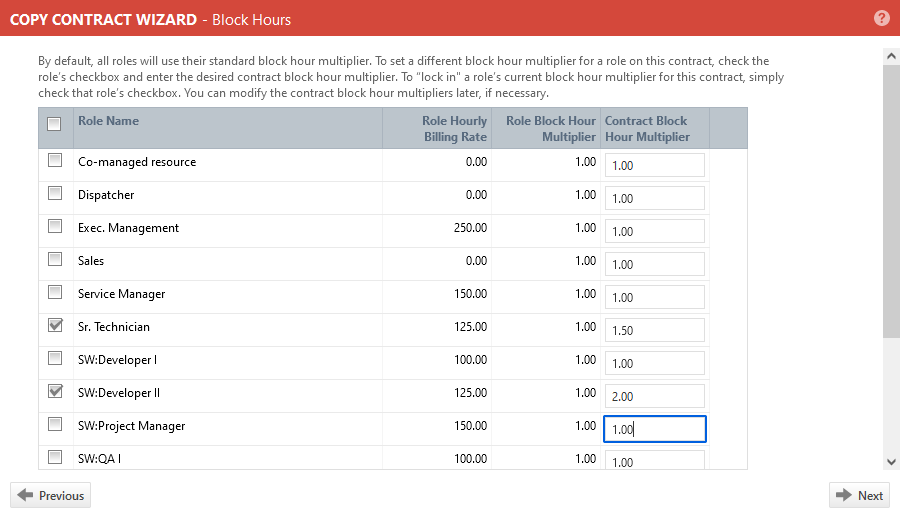
This page displays a list of all roles in your organization and the default Role Block Hour Multiplier for each role. Here, you can lock in a role's current Role Block Hour Multiplier or specify a different Contract Block Hour Multiplier for each role.
Select the roles where block hour multipliers will be changed or locked in when your standard multipliers change. All other multipliers are still available for use, but will continue to be consumed using the Role Block Hour Multiplier. Contract block hour multipliers appear in the Rates & Multipliers page that you access from the Rates & Multipliers option on the contract menu.
- Select the check box for all block multipliers that will be changed or locked in under this contract.
- For roles that will be billed at a different rate, enter the new multiplier in the Contract Block Hour Multiplier field.
- Click Next.
On this page, you add services and service bundles to recurring service contracts. If renewing or copying the contract, you can also remove services and bundles.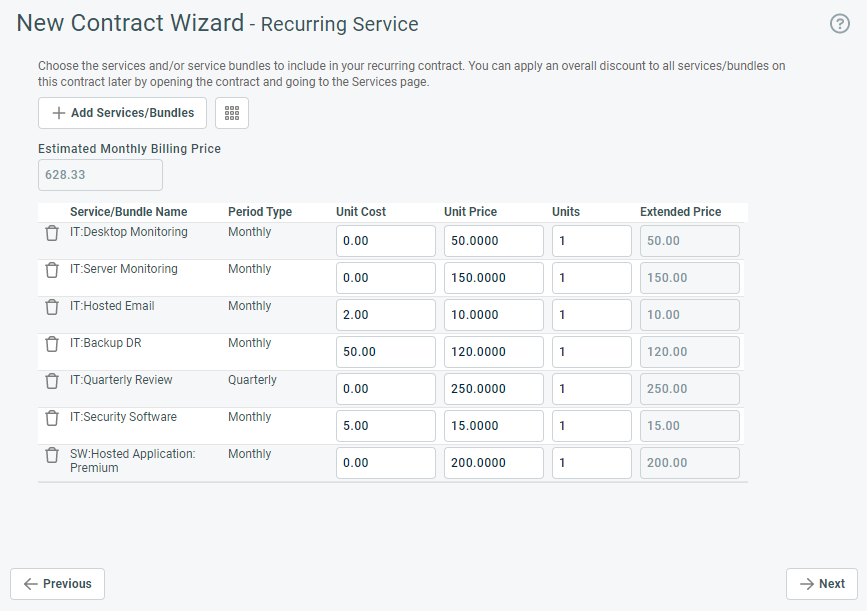
For information about services and service bundles, refer to About services and service bundles.
To add services and service bundles to the contract, do the following:
-
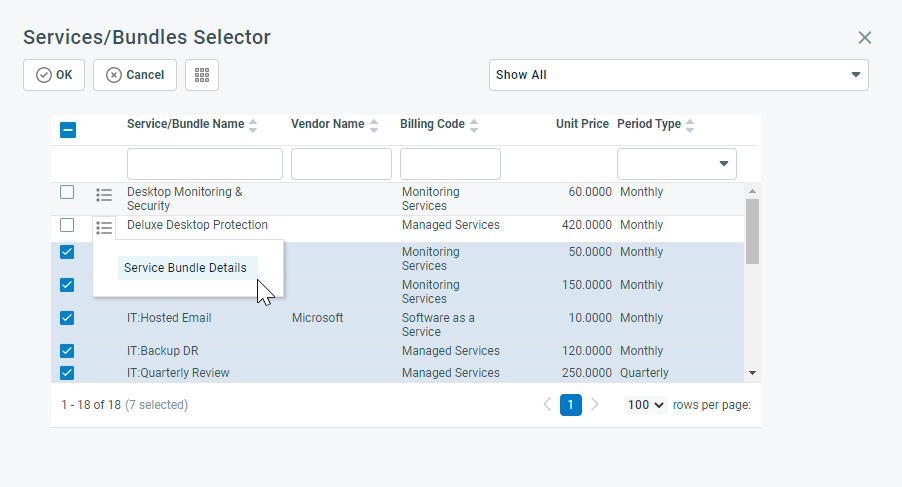
Click Add Services/Bundles. The Services/Bundles Selector page opens. It contains a list of all services and service bundles your administrator has configured.
-
Use the main filter in the upper right corner to show all, services only, or service bundles only.
-
Use the filter row below the table header to narrow your search.
-
To view the list of services that make up a service bundle, select Service Bundle Details from the service bundle context menu.
-
Select one or more services or service bundles and then click OK. Repeat if necessary. The selected services and bundles now appear on the wizard page.
IMPORTANT You can add up to 200 services and 200 bundles at one time. If you select more than 200 of either, they will not be added, and there will be no warning.
-
Accept or edit the contract Unit Cost and Unit Price for each selected service. For service bundles, you can only edit the Unit Price.
NOTE Use negatively priced services or service bundles to set up recurring discounts.
- Drag the scroll bar to the right and enter the Number of Units to include in the contract. A unit is usually one supported device or item, for example, a PC, printer, server, or license. The Extended Price will be calculated as Unit Price X Number of Units.
- The read-only Estimated Monthly Billing Price field appears above the table. Setup fees are not included in this calculation; they generate a separate one-time billing event.
- The Associated Devices column displays a count of devices associated with that instance of the contract service.
- If the contract you are renewing has one or more contract services that are mapped to an Integrated Customer Billing offering (shown in the rightmost column Associated Integrated Customer Billing Mappings), these mappings will automatically carry over to the renewal contract, unless you delete them by clicking the Delete
 icon. Refer to Integrated Customer Billing.
 - When you have added all services and bundles, click Next.
On this page, you enter milestones (billing events) for a fixed price contract.
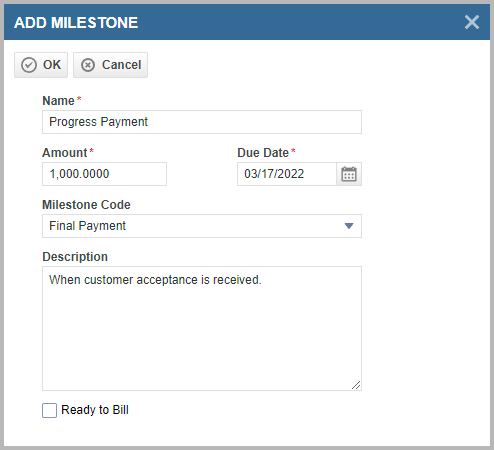
A milestone is a billing item generated from a fixed price contract, similar to a charge for a part of the total fixed price of the project. A contract can have one or multiple milestones, and you can create new ones as long as the contract is active. It can be associated with the completion of a project task or phase, or be created as Ready to Bill on a specific Due Date. Refer to Milestones.
To add a milestone, do the following:
| Field | Description |
|---|---|
| Name | The name for the milestone. It must be descriptive enough so resources can select the right milestone in a project and associate it with a project task or phase. |
| Amount | The amount to bill when the milestone status is set to Ready to Bill and the Due Date has been reached. |
| Due Date |
The date the milestone is expected to be billed, and will appear in Approve & Post. Note that the milestone will only become billable on this date if its status is set to Ready to Bill. NOTE To create a billing event in the future, set the status to Ready to Bill and enter the desired Due Date. |
|
Milestone Code |
The milestone code determines the tax category applied to the milestone. If a Default Milestone Code was selected on page 2 of the wizard, it will automatically populate the Milestone Code field of each milestone. Click the selector icon to choose a different milestone code. |
| Description | Enter a description of the objective that must be reached before the milestone becomes billable. |
| Ready to Bill (check box) |
Ready to Bill is a system milestone status. The status of the milestone in combination with the due date controls when the milestone becomes billable. Your Autotask instance contains the following system milestone statuses:
NOTE You can add additional Milestone Statuses in Left Navigation Menu > Admin > Admin Categories > Features & Settings > Contracts & Un-Posting > Billing Milestone Statuses. |
- Click OK to add the milestone, and repeat as necessary.
- Click Next.
NOTE The contract wizard allows you to define up to 25 milestones. To add additional ones, open the contract once the wizard has finished, and click the Milestones on the contract menu.
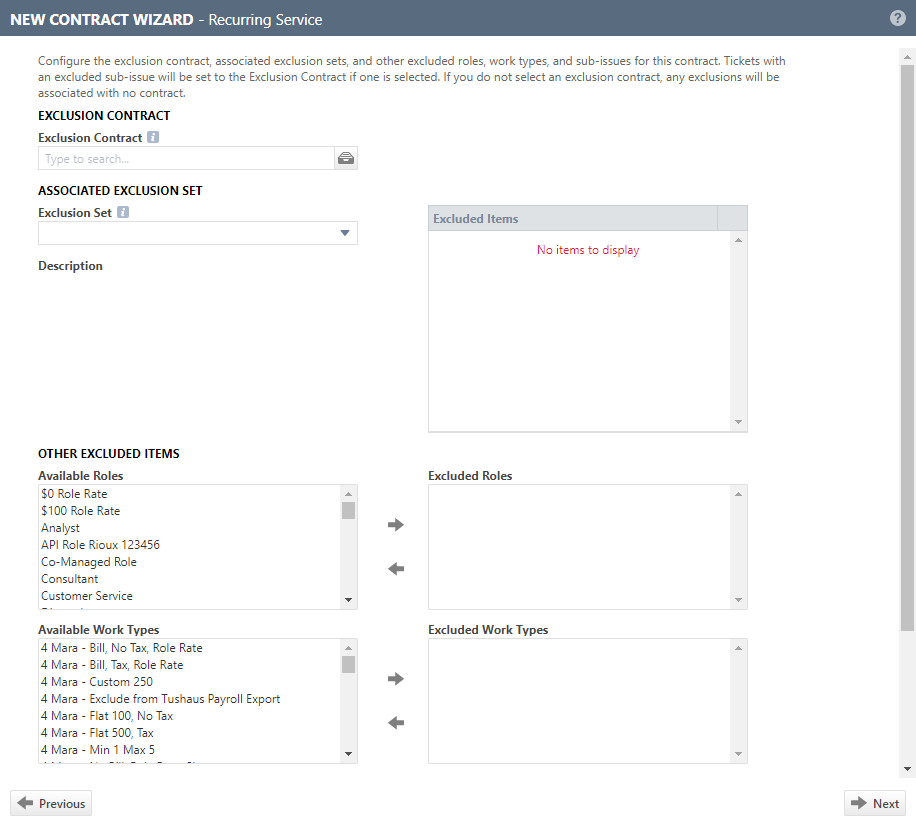
Exclusion is a contract feature that allows you to exclude individual roles, work types, and sub-issues from the current contract. Refer to Other Excluded Roles & Work Types. You can also select predefined sets of roles, work types, and sub-issues to which the contract won't apply. Refer to Managing contract exclusion sets and Adding, editing, or copying a contract exclusion set.
- You can then either apply a different contract, the exclusion contract, or leave the Exclusion Contract field blank to remove contract coverage entirely. Refer to Creating a contract.
- If the first exclusion contract also excludes some of the rolled-over roles, work types, or sub-issues and has its own exclusion contract, the roles, work types, and sub-issues may be covered by this second exclusion contract. This is called an exclusion path or an exclusion contract chain.
Excluded roles, work types, and sub-issues are managed on the Exclusions page of the contract. Using exclusions is optional.
To exclude roles or work types from the contract, complete the following fields:
| Field | Description |
|---|---|
| Exclusion Contract | |
| Exclusion Contract |
The exclusion contract is the contract that will be used instead of the current one if the roles, work types, and sub-issues excluded below (and contained in the Exclusion Set, if any) are applied to tickets and ticket time entries. It will automatically substitute for the original contract when a user is saving a time entry with an excluded role, work type, or sub-issue type. If the exclusion contract has itself an exclusion contract, any roles, work types, and sub-issue types not covered under the exclusion contract will use the exclusion contract of the exclusion contract. The exclusion contract chain is displayed on the Summary page of the contract.
NOTE Per-Ticket contracts cannot be selected as exclusion contracts, because they must be applied to the ticket and a time entry for billing to complete properly. If you accessed the Exclusions page from the contract menu, you can open the selected exclusion contract by clicking the View Contract |
| Associated Exclusion Set | |
| Exclusion Set |
An exclusion set is a predefined list of roles, work types, and sub-issues that will not be covered under the current contract. Exclusion sets can be used in multiple contracts. They will increase accuracy and save time. EXAMPLE Most of your customers have a Remote Support contract that is the default contract, since initially, you will attempt to solve any issues on the phone or using screen sharing. This contract covers roles such as Support Technician and work types such as Remote Support. All other roles and work types are added to an exclusion set called Not Remote. This ensures that the ticket's or project's contract is not applied to time entries that use the excluded roles and work types. They will use the exclusion contract, or no contract at all. Click the drop-down menu and make a selection. All previously created exclusion sets are available. Refer to Managing contract exclusion sets. To create a new exclusion set and apply it to the contract (where available), click the plus sign. The New Contract Exclusion Set page will open. Refer to Adding, editing, or copying a contract exclusion set. |
|
Description |
The description of the selected exclusion set appears here. |
| Role or Work Type |
These panes show the roles, work types, and sub-issues that were individually excluded from the contract, either instead of or in addition to the exclusion set. Select and click, or double-click, a role, work type, or sub-issue. This will move it from the Excluded to the Available lists. |
| Other Excluded Roles & Work Types | |
| Role and Work Type selection panes |
To exclude specific roles, work types, and sub-issues, or to exclude additional roles, work types, and sub-issues (if you selected an exclusion set), select and click, or double-click, a role, work type, or sub-issue. This will move it from the Available to the Excluded lists. Roles, work types, or sub-issues that will automatically be excluded when the contract is created have "(auto-excluded)" appended where they appear in this list. |
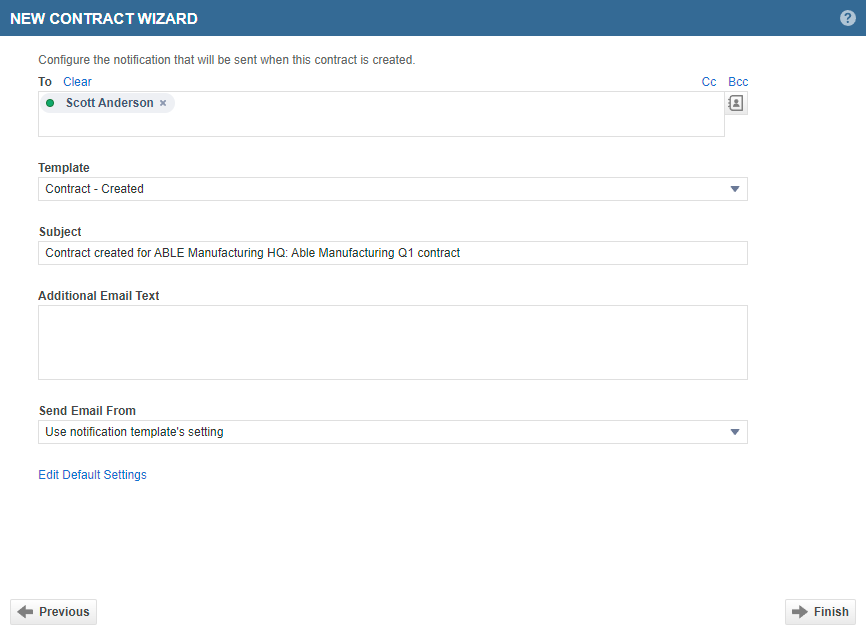
On this page, you set up the notification messages that Autotask will send when you click Finish.
- Populate the following fields:
| Field | Description |
|---|---|
|
To |
Select the recipients who will receive a notification message. Refer to Add role-based recipients and Add individual resources and contacts using typeahead. |
| Template |
Notification templates determine the content and layout of the notification email. Most templates contain not only the subject line and email body text, but variables that pull data right out of Autotask. NOTE If the list of recipients includes resources who lack permission to view internal notes, attachments, etc., the text pulled by the variable is replaced with See [Entity Name]. This field appears in entities that support email notification when you create or edit them. The default template is selected, but can be modified. All active notification templates for the entity and event are available. If it is present, click the preview icon |
| Subject |
This field appears or is enabled in entities that support email notification when you create or edit them. It determines the Subject line for the notification email that is sent out. If you have selected a notification template, the Subject line is populated by the notification template's subject but can be modified. |
| Additional Email Text |
This field appears in entities that support email notification when you create or edit them. It stores additional text you want to appear in the notification email. Enter any text that you want to appear in the notification email above the attachment or above the body text defaulted in from the template. Depending on the entity, text that you enter here may or may not save to Autotask. If saved, it will be available for viewing as a system note. |
| Send email from | Choose the Send Email From option you'd like to use for this message. For more information, refer to Selecting a notification sender. |
| Edit Default Settings | Default notification settings are specific to your user account and can be managed on the Default Notifications page. Refer to Configuring default notification settings. |
- Click Finish.
NOTE Once you click Finish, you cannot return to previous wizard pages. Any changes must be made to the completed contract. Refer to Creating a contract or Contract Summary.
This page lets you determine how to proceed after the wizard is complete. The following links appear:
- Open Contract
Select this option to open the Summary page of the newly created contract. From here, you can edit the contract and view or edit services, devices, notes, projects, and tickets associated with the contract.
- Create a ticket on this Contract
When you click this link, Autotask will create a ticket associated with the current contract and open the New Ticket page.
NOTE It is possible to use workflow rules to automatically create a ticket when a new contract is created, rather than relying on this selection in the wizard. For more information, refer to Actions: Create Ticket(s) section.
- Add charge defaults to this Contract
Selecting this option opens the Contract Charges Default page of the newly created contract. Refer to Charge Defaults.
- Add billing rules to this Contract
If you'd like to set up automatic billing workflows for the contract, select this link. Refer to Creating and managing billing rules.
- Create another contract
Selecting this option opens the New Contract Wizard page.
- Close this window
Troubleshooting
- Edits to recurring service contracts created unwanted prorations
- How can I adjust a Recurring Service Contract's Start Date?
- How can I end a Recurring Service Contract early to stop billing the services?
Next steps
When you click Finish on the last page of the New Contract Wizard for a prepaid contract (Block, Retainer, Per Ticket), the setup is not yet complete. You have not yet added any block purchases, retainer purchases, or ticket purchases and their corresponding charges that will ensure that you get paid for your work.
For details, refer to Adding block, retainer, or ticket purchases.
