Forwarding and modifying tickets
PERMISSIONS These pages are governed by the Service Desk security settings of the security level assigned to you.
NAVIGATION Any Ticket List > bulk menu > Forward/Modify Ticket
NAVIGATION Ticket Widget Drill-in tables > context menu > Forward/Modify Ticket
NAVIGATION Ticket page > ![]() Forward
Forward
NAVIGATION Ticket Time Entry or Ticket Note > Save & Forward/Modify
When you forward a ticket, it will be moved from the current to the selected queue, and/or the current primary resource's ticket lists in My > Service Desk > Tasks & Tickets (and others) to the selected resource's. Optionally, the tickets can be added to the primary resource's work list.
-
All users can forward their own tickets to any user in their organization who is a member of at least one queue.
-
Users can also forward tickets to any queue, even if they are not a member of that queue. The recipient of the forwarded ticket will become the ticket's primary resource.
IMPORTANT When you use Forward/Modify, you edit the ticket and all workflow rules that contain the Ticket Edited event will fire. When you use Forward/Modify for bulk operations like reassigning ticket to a new ticket category, be aware that this might send a large number of notifications to your customers.
How to...
- Open the Forward/Modify Ticket(s) page. To open the page, use the path(s) in the Security and navigation section above.
NOTE You cannot forward or modify a ticket while a note or time entry dialog window is minimized on the Ticket page.
- Complete or edit the fields as described below:
- If you are forwarding or modifying multiple tickets, you will have differing ticket titles and descriptions, and it is possible that they are currently assigned to different queues and resources. In this case, Multiple Selected - Keep Current will display in these fields.
- If the queue is the same for all selected tickets, the queue name will be selected.
- If the resource is the same for all selected tickets, the resource name will be selected.
- If none of the selected tickets has a resource assigned, (None Selected) will be displayed.
-
If the Queue field is Always required" for at least 1 ticket, the field will be required for all tickets.
-
If no Queue field is set to "Always required" but at least 1 ticket 's Queue field is set to "Required When Primary Resource Is Blank", Queue fields for all tickets will be set to "Required When Primary Resource Is Blank."
- Existing secondary resources are not displayed and cannot be removed. The selected secondary resources are simply added to any secondary resources already assigned to each ticket.
- If a resource is already a primary resource on one of the selected tickets, they will remain as the primary resource and will not be added as a secondary resource to that ticket.
- If all the tickets belong to the same category, any secondary resource list value restrictions from that category will apply.
-
If you are forwarding multiple tickets with differing values in a field, you will see either Varies - Keep Current or Multiple Selected - Keep Current. Contract-related fields cannot be updated.
-
If you select a different ticket category, it may affect which fields are required and which menu options are available. Note that your security level may restrict which ticket categories are available to you.
-
If your security level specifies a "Render as..." ticket category, you will not be able to change the ticket category and the visible fields are limited to those allowed by the "render as" ticket category. Field picklist values include those from the "render as" category as well as the currently selected value.
-
If you enter a value in a field, all selected tickets will be updated to the value you select.
| Field | Instructions |
|---|---|
Summary |
|
| Ticket Title, Description |
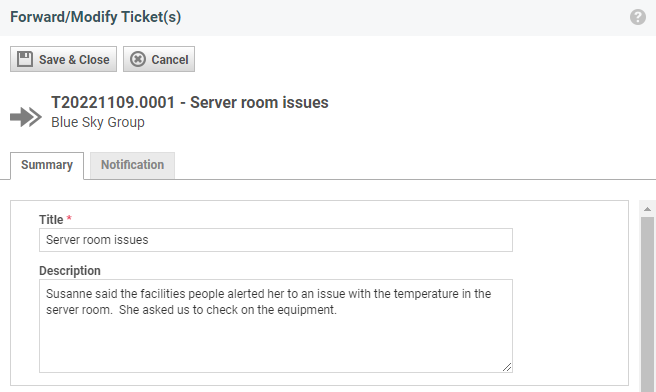
The Ticket Title and Description fields are already populated with information from the ticket. |
|
If the ticket description field includes Rich Text formatting or images, the edit icon |
|
| Apply these change to the X incident(s) | If you are forwarding or modifying a problem ticket, select the Apply these change to the X incident(s) check box to apply the same changes to the problem ticket and any associated incidents. This check box only appears when forwarding/modifying a problem ticket type. For more information on problem/incident tickets, refer to Working with problem and incident tickets. |
Assign To |
|
| Queue, Resource |
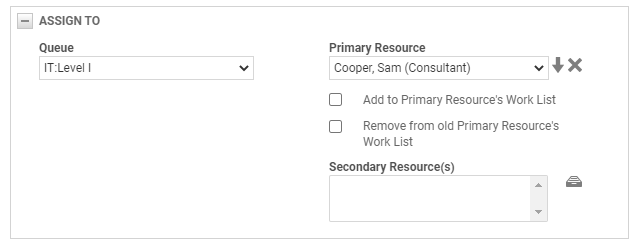
From the drop-down lists in the Queue or Resource fields, you can select a queue, a resource or both to forward the ticket to. If you select a queue and a resource, the resource does not have to belong to that queue. You can use the Demote icon If either field is required, a value must be selected for the required field before the ticket can be saved. Queue requirements for multiple tickets: IMPORTANT When forwarding a ticket or tickets to a new resource or queue, email notifications are only sent if the Primary Resource and any other applicable recipients are selected on the Notification panel. NOTE An internal note is added when primary resource, secondary resource, or queue are changed via Forward/Modify. |
| Add to Primary Resource's Work List | Select this box to add the ticket to the primary resource's Work List. |
| Remove from old Primary Resource's Work List | If you are changing the primary resource on a ticket and you are checking the Add to Primary Resource's Work List box, you may want to also check this one, so the same ticket is not going to be on two resources' work lists. Tickets where the stopwatch is running or paused will not be removed. |
| Secondary Resource(s) (single ticket) / Add Secondary Resource(s) (bulk menu) |
This field allows you to add one or multiple secondary resources to one or more tickets. Click When forwarding/modifying a single ticket, existing secondary resources are displayed and can also be removed. When forwarding/modifying multiple tickets: |
Edit Ticket Detail |
|
| Ticket Detail Fields |
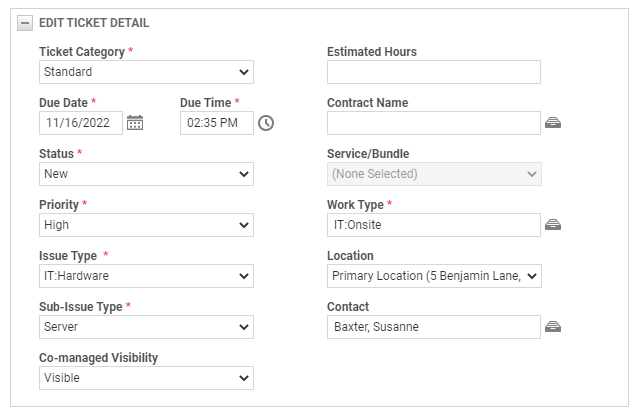
In the Edit Ticket Detail section, you will see all fields that are visible on the ticket, plus all fields that are required for the ticket category, both visible and non-visible. The picklist options are determined by the ticket category, as well. |
| User-Defined Fields | |
| User-Defined Fields |
With the exception of List (Multi Select) UDFs, which cannot be forwarded, User-Defined Fields can appear on the Forward/Modify Ticket(s) page. Visibility is determined by the system setting Forward/Modify Ticket respects field visibility (User-Defined Fields only). Refer to Service Desk system settings. When this setting is enabled: When the setting is not enabled: NOTE If your security level specifies a "render as" ticket category, then you see the UDFs visible on that ticket category. For information on the "Render as" security level setting, refer to Render all Tickets as Ticket Category:. |
| Notification Tab |
|
| Notification Fields |
To notify resources and contacts, click the Notification tab, select recipients, and complete the notification fields. Refer to Generating a manual notification. NOTE When you Forward/Modify multiple tickets at once, the Contacts selector and option to "Select all ticket contributors" are not available for the notification. You can click Edit default settings to override notification defaults. Refer to Configuring default notification settings. |
- Click Save & Close.
NOTE An internal note is added to the ticket when primary resource, secondary resource, or queue are changed via forward/modify. When any other items such as Issue Type or Status are modified, no note is added.
- Click the Refresh button to update the ticket list after you save & close.
On ticket lists that feature selection boxes, you can forward multiple tickets to the same resource or queue.
- On ticket tables with a right-click menu, select several tickets (by checking the boxes on the left) and then right-click and select Forward/Modify Selected Ticket(s).
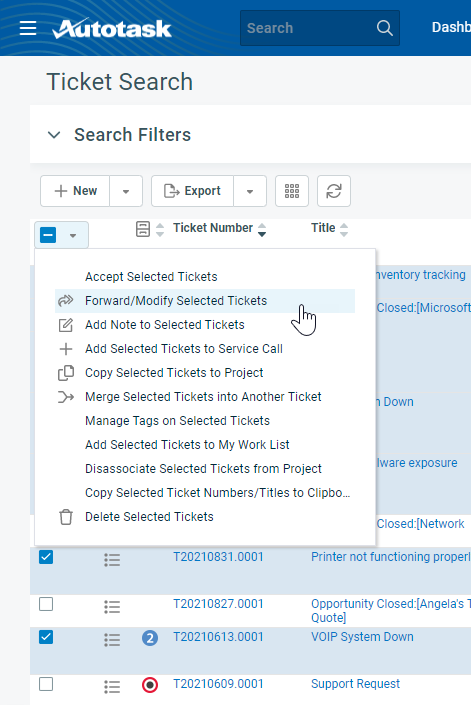
On ticket tables with a context menu, select several tickets (by checking the boxes on the left), then click the drop-down icon in the selection column and select Forward/Modify Selected Tickets.
- Modify the tickets as desired. Refer to Forward or modify a ticket above for details.
NOTE Some fields will display "Multiple Selected - Keep Current", which allows you to keep the current information in the individual tickets. If you change the information in a field, all tickets will be updated to the selected value.
The ticket category can be associated with a ticket checklist. When you change the ticket category on the Forward/Modify page, checklists will behave as follows:
- If the current ticket category has a default checklist and the new ticket category does not, the checklist will be kept
- If the current ticket category does not have a default checklist and the new ticket category does, the checklist will be added
- If the current and the new ticket category both have a default checklist, the new ticket category's checklist will be added to the previous category's checklist, as long as the maximum number of checklist items (20) has not been reached
This behavior is true for both tickets and recurring ticket instances.


