Accepting the outsource agreement
PERMISSIONS Allow All (outsourcing permission level) or Administrator
NAVIGATION Left Navigation Menu > Outsource > Dashboard (before agreement is accepted)
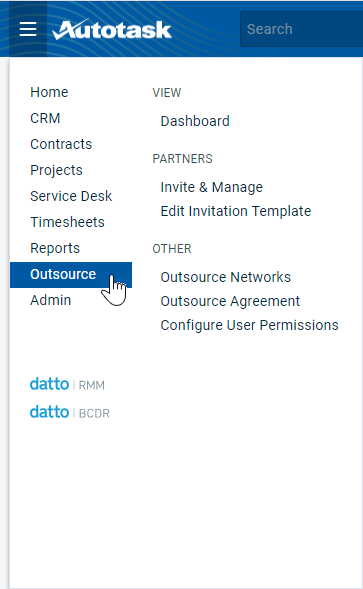
NAVIGATION Left Navigation Menu > Outsource > Other > Outsource Agreement
NOTE Your company can insource tickets outsourced to you without accepting the Outsource Agreement. Refer to Insourcing (receiving) tickets.
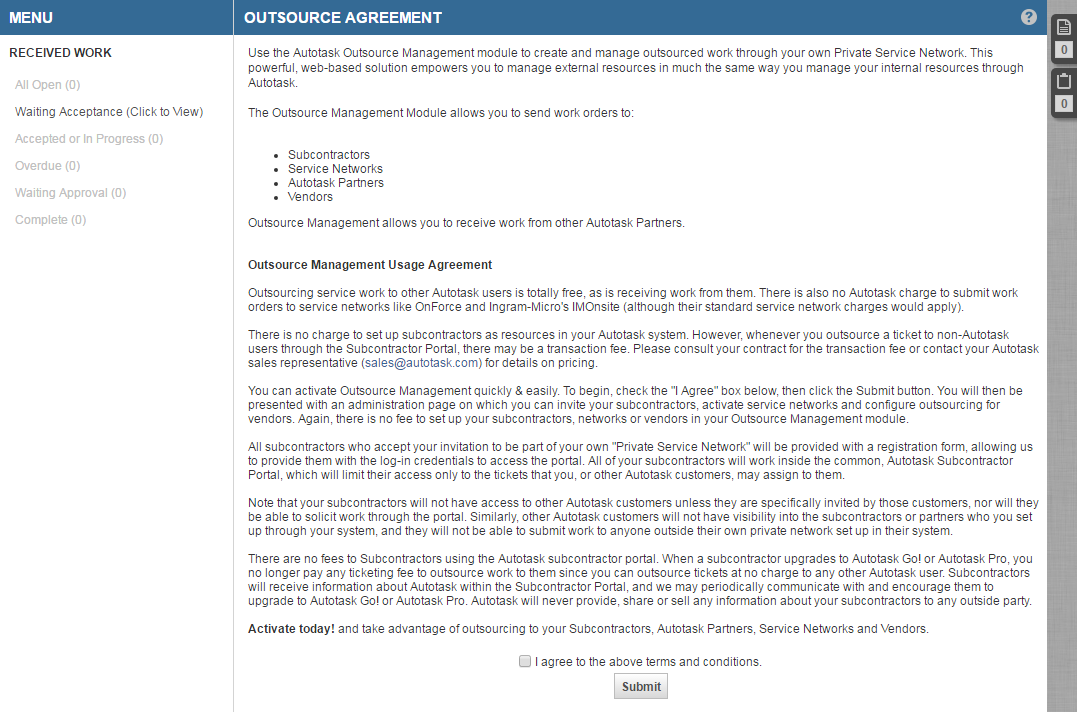
If you have not yet accepted the outsource agreement, the Outsource menu will show only one item, Dashboard, and the Dashboard will only display the Received Work options.
For your company to outsource tickets to other organizations, you must agree to the terms and conditions of the Outsource Agreement.
The organizations you outsource to do not have to use Autotask. If they do, they manage their insourced tickets in Autotask. If they are not, they can accept and manage tickets through the Subcontractor Portal.
There is no transaction charge for tickets outsourced to another Autotask customer. However, whenever you outsource a ticket to non-Autotask users through the Subcontractor Portal, there may be a transaction fee. Please consult your contract for the transaction fee or contact your Datto Account Manager for details on pricing.
How to...
All Autotask administrators can access the Outsource Agreement.
- Go to Left Navigation Menu > Outsource > Dashboard
- Check I agree to the above terms and conditions and click Submit.
- The page will update and the dashboard will now contain the Outsources Work folders, with the default Outsourced Work - All My Open page displayed. For information on the Outsourcing Dashboard, refer to Managing outsourced tickets.
After you log out and log back in, the Autotask > Outsource menu will now contain several new outsource-related selections.
Use those selections to begin inviting partners to participate, configure user permissions, and add networks to your list of outsource networks.
Once the terms of the agreement have been accepted, the Outsource agreement can be viewed by navigating to Left Navigation Menu > Outsource > Other > Outsource Agreement. The name of the resource who accepted the agreement and the date and time of acceptance are displayed.
Changes to Autotask when you accept the outsource agreement
When you accept the Outsource Agreement, you will see the following major changes in Autotask.
Outsource management configuration tasks appear in the Outsource module rather than the Admin module because outsourcing permissions allow users who are not Autotask administrators to access some outsource management administrative tasks.
NOTE All Autotask system administrators have access to all outsource management features. You cannot assign administrators a lower level outsource permission.
The following items appear in Left Navigation Menu > Outsource. If your company has not accepted the Outsource agreement, you will see only Dashboard:
| Menu Selection | Feature |
|---|---|
| Dashboard | Requires Allow Partner Management, Allow All, or administrator permissions. Allows you to manage outsourced and received (insourced) ticket lists. If you have not yet accepted the Outsource agreement, this will be the only option. Select it to view and accept the agreement. |
| Invite | Requires Allow Partner Management, Allow All, or administrator permissions. Allows you to create a list of possible partners and send an email invitation to those organizations. Refer to Inviting and managing service partners. |
| Edit Invitation | Requires Allow Partner Management, Allow All, or administrator permissions. Allows you to edit the content of the invitation sent to the potential partners that appear on the Invite Partners list. Refer to Customizing the partner invitation. |
| Outsource Networks | Requires Allow Partner Management, Allow All, or administrator permissions. Allows you to add service networks or vendors to the Outsource Network list. Refer to Adding a network or vendor. |
| Outsource Agreement |
Available to all users with access to the Outsource module. Allows you to view the Outsource agreement if your company has accepted it. The agreement displays the name of the resource that accepted it, and the acceptance date. |
| Configure User Permissions | Requires Allow All, or administrator permissions. Allows you to assign outsource permissions to resources. Note that Autotask administrators can also assign outsource permissions from the Resource Setup Security tab. Refer to Assigning outsourcing permissions. |
NOTE Tickets are outsourced from the ticket detail view.
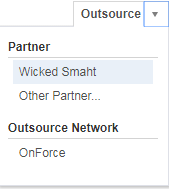
When the Outsource module has been activated, the Outsource menu appears in the menu bar at the top of the ticket detail:
Use this menu to select a partner, network, or vendor and access the outsource configuration features. Only users with permission to outsource will see the Outsource menu.
Once a ticket has been outsourced, outsource information is displayed in a bar across the top of the ticket. All users will see the outsource information, regardless of whether or not they have permission to outsource. Users with permission to outsource will also see a View Terms link that provides access to the outsource terms.
For information on changes to the Ticket page, refer to Managing outsourced tickets (Lead Partner) or Managing received tickets (Service Partner).
In addition, outsourcing fields or features appear in the following standard Autotask views:
- Resource Management: On the Security tab of the Resource Management page, a field allows administrators to assign outsourcing permissions. Refer to Assigning outsourcing permissions.
- Service Desk Workflow Rules: Attributes and notification options make it possible for outsourced and received tickets to trigger workflow rules. In addition, variables are available in notification templates that include outsourced and received ticket events in automatic notification. Refer to Using workflow rules and notifications with outsourcing.
- Reports: Autotask reports are available to allow you to track outsourced and received ticket services and transactions. Refer to Reports about outsourced tickets.


