Adding or editing a task
PERMISSIONS Permission to view projects. Refer to Project security settings.
NAVIGATION Left Navigation Menu > Projects > Search > Projects > click Search > context menu > View Project > Schedule
Tasks only exist as part of a project. To create a task, you must have access to the project. To open the page, use the path(s) in the Security and navigation section above.
You can manually enter all task data, or do one of the following:
- Select a task form template to populate fields on the New Task page. For more information, refer to Form templates.
- Copy data from a ticket. For more information, refer to Copying a ticket to a project.
- Copy an existing task using the task context menu in the project schedule. Refer to The Project Schedule page.
- Import task data from a spreadsheet. For more information, refer to Populating the Project Phases and Tasks import template.
How to...
You can add or edit a task or issue directly in the schedule table. However, you can only populate and edit the fields visible in the schedule columns. Use the Column Chooser to add the fields you need. To access all fields available for the task, use the New or Edit Task page when you add or edit a task.
While adding tasks directly to the schedule is fast and convenient, the following restrictions apply:
- Your personal profile default task category is not applied automatically
- You cannot set a task as an issue from the schedule. You must use the New/Edit Task page.
- You cannot edit the task category from the schedule
TIP To add a new task that is similar to a task in your schedule, use the context menu option New > Copy of this Task to copy the existing task, modify it as needed, and save it.
- To add the task to a specific point in the schedule, select the row right above the spot where you want to add the task.
TIP If you do not select a row, the new task row is added at the end of the schedule.
- From the New menu, select Open in Schedule > Task (Use default category), or Task (Select a task category).
If you select Task (Use default category), a new row with editable fields opens below the selected row. The category is set to the user's default and cannot be edited.
If you select Task (Select a task category), the Select a Task Category window opens. Select a category from the menu and click OK. A new row with editable fields opens below the selected row. The category is set to the your selection and cannot be edited.
- Complete all required fields and additional visible fields as needed.
- When done, click Save.
If your task is not where you want it in the schedule, you can use the Indent and Outdent commands, and drag and drop, to move the task. Refer to Indent or outdent schedule items.
- In the schedule, click the row of the task you want to edit. Do not click the Task ID.
- Edit the available fields.
NOTE Fields with a red triangle in the upper right corner are required. Required fields must have a value before you can save.
- Click Save.
TIP To modify selected fields on multiple tasks at once from the project schedule, use the Forward/Modify feature.
If you would like to create an issue, select a speed code or a form template, or simply would like to have a more comfortable interface to create a task, select the Open in "New" page option. The New or Edit Task/Issue page has a layout very similar to the Task page.
- Open the project schedule. From the New menu select Open in "New" page.
If you have set your profile settings to prompt you to select a category for new tasks, the prompt page opens.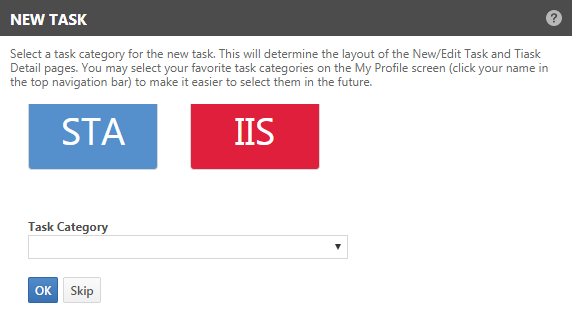
Select one of the color-coded favorites you have set up in your profile settings, or select a different category from the Task Category menu. Click OK to close the window.
If you click Skip, the window closes and the default system category is assigned to the new task.
- Complete the remaining fields and settings as described below.
- Click Save.
- Open the project schedule.
- Locate the task to edit, hover over the context menu icon and select Edit.
- Complete or modify the fields as desired and save.
NOTE You can edit Remaining Hours from the project schedule or from the Edit Task Time Entry page, but not from the New/Edit Task page. For information on Remaining Hours, refer to Estimates and remaining hours.
On the Edit Task page, you can change the category of an existing task either manually, or by applying a form template that specifies a different task category.
Changing the task category can change default field values, which fields are visible and required, what options are available for selection in pick lists, and what features are available on the task.
Before you change the category, be sure you know how the change will impact your tasks. Refer to Implications of hiding fields.
If you make changes to any fields on the New or Edit task page and you do not save them, and you then change the task category, a prompt immediately opens. You can chose to save or discard your unsaved changes before the new task category or form template is applied.
- If you click Yes, save my changes, the task is saved with the changes you made. Then the task category is applied; or, if you selected a form template, the form template, including the new task category, is applied.
- If you click No, discard my changes, the unsaved changes on the page are discarded. Then the task category is applied; or, if you selected a form template, the form template, including the new task category, is applied.
In either case, the page will reload in Edit mode with the new task category layout. Make any additional changes and then save the task.
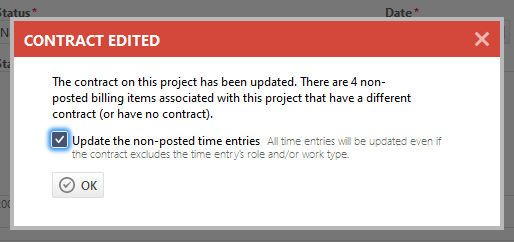
Users with the required permissions can modify task fields that will impact how the labor entered on the task is processed.
- At the project level, you can change the billing contract
- At the task level, you can change the work type
These changes may not only impact future time entries, but also any time entries that are not yet posted.
- At the project level, you can apply a new contract, but roles and work types will not be changed, even if they are excluded by the new contract.
- At the task level, updating the work type may change not only billing role modifiers, but also how unposted time entries are processed. If you select a work type that has an associated after-hours work type, and the time entry is partially or in its entirety outside of normal business hours, the after-hour work type is applied.
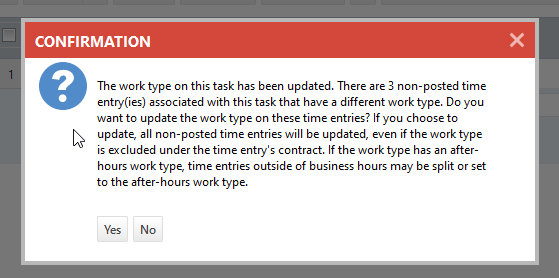
Task field descriptions
The following menu options, buttons and fields can appear on the New Task, Edit Task, and Forward/Modify Project Task pages.
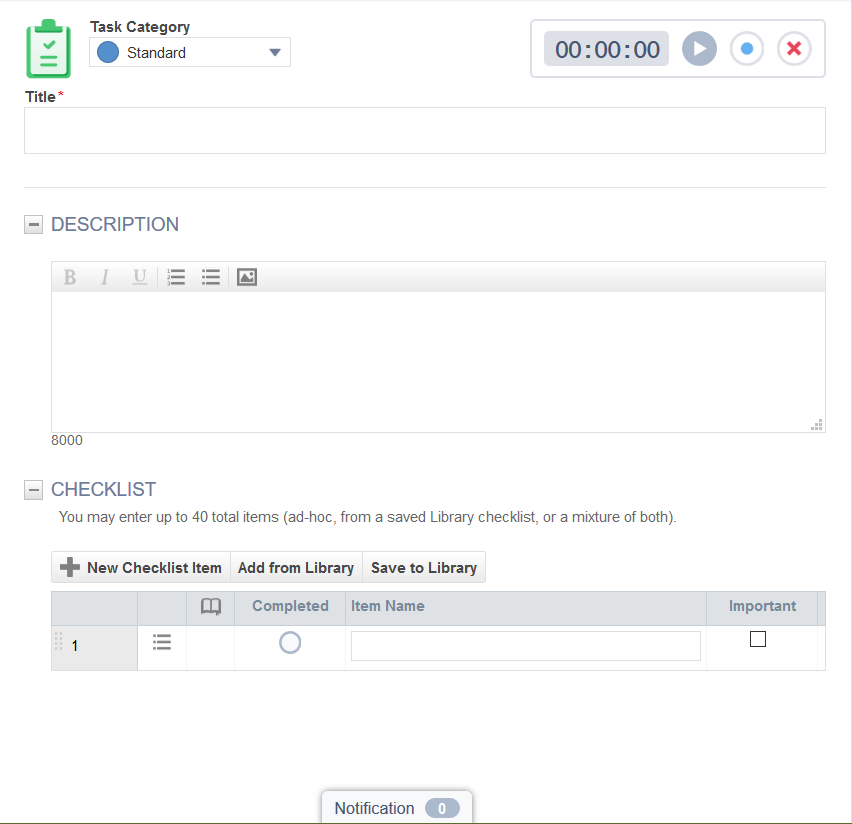
The New/Edit Task page tool bar includes the following menus and buttons:
| Menu or Button | Appears on Forward/Modify page | Description |
|---|---|---|
| Save |
|
Click to save, or click the down arrow and select Save & Close, Save and New, or Save. |
| Save & Close | Click to Save task and close the New or Edit task page. | |
| Save & ... |
|
Click to Save the task & ... Open the task's detail page for viewing. Open another New Task page Open the New Note page to add a note to the task Open the New Service Call page to associate the task with a Service Call |
| Cancel | Click to close the New/Edit Task page without saving. | |
| Cancel Task or Restore Task (on Edit Task page only) |
|
When you cancel the current task: It no longer appears in My Tasks and Tickets for the assigned resources and resources can not enter time on it. The task status is set to Complete and estimated hours set to 0. The task appears as disabled in the Project schedule but can be edited. When you restore a canceled task: All functionality is restored, but the Status and Estimated Hours are not reset to their pre-cancellation values. |
| Form Template menu |
|
Select a form template to pre-populate multiple fields on the Task page. Enter a speed code to locate a specific form template or locate the desired form template in the menu. Refer to Form templates. |
| Field | Appears on Forward/Modify page | Description |
|---|---|---|
| Task Category | On the New Task page, the category field is populated by the setting in your user profile or selected when opening the New Task page, the system default, or, a "View as" category if your security level restricts you to one category view. Refer to Project security settings. The Edit Task page displays the current category assigned to the task. Unless you are restricted by the "View as" security level setting, you can change the task category. Refer to What happens when you change the task category? |
|
| Task Stopwatch |
|
The stopwatch tracks time spent working on the tasks and can transfer that time to a task time entry. It appears on any task associated with a task category that has enabled the stopwatch. Refer to The task or ticket stopwatch. |
| Title |
Enter a title that will provide useful information when viewed in lists and the project schedule. NOTE Titles are limited to 250 characters. |
|
| Created date and created by Resource (Edit page only) |
|
Non-editable, but email resource icon is available. |
| Description |
|
Enter a description with as many details as possible so that work can begin without need for additional clarification. This field supports Rich Text. For important information and compatibility details about the Rich Text feature, refer to The Rich Text editor. Descriptions have a limit of 8000 characters. |
| Checklist |
|
The Checklist feature is always visible on add or edit. It shows in the Task only if check list items or a library checklist are added by users. Refer to The checklist. |
| Timeline (optional by task category and visible on edit page only) |
|
This feature is not editable. It can be hidden at the task category level. Refer to The task timeline. |
| Accessory Tabs: Activity, Expenses, and Service Calls (visible on Task and Edit Task only) |
|
Refer to Task accessory tabs. |
| Notification |
|
The New/Edit Task page features a notification panel that is accessed from a persistent handle at the bottom of the page. For more information, refer to Notification panel. |
The Details panel is configured on the task category assigned to the task. The category determines which fields appear in the panel, which sections contain which fields, and various field specific settings (for example, whether or not the field is required).
The following fields can appear in the Details panel.
The following fields appear in the Detail Panel header in the order listed. Organization, Project, and Status always appear and are required. Priority is not required and can be hidden at the task category level.
| Field | Appears on Forward/Modify page | Description |
|---|---|---|
| Organization | The organization that the task's project is associated with. This field cannot be edited. This name is a link to the organization's detail page, for users with security level permission to view the organization. | |
| Project | The name of the project the task is associated with. This field cannot be edited. The project name is a link to the project summary page, for users with security level permission to view the project. | |
| Status | The status of the task. The status indicates the progress of the work associated with the task. Select a new status from the menu. Menu options may be limited by the task category. When adding a task, leave Status set to New. Resources will update the status as they work on the task. When Status is changed to Complete and you click Save, the Complete Task Reason pop-up window opens. Enter a reason and Save & Close. The Reason is saved as a system note. Tasks use the same list of statuses as issues and tickets. They are specific to your instance of Autotask and are set up in Left Navigation Menu > Admin > Admin Categories > Features & Settings > Projects & Tasks >Task Statuses. |
|
|
|
This field is optional and may be hidden by the category associated with the task. Priority usually indicates the urgency of the work associated with the task. This field can be edited. TIP The previous numerical Priority field has been renamed Priority Order, and is still available. We recommend that you use either the numerical field or the new Priority field that is similar to the ticket Priority field, not both. |
The following fields, listed in alphabetical order, are available for display on the Details panel. Fields must be contained in a Section. The Task's category controls which Sections appear on the task, and what fields they contain. Sections may vary between task categories. A task category may not include all the fields listed below.
| Field | Appears on Forward/Modify page | Description |
|---|---|---|
| Change Order Hours |
|
Read only. Does not show on New Task page. |
| Client Portal Access | This field controls whether or not the task is available to contacts via the Client Portal. Make a selection from the following:
|
|
| Complete Date/Time |
|
Read only. Displays the date and time the task was completed. |
| Completed by |
|
Read only. Displays the name of the resource that completed the task. |
| Contacts |
|
Assign the task to one or more customer contacts. Select contact(s) from the data selector, or start typing the last name and select the contact from the list. The data selector displays only contacts associated with the organization associated with the task's project. Selected contacts are added to the project team and will receive emails sent using the email team members feature. A notification icon appears next to each contact's name. If the selected contact is a Client Portal user, the contact can view tasks in the portal. Contacts cannot enter time on a task. This field cannot have a default. |
| Contract |
|
Read only. Displays the Contract associated with the task's project, if there is a contract. |
| Department | Select the Department that you want to associate the task with. The department selection no longer limits the selection in the Primary and Secondary Resource selectors to resources associated with the department. Changing the department will not clear the resource field. If the task category's detail tab setting Other Options > Only allow user to assign work types that match the task's department system setting is enabled, select the Department first to populate the lists for Work Type Name. Work Type is required when assigning a resource. On the New page, if the task category specifies a default department that is active, that department populates this field. This applies if the Department field is hidden, except that Autotask does not check to see if the Project's default department is active. |
|
| Duration (days) |
|
The number of days it will take to complete the task. On Save, the task End Date is set automatically based on this amount. Or, if you specify the End Date, the duration is set automatically based on the difference between the end date and the start date. Fixed Work: When automatic calculation is not enabled, enter the duration manually. TIP To enable automatic calculation based on resource capacity, select the check box for "Use Capacity to calculate Duration for Fixed Work Tasks" on one of three pages: the Edit Project page (Summary > Options > Edit Project > Daily Capacity); the Project Settings page (Project Schedule > Actions > Project Settings) or on the toolbar on the Project Schedule page. NOTE Duration is not calculated when Estimated Hours = 0. Fixed Duration: Manually enter the number of days it will take to complete the task. For both task types, on Save, the End Date field adjusts to reflect the task duration. Project Settings for business hours and holidays are respected. NOTE If you manually adjust the End Date, on Save the duration will adjust to reflect the specified date. The maximum duration of a task is 20 years. |
| End Date/Duration or End Date |
|
The task page must display either End Date/Duration or EndDate. One of the two must be included with the visible fields. You cannot display both. If both fields are visible, or both are hidden, you cannot save the task category. End Date, whether paired with Duration or not, is required. You must specify the date the task will end. If End Date/Duration is the visible field in the task category, two separate fields, End Date and Duration appear on the task. The Duration amount is automatically calculated based on the Start Date and End Date. If the Duration field is completed first, or edited, the End Date field updates. The maximum duration of a task is 20 years. |
| Estimated (h) and Per Resource (h) |
These two fields are interdependent and which field you complete depends on the Task Type you select.
NOTE If you adjust the Estimated Hours and Remaining Hours manually in the time entry page or schedule, a message opens. You will have the option to keep the previous adjustments made to remaining hours or re-set the adjustments to 0.00. TIP In the Schedule, you can display the Estimated, Actual, and Remaining Hours columns to quickly assess the progress of phases and tasks. |
|
| Filter resources by project billing roles | This check box appears on type-ahead lists and data selectors for the Resources fields.
NOTE If you select a resource who is not currently a part of the project team, the resource will be added to the team. |
|
|
Filter Primary Resource field by project billing roles |
|
|
|
Filter Secondary Resources field by project billing roles |
|
|
|
Find Resource icon |
Launch the Find Resource wizard to help find suitable resources for the task. Resources you select with this search tool are automatically added to the task with the appropriate assignment. TIP For more information, refer to The Find Resource wizard. The Find Resource wizard requires that your company use the Resource Management Skills tab to track skills, certificates and training, and degrees for all resources, so that it can identify resources with matching skills sets. This feature is also available from the (secondary) Resources tab. |
|
| Hours per Resource |
|
The number of hours that each assigned resource will require to complete the task. This value is passed to Resource Utilization and Workload reports. Dependent on Task Type:
|
| Issue |
|
A project issue is a special kind of escalated assignment that is usually a priority. Issues usually arise unexpectedly and have the potential to delay the project. To make this item an issue, select this check box. Issues can also be created by Client Portal users, or reported by customers, in which case you may want to indicate who reported the issue. Refer to Issue Reported By, below. You can access issues in the schedule from View > Tasks and Issues > Issues. The Issue column in the schedule displays an icon to identify issues. Also refer to What is the difference between tasks and issues? |
| Issue Reported By |
|
Available only when the Issue check box is selected, for use when a customer reports the issue or creates the issue in Client Portal. Use the data selector to find the customer contact name, or start typing the last name and select from the correct name from the list. |
| Location | Click the data selector and select the location you want to associate with the task. If location is required but is not selected, the primary location of the account will be used. | |
| Phase |
|
Click the data selector and select the project phase to which you want to add the task. If a phase already appears in the field, you can either select a different phase, or click the X to clear the field. If no phase is selected, the task is added at the project level at the end of the schedule. |
| Predecessor Tasks |
|
If there are phases or other tasks or issues that should be completed before work can begin on this item, click the data selector. For details on selecting predecessor tasks, refer to Predecessor and successor tasks. |
|
Primary Resource Secondary Resources |
Set the primary resource responsible for completing the task. Select a resource from the data selector, or start typing the last name and select the contact from the list. NOTE You can have only one Primary Resource. Filter (Primary or Secondary) resources by project billing roles: select this check box to limit the selection in resource selectors for the Primary or Secondary resources to team members and roles associated with the project. NOTE If you select a resource who is not currently a part of the project team, the resource will be added to the team. TIP If the "Check Resource Availability" system setting is enabled, when you save the task, Autotask checks the primary resource's availability based on the "Hours per Resource" and Start and End Dates for the task. If the resource does not have sufficient available time, a 'Cancel and reassign or Continue' message opens. For additional information, refer to Projects system settings. TIP If this field is not required, you can leave the task assigned to the department level. Department leads can access department-level tasks on the My Tasks and Tickets page; select Display > Unassigned Department Tasks. Use the The setting "Require Department when assigning a resource(s) to tasks/issues" has been retired. |
|
| Priority Order | If your company has defined an external numeric list of task priorities, enter a priority number here. The number should indicate the relative importance of the task. The list of Priority numbers is not stored in Autotask. This field is always required. The default value is 0. If your company does not use the Priority Order field, leave the default value of 0 and then hide the field. Also refer to Priority. |
|
| Projected Variance From Estimated Hours |
|
If the task has a Projected Variance from the Estimated Hours, this read only field displays that number. Refer to Estimates and remaining hours. |
|
Purchase Order Number |
|
If the project has been assigned a Purchase Order Number, that number appears here. You can edit it. This PO Number becomes the default PO Number for labor and expenses associated with this task. It appears on invoices and a separate invoice is generated for each PO Number. If the purchase order number is changed and there are non-posted charges (change orders) or expenses associated with the task that have the original purchase order number, when you save the change, a message will appear which indicates how many items have the original PO number and will provide the option of updating all those items to the new number. |
| Secondary Resources (Role) |
|
This field is never required. Select one or more secondary resources from the selector. On the project schedule, the number of secondary resources appears in brackets after the primary Resource Name. NOTE You can have up to 57 secondary resources. Use the up and down arrow icon to move a primary resource to the Secondary Resource field. If a Primary Resource is currently assigned, that resource is moved down to the list of Secondary Resources. |
| Start Date/Time or Start Date |
|
The task page must display either Start Date/Time or Start Date. One of the two must be included with the visible fields. You cannot display both. If both fields are visible, or both are hidden, you cannot save the task category. Start Date or Start Date/Time is required. You must specify the date the task will start. If Start Date/Time is the visible field in the task category, two separate fields, Start Date and End Time appear on the task. End Date is always required, End Time is not required. The Duration amount is automatically calculated based on the Start Date and End Date. If the Duration field is completed first, or edited, the End Date field updates. Optionally, enter the date (and, when applicable, the time) that work on this task should start. If you have specified a Duration, on Save the End Date adjusts to accommodate the duration. Project settings are respected. If you manually specify an End Date and that date does not match the Duration number of days, on Save the Duration field will adjust. If the specified dates fall outside of the parent phase or overall project dates, the phase and project dates will adjust to include the task dates. NOTE If you adjust the Estimated Hours and Remaining Hours have been adjusted manually in the time entry page or schedule, a message opens. You will have the option to keep the previous adjustments made to remaining hours or re-set the adjustments to 0.00 |
| Start No Earlier Than |
|
If there is a reason why work cannot begin on this task until a specific date, enter that date in this field; for example, if the task impacts billing so work cannot begin until the second week of the month, enter the 15th of the month here. This field can be set as required or not. When required, a value must be provided. If you enter a date here, it must be > or = to the Start Date. When you populate the field, a calendar icon appears in the Alert column. The Alert message informs that the task can start no earlier than the specified date. You can click in the message to hide the alert. NOTE If you edit the task and change the Start Date, on Save the Start Date automatically populates the "Start No Earlier Than" field and the alert appears in the Alert column. |
| Task Type | Select a Task Type. This selection drives the behavior of the Estimated Hours, Duration, and Hours/Resource fields. Please review the descriptions for those fields before you complete the Schedule section. Fixed Work: the amount of work in a task is finite, and the total workload is divided between all assigned resources. Estimate the total person hours the task will require and enter that amount in the Estimated Hours field. Fixed Duration: indicates a task that runs for a set number of hours, on which several resources work at once; for example, a meeting. Estimate the number of hours you expect each resource to pend on the task and enter that number in the Hours Per Resource field. The Estimated Hours field is automatically populated with the total number of hours that will be spent on the task; that is, the Hours per Resource multiplied by the number of assigned resources. For example, if 4 resources are assigned to attend a meeting that will require 2 hours per resource, the Estimated Hours = 8. For both task types, the Hours per Resource value is passed to Resource Utilization and Workload reports. |
|
| User-Defined Fields | The task user-defined fields are available for display on the task page. They are available in the list of fields available on the Details tab of New or Edit Task Category. The UDFs are not grouped together. They appear in the list of Hidden Fields and the field name is followed by (UDF). They can be included in any Section of the Details panel. The task category settings control whether or not a UDF is required or has a default value. |
|
| Variance Hours |
|
The difference between the task's estimated hours and the actual hours. Refer to Estimates and remaining hours. |
| Work Type | Select the Work Type that best describes the work to be done. Work Types provide report data on how much time your resources spend on different activities. They also determine whether time applied against the task is billable or non-billable.
|
|
| Workload Report icon |
Click to show the availability for each resource. For more information, refer to Workload report. |
In most respects, tasks and issues are identical.
Issues differ from tasks in the following ways:
- On the project schedule, issues can be called out by selecting the Issue/Milestone Icon in the column chooser
- On the Projects dashboard, a link to all your open issues is displayed.
- Issues can also be created by Client Portal users, whereas tasks cannot.
TIP We recommend that you use tasks for the majority of your project assignments. Reserve issues for tasks that require special attention, like unforeseen tasks, or tasks that have the potential to delay a project.
NOTE Unless stated otherwise, "tasks" include both tasks and issues.
Tasks may be assigned to any of the following:
NOTE Resources or customer contacts assigned to a task automatically become members of the Project Team.
- One primary and multiple secondary resources - When you are assigned to a task as a resource, you can open the task from your My list in two places: My > Tasks and Tickets and My > Projects > View My Tasks for Project. You can enter notes and time on the task that will automatically appear on your timesheet and update the project.
- A department - If the task is assigned to a department where you are the department lead, but not assigned to any resource, you can view it on the My Tasks and Tickets list. Select Unassigned Department Tasks on the Display menu. You can enter time and notes on department tasks.
- A contact - A customer contact can be assigned to a task that requires a customer action, such as provide feedback or approval before the project can move forward. Tasks with a contact resource still have an internal primary resource; the client contact is assigned to the task as a secondary resource.
Often tasks with client team members are used in conjunction with Client Portal. In Client Portal, your client is able to complete the client task, if the task specifies that the client can complete it. For more information, refer to Overview of Client Portal and Taskfire Internal Help Desk.
NOTE The client's time spent completing the assigned client task is not recorded as project time.
TIP Even if you are not using Client Portal, the client task can be used to signify a client is responsible for the task. The internal resource will monitor the client action and complete the client tasks when appropriate. Any time applied to a client task by an internal team member is non-billable.
You can create a link between the task that is currently open in the New/Edit Task page or schedule row, and another task or issue. This task is called the predecessor task.
TIP When working with predecessor tasks, the Predecessors and Number of Successors columns ensure that all users are aware of dependencies between schedule items.
- Make sure the Predecessors (Lag days) column is displayed on the schedule table.

On the New/Edit Task page, scroll to the Predecessors field.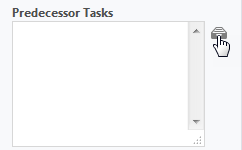
- Click the icon to open the Predecessor page.
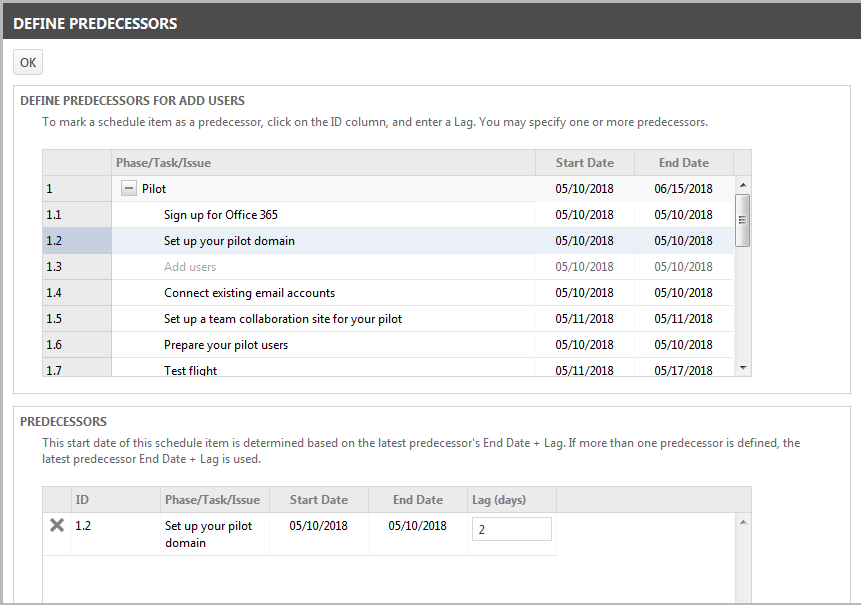
- The Define Predecessors dialog box opens.
- Under Define Predecessors, click the ID column to select the predecessor(s) for the task.
The selected items are added to the list in lower half of the page.
- Specify the Lag in days.
The lag is the number of days between the End Date of the predecessor and the Start Date of the linked task.
- To remove a predecessor, click X.
- Click OK.
If you have selected a predecessor task that will create a circular reference, for example, the new predecessor task is already a successor to the task selected as a predecessor, a warning message opens. Select another schedule item.
- The Start Date of the current task is changed to the End Date of the latest predecessor schedule item, plus the specified number of lag days between the two tasks.
EXAMPLE For example, add or edit Task B and select Task A as a predecessor. Assign a lag of 1 day. The End Date of Task A is 4/30/2022, so the Start Date for Task B is set to May 2, 2022, that is, there is 1 day, May 1, between the End Date of Task A and the start date of Task B.
TIP To set Task B to start the day after Task A ends, set the Lag to 0, that is, no days between. To set Task B to start the same day that Task A ends, set the lag to -1.
Any changes to task or issue dates will impact the dates of any other tasks or issues that are linked to the item, along with phases that contain the tasks and items. If the adjustments to tasks, issues, or phases cause dates to fall outside of the project dates, the project dates also adjust.
- The Predecessors column displays the ID numbers for each predecessor task or issue, as well as (in parentheses) the number of lag days.

- The Timeline section on the Task page shows the links between the current task and its predecessors and successors.
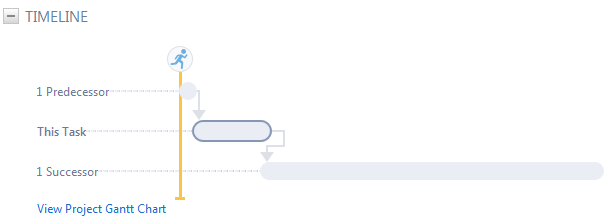
- In the The Gantt chart (timeline view), a thin line connects linked items. An arrow at one end shows the direction of the dependency.
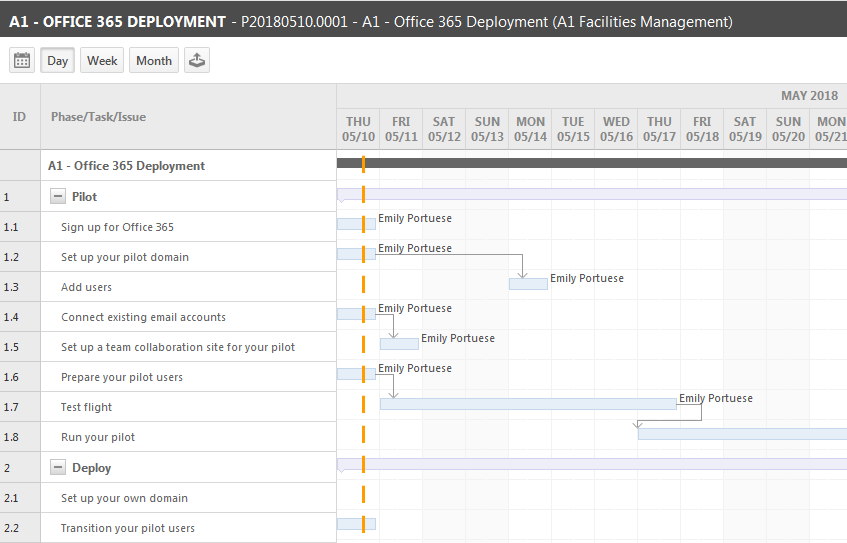
- When the predecessor task is completed, a notification email is automatically sent to all resources who are assigned to the current task.
- If you complete a task before you complete one or more predecessor tasks, an icon appears in the Alert column. Click the icon to open the alert. The alert includes an option to disassociate the completed task from incomplete predecessors and/or all successor tasks. For more on alerts, refer to Alerts.
However:
NOTE The "Start No Earlier Than" field does not automatically update when predecessor dates change.
TIP When you slide items in the schedule, predecessor and successor task dates do not update. Refer to Sliding the project schedule.
Best Practice:
TIP A predecessor task can have a later end date than the successor task. But some projects require tasks to be completed in a specific order. The second task (successor) can occur only after the first task is completed. To prevent resources from entering time on a task before the End Date of another task, set the task's Start No Earlier Than field to the day after the End Date of the predecessor task.
TIP Workflow rules for project tasks include an Action to change the status of successor tasks. Use this option to create a rule that automatically updates successor tasks when the predecessor task is set to Complete. Update the successors to a status that indicates that resources can now work on the tasks. The rule can also include a notification to the project team. Refer to Adding, editing, and copying workflow rules.
The New and Edit Task pages feature a notification panel that is accessed from a persistent handle at the bottom of the page.
For more information, refer to Notification panel.
Accessory tabs
Refer to Task accessory tabs.
