Adding, editing, or copying a resource
PERMISSIONS Security level with Admin permission to configure Resources/Users (HR). Refer to Admin security settings.
NAVIGATION Left Navigation Menu > Admin > Admin Categories > Organization Settings & Users > Resources/Users (HR) > Resources/Users (HR) > Resources/Users > New > New Resource
NAVIGATION Left Navigation Menu > Admin > Organization Settings & Users > Resources/Users (HR) > Resources/Users (HR) > License Management > New > Resource
NOTE Set up resources who will be timesheet and expense report approvers first, beginning with the highest level approver. They will be assigned as approvers when you set up the other resources.
IMPORTANT
To preserve data integrity, resources cannot be deleted from Autotask. Consider this when adding a resource.
For information on adding a co-managing user or an API user, refer to Adding or editing a co-managing user and Adding or editing an API user.
To add or edit an internal resource to your Autotask instance, do the following:
- To open the page, use the path(s) in the Security and navigation section above.
- To add: On the Resources page, click New.
TIP If the new resource shares similar information with an existing resource, you can start with a copy of the existing resource. Refer to Copying a resource.
To edit: Locate the resource to edit. From the context menu, select Edit.
- For a new resource, populate all required fields on the General, Security, HR, Approvers, and Associations tabs.
For an existing resource, edit fields as needed.
NOTE Tabs with a red asterisk contain fields that must be populated before the resource can be saved.
- Click Save.
New Autotask users who will use Two-factor Authentication (2FA) to log in will receive a verification email that allows them to complete the setup of their user account. Refer to Creating a password and enabling two-factor authentication (2FA) .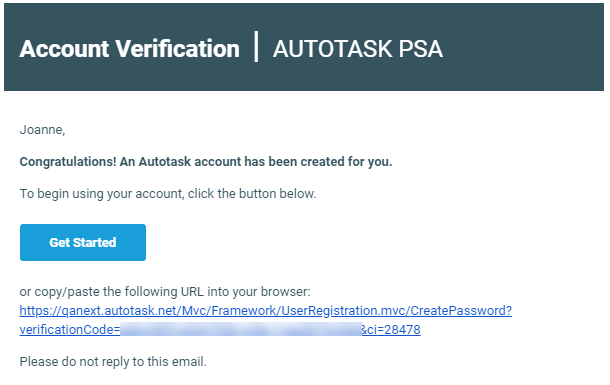
IMPORTANT Users who will be using Single Sign-on (SSO) will not receive a verification email. Their authentication is handled through their identity provider.
Complete the General tab
¹ Indicates the field is copied when you copy the resource. Refer to Copying a resource.
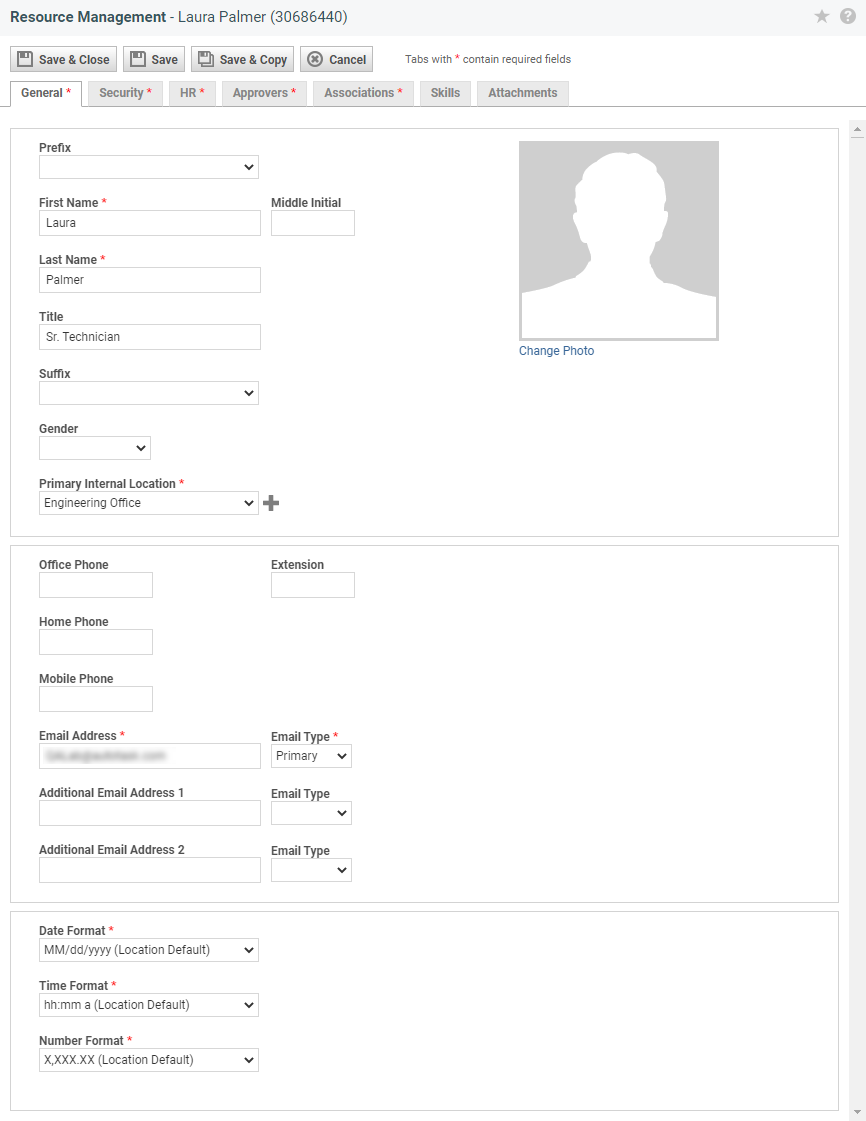
Field Description Personal Information Fields Complete the required First and Last Name fields and, if desired, select a Prefix, enter a Middle Name, Title,1 and Suffix, and select a Gender1. Primary Internal Location1 Select a Primary Internal Location, or add a new one. The Primary Internal Location is usually the office or facility the resource reports to. This selection drives the holiday set that is applied to the resource and the date and time setting defaults. Refer to Internal locations. Phone Numbers Enter office, home, and mobile phone numbers. Email Addresses Specify up to three email addresses and assign a type to each address. Email type choices are Primary, Secondary, Mobile, SMS (short message service), and Pager. At least one email and corresponding email type are required. To send a short message or text to a mobile phone, use the carrier-specific format mobilenumber@carrier.com. For example: 1234567890@vtext.com. SMS messages can be used in workflow rule notifications. The email maximum character length is 254.
A verification email is sent to the resource's Primary email address when the new resource is saved or when the Primary email address is changed. The verification email includes a Get Started (new user) or Confirm My Email (updated email address) button, as well as a URL that resources can paste into a browser.
If the email is more than 24 hours old or invalid, an Invalid/Expired page appears. Users are able to resend the verification email from this page.
IMPORTANT Resources must verify the email address before they can log in to Autotask. For email changes, the original address will remain in the Email field and Pending change to xxxxx@xxxxx.xxx will appear next to it. While the change is pending, all communications sent by Autotask will continue to go to the original email address. This includes notifications, LiveReports, and security event notifications.
Date, Time, and Number Formats1 Specify local settings for date, time, and number formats. These fields are required, but default to those of the primary internal location of the resource. The selected formats affect display only. Expense Reimbursement Currency (only displayed if Multi-currency is enabled) If multi-currency is enabled, each user will have a default reimbursement currency. This is normally the currency of the country they live in. This currency is the default for all new expense reports that this user creates.
This field defaults to the internal currency and contains all active currencies, listed by their three-letter currency name.If you have integrated with QuickBooks and the Require all expense reports created by a resource to be reimbursed in the same currency, and prevent a resource's reimbursement currency from being changed (Must be enabled when using QuickBooks integrations) setting is enabled, this field will be disabled when you are editing an existing resource. It will be enabled when you create a new resource.
Photo Optionally, click Change Photo to open the New Photo window to add a photo image. Upload the photo and click Save & Close. The size limit is 4 MB. Survey Results If the Survey feature is in use, the resource's Survey Rating will appear below the photo once the resource record is saved and customer surveys that impact this rating have been completed.
Complete the Security tab
1 Indicates the field is copied when you copy the resource.
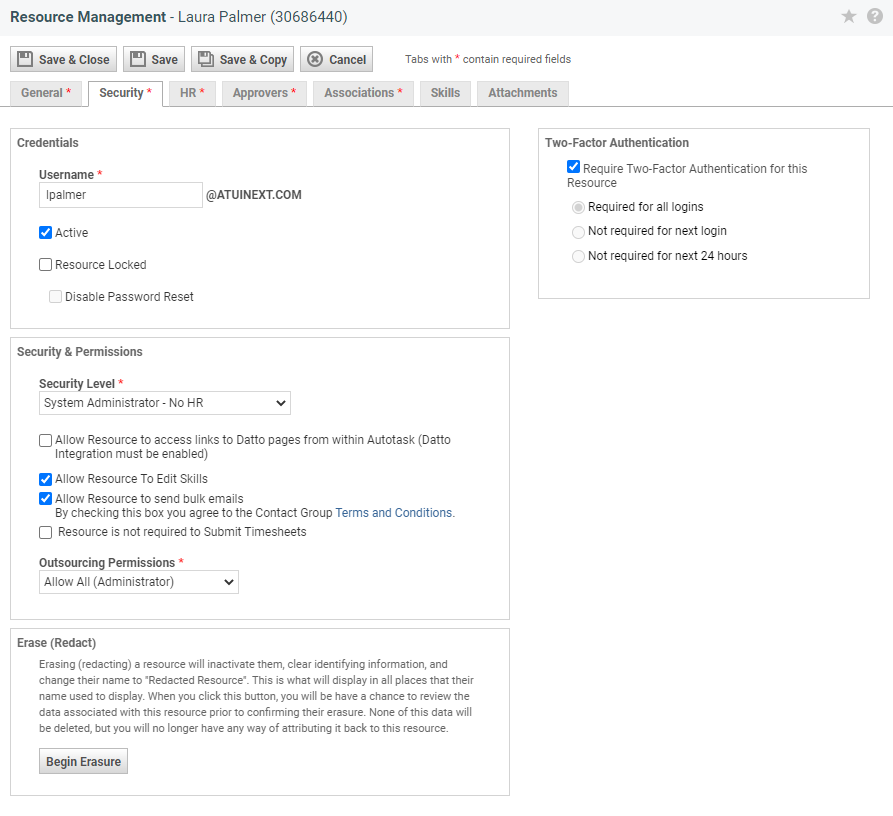
Field Description Credentials Username Displays the username required for logging into Autotask. It defaults to the first letter of the resource's first name and the last name in lowercase with no spaces. For example, the username for Dave Smith would be "dsmith."
- You can change the Username field to avoid duplicates. The username must be letters and numbers only. Special characters (e.g. [!], or [+]) are not supported.
- When you save a resource, if the resource name already exists in the system, a message will indicate that you must enter a different username before you can save the resource.
- The username is limited to 32 characters.
TIP Your Autotask domain name appears to the right of the field. The full name needed to log into Autotask is username@yourdomain.com.
Resend Welcome Email
(2FA authentication only)This button is available for new resources who have not yet verified their email address. The verification email is sent automatically when you initially create and save the resource. The button is grayed out until you save the resource. You may want to resend the welcome message when a new user is reporting he or she cannot log in to Autotask.
NOTE For security reasons, the resource's username will not be included in the verification email. You will need to send the username to the resource using another method. The username is required for log in.
Active The resource is active by default. If you do not want the new resource to be immediately active, clear the check box. For more information on the impact of deactivating resources and what to do when a resource leaves the organization, refer to Inactivating and activating resources. Resource Locked Refer to Unlocking a resource. Disable Password Reset
Select the check box to block the resource's ability to reset his or her password from the Login page, the Profile page, and the Welcome email. This is a security measure for terminated employees.
Security & Permissions Security Level1 Select a security level to control which Autotask features the resource can access. Autotask comes with a set of default security levels and your administrator can then add customized security levels to provide permission to access selected features. For additional information on security levels, refer to System security levels and Creating or editing a custom security level.
When creating a Dashboard User, refer to Configuring a dashboard user account.
NOTE If you select a co-managed security level for a user, it will convert them to a co-managing user, and this cannot be undone. The co-managing user will also need to be associated with a contact record at a customer account.
Allow Resource to access links to Datto pages from within Autotask
(Datto BCDR integration only)
This check box determines whether an individual resource will be able to see the icon links to Datto pages on the Ticket Insight and Device pages. Refer to Resource permissions for the Advanced Datto BCDR Integration. It does not enable the Datto Integration for the resource. The integration is enabled on the Advanced Datto Integration page (Left Navigation Menu > Admin > Admin Categories > Extensions & Integrations > Datto BCDR > Advanced Datto Integration.)
Disabled by default.Allow Resource to access links to Datto RMM pages from within Autotask
(Datto RMM integration only)
This check box determines whether an individual resource will be able to see the Datto RMM links on the Ticket page, Device pages, and the Autotask menu. This option is enabled for Administrators but disabled for all other security levels.
Access to Datto RMM can also be enabled from the Datto RMM Integration page. Refer to Resource permissions for the Datto RMM Integration.Allow Resource to Edit Skills Select the check box to allow the resource to maintain his or her Skills profile, including skills, skill levels, education, certifications, and training, and to attach a resume to his or her profile.
Anytime a user makes any changes to their profile on the General or Skills tab, a notification email is sent to all timesheet approvers, department heads, and workgroup leads the user is associated with.Allow Resource to send bulk emails1 Select this check box to allow this resource to send bulk emails from the Contact Group Manager. NOTE All resources with permission to send contact group emails must comply with the Contact Group Terms and Conditions of Use. As an administrator, you are responsible for ensuring that resources have read and agreed to the terms and conditions before they begin using the contact group email feature and you are responsible for the actions of any resource to whom you assign bulk email permission. For additional information, refer to Assigning bulk email permission.
Resource is not required to submit Timesheets By default, all resources are required to submit timesheets. Resources who do not submit their timesheets will appear on the Daily Alerts > Timesheets section.
If you have resources who do not submit timesheets (for example, your CEO), you can select this check box so alerts that clutter up the Daily Alerts will not be generated for this resource.
Note that even users who do not have to submit a timesheet will need a timesheet approver so time off requests can be processed.
Outsourcing Permissions1 If your company will be using Outsourcing, select a permission level in the Outsourcing Permissions field. Refer to Assigning outsourcing permissions. Erase
Erase (Redact) This section will allow you to remove all information from a resource record in your Autotask instance that could identify a natural person. The first and last name will be replaced by Redacted Resource. Click Begin Erasure to start the process. Refer to Erasing (redacting) contacts and resources. Two-Factor Authentication
Two-Factor Authentication (2FA) 2FA cannot be disabled, but you are able to pause it for a resource who has changed or lost their mobile device.
Single Sign-On (OpenID Connect)
Single Sign-On (OpenID Connect) This section is only displayed if single sign-on using OpenID Connect is enabled for selected resources.
If the feature is enabled, the Unique ID field is required. Refer to Configuring single sign-on using the OpenID Connect standard.KaseyaOne Connection
KaseyaOne User ID This section displays the KaseyaOne User ID of the resource after the resource has logged into Autotask through KaseyaOne. Click Disconnect User to clear the KaseyaOne User ID of the selected resource.
Complete the HR tab
1 Indicates the field is copied when you copy the resource. Note that in a copy, Hire Date, Timesheet Start Date, Effective Date, and Internal Cost default to today's date.
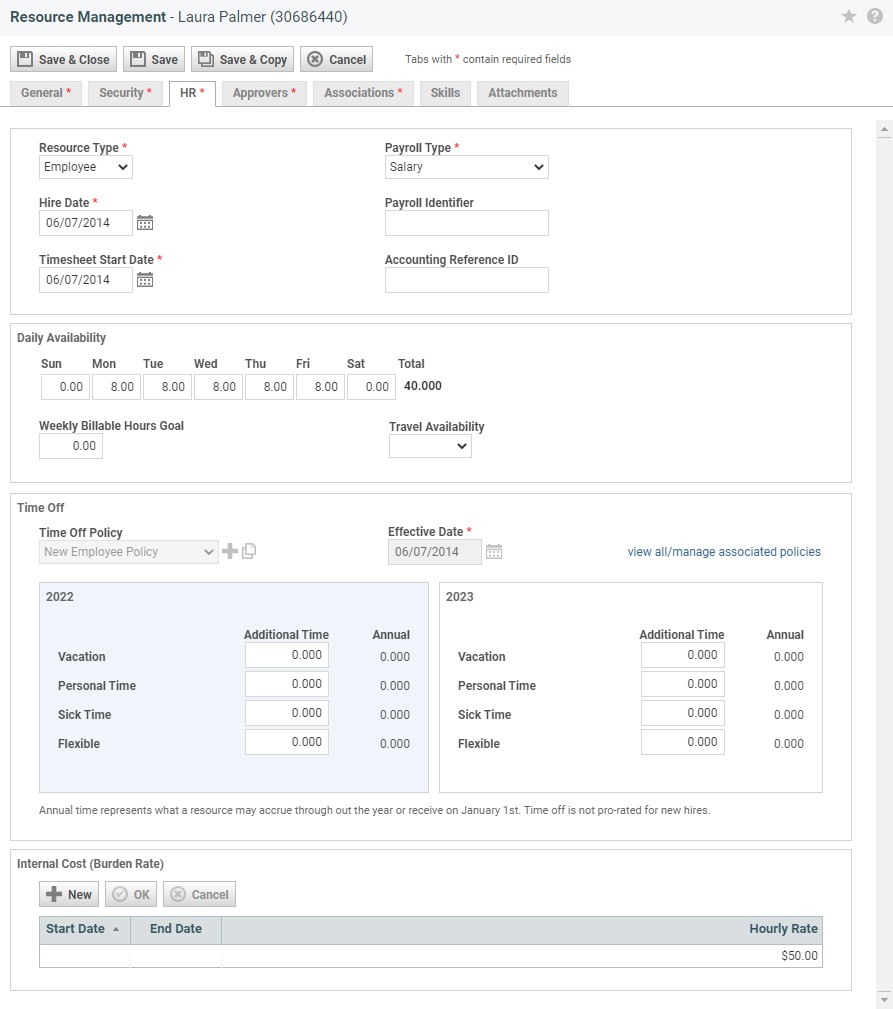
Field Description Resource Area Resource Type1 Select Employee or Contractor. NOTE Hours worked by contractors will not appear on the Payroll Summary report.
Hire Date The date on which the resource started work. This will default to the date on which the resource's record was created in Autotask, but it can be adjusted to the actual hire date. NOTE This field is used by Autotask to determine the resource's eligibility for Time Off Policy tiers. You can adjust the Hire Date to associate a resource with a different tier.
If the resource is deactivated and then reactivated (for example, rehired), the system will calculate the time they would have earned in the interim. To re-set the resource's time-off calculations, populate Hire Date with the date the resource returns to work.
If Hire Date is changed mid-year, you will be prompted to accept updates to the resource's Annual Hours for this year, and the recalculating of their accrued and current balances.
Timesheet Start Date The date on which the resource can start entering time on their timesheet. This will default to the hire date but can be adjusted for resources who were employed before Autotask was instituted. This date cannot be earlier than the hire date.
Best Practice: For existing resources, the timesheet start date should be the date when they are expected to start time tracking, not the hire date. That way, resources are not required to submit empty timesheets that predate the availability of Autotask.
Payroll Type1 The type (Contractor, Hourly, Salary, or Salary Non-exempt) that describes the payment system for the resource. Payroll Identifier A unique identifier that is used when exporting payroll data to an external application. Accounting Reference ID The accounting reference ID (such as your accounting system vendor name) for the resource. This ID will be applied to expense reports. For more information, refer to Adding or editing an expense report. Availability Area Daily Availability1 The number of hours the resource is available for work each day. Autotask uses these numbers to form a baseline for the resource's availability in a standard work week. This can be used for resource utilization and workload reports, which help managers to maximize resource assignments and monitor workloads. Weekly Billable Hours Goal1 The billable hours goal for the resource can be established to track how billable a resource is in a specific time frame. For more information, refer to Establishing weekly billable hours goals. Travel Availability1 The percentage of the work week the resource is expected to travel. NOTE If the resource spends considerable time in transit (which cannot be billed to the customer), the Weekly Billable Hours Goal should be adjusted.
Time-off Area View All/Manage Associated Policies This link is available only when the resource is being edited.
Click to access the Policy Assignment History page to associate this resource with a policy and view the resource's policy history.
For more information, refer to Policy assignment history.
Time Off Policy1 When you are creating a new resource, the field is populated with the default time-off policy if one was specified, or the None policy if there is no default policy.
- Click the drop-down menu to select a time-off policy from the list.
- Click the + sign to create a new policy for this resource.
- Click the copy icon
to copy an existing policy and modify it for this resource.
NOTE This field is view-only when the resource is being edited. Click the View All/Manage Associated Policies link to associate another policy or change the effective date.
NOTE If you edit or copy an inactive resource, the View All/Manage Associated Policies link is not available. You cannot change or edit the time-off policy for a resource created by copying an inactive resource, even after you have saved and activated the resource.
Effective Date When you are creating a new resource, enter an effective date for the selected time-off policy. NOTE The effective date cannot be earlier than the hire date. Changing the policy and effective date creates a new association for the resource.
This field is view-only when the resource is being edited. Click the View All/Manage Associated Policies link to associate another policy or change the effective date.Additional Time Use these fields to make adjustments to your existing resources' time-off policies, set up time off schemes for new hires that start work after January 1, and adjust policy associations that require modifications to the default.
These fields are enabled when:
An active policy for an active resource is selected in the time off policy drop-down menu.
A resource is being created.
NOTE If a resource is inactive, these fields cannot be changed.
Using the Additional Time fields:
• If a value is entered in an Additional Time field for the current year, it will be added to the resource's current balance for that policy.
• When time is entered or changed, it will be stored for 01/01/YYYY and the resource’s time off will be recalculated from that date through this year and next, or just next year if the additional time was entered for next year.
Additional Time will:
• Preserve, for the current year, any additional time hours that were entered during the previous year.
• Be equal to any unused time up to the rollover cap as specified by the tier for which the resource is eligible on January 1 (based on hire date).
• Cause the resource's current balance hours to be recalculated, if additional time hours are adjusted after January 1.
Additional Time will NOT:
• Adjust when the Policy is changed.
• Include Rollover Cap hours. Rollover Cap hours are immediately added to a resource's balance on January 1.
• Affect the Rollover Cap amount but will change the resource's Current Balance.
When this page updates on January 1 at midnight, the system will calculate the Additional Time and Annual Hours amounts for the new year and the following year. Additional Time for the current year will not change; it will remain whatever was entered in the Additional Time fields. When the system updates:
• Allotment-type Policy: If a Rollover Cap is specified, the system will determine the number of hours that can roll over and add them to the resource's Current Balance for the year, not to the Additional Time displayed on this page.
• Accrual-type Policy: It will consider the Accrual Rate and any tier changes they are eligible for during the year, and then calculate the number of hours that the resource can accrue during that calendar year.
The Annual fields are read-only and display the number of time-off hours (by policy) the resource has as of the current day. If a resource is associated with more than one policy in a year, Annual will be equal to what they have accrued and what they can accrue during the time they are associated with the policy.NOTE The Additional Time fields are linked to System Settings > Timesheets settings and are disabled if the associated system setting is disabled. For information on system settings, refer to Timesheets system settings.
Internal Cost (Burden Rate) Area (requires permission to view resource internal costs ) Internal Cost1
(copies active rate only)Specify the internal cost of the resource. The hourly rate you enter here is used throughout Autotask to calculate the cost of work that has been performed and impacts profitability. NOTE You must enter a rate when creating a resource, but it is possible to enter 0.00.
You can add, edit, and delete rates.
• To add a rate, click New and specify a start date and hourly rate.
• To delete a rate, right-click it and select Delete Rate.
• To edit a rate, right-click it and select Edit Rate. Edit the start date and/or hourly rate.NOTE If you create a resource and do not have access to this area, a default rate populates the field.
If you copy an existing resource, the internal cost will be copied to the new resource.
If you create a new resource, the internal cost will be populated with 0.00.
Start Dates:
• The Start Date for the initial Internal Cost rate will always default to a preset system date far back in time. This ensures that any time entry added or imported into your Autotask instance will fall under a valid Internal Cost. This date is not meaningful to the user so it does not display.
• Start Dates for any additional Internal Cost rates are entered in the (required) Start Date field. They display in the Internal Cost row and are used to calculate the End Date of the previously added Internal Cost rate.
End Dates:
• The first Internal Cost rate does not have an end date. When you add additional Internal Cost rates, the End Date is automatically calculated as [one day before the new rate takes effect].
• The End Date of the last Internal Cost rate is undetermined, so it defaults to a preset system date far into the future. This date is not meaningful to the user so it never displays.
Complete the Approvers tab
1 Indicates the field is copied when you copy the resource.
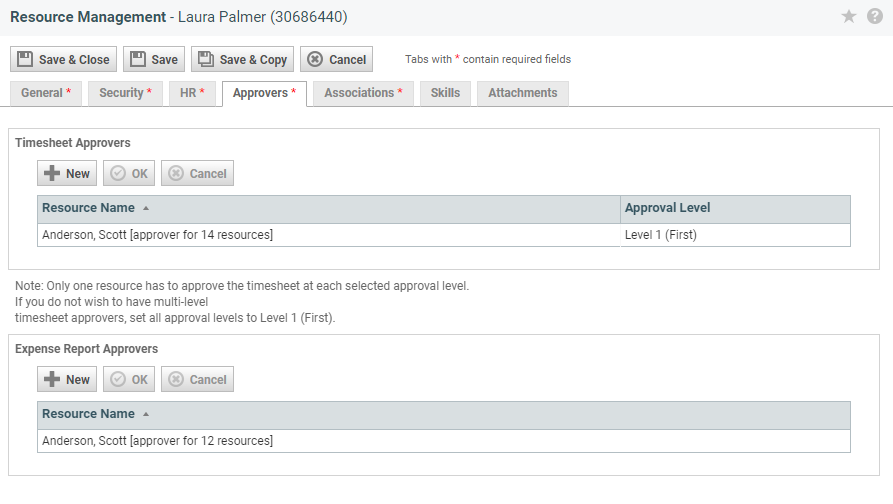
Field Description Timesheet Approvers Resource Name1 Select the resources you want to specify as approvers from the Resource Name drop-down list.
All resources that approve timesheets for one or more resources will be grouped at the top of the drop-down list. The number following their names indicates how many resources they currently approve. All other active resources will be grouped at the bottom of the list. Names will be sorted alphabetically by last name within both groups. For more information refer to Adding timesheet approvers.Approval Level1 Select Approval Level 1, 2, or 3. This number specifies the approval tier for the approver. Note that you do not have to specify approver levels in order, that is, you can set a resource as a Level 2 approver before you specify a Level 1 approver. Expense Report Approvers Resource Name1 Select the resources you want to specify as an approver from the Resource Name drop-down list.
All resources that approve expense reports for one or more resources will be grouped at the top of the drop-down list. The number following their names indicates how many resources they currently approve. All other active resources will be grouped at the bottom of the list. Names will be sorted alphabetically by last name within both groups. For more information refer to Adding expense report approvers.
Complete the Associations tab
1 Indicates the field is copied when you copy the resource.
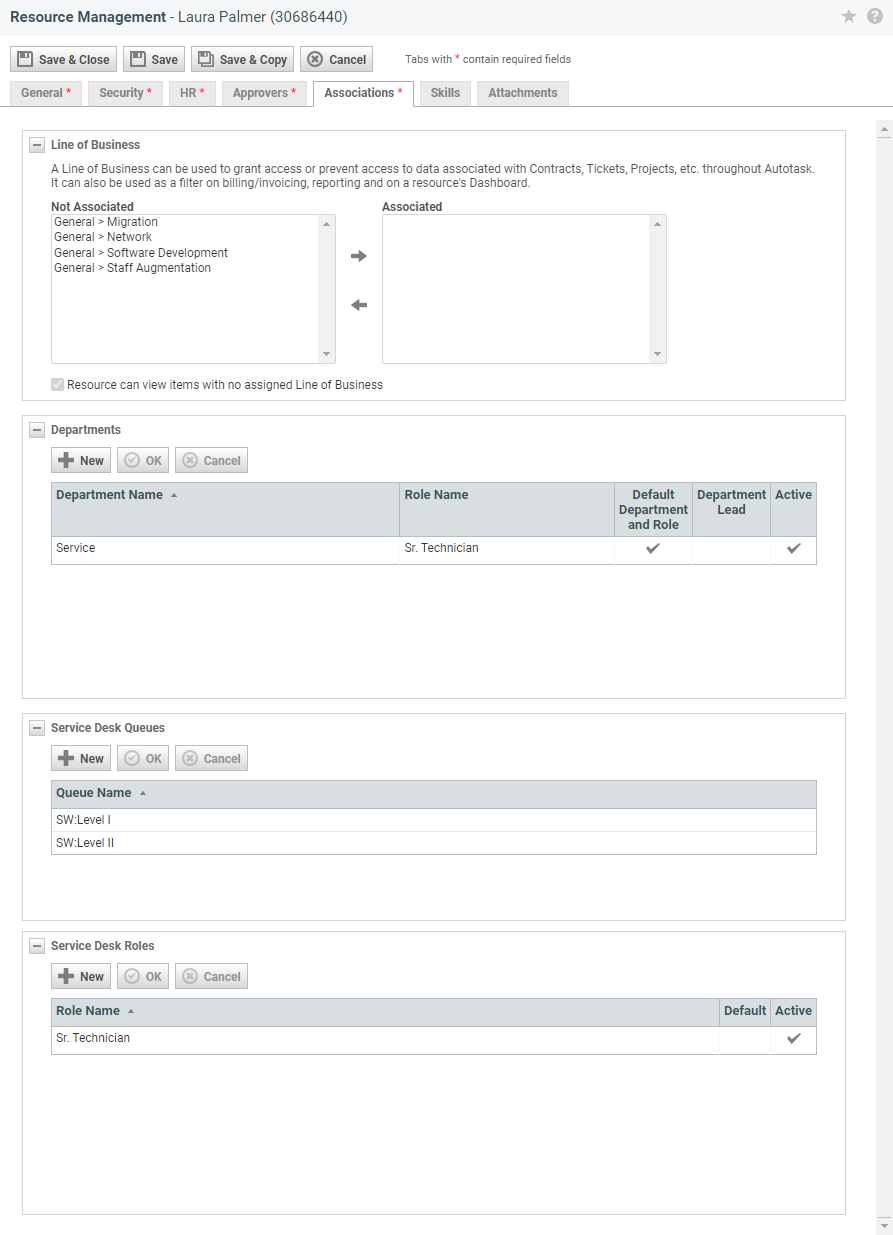
Field Description Line of Business A line of business can be used to grant access or prevent access to data associated with contracts, tickets, projects, etc. throughout Autotask. It can also be used as a filter on billing/invoicing, reporting, and on a resource's dashboard.
The Line of Business section will only be displayed if the Organizational Structure feature is enabled. Refer to Setting up organizational structure.
Not Associated / Associated Refer to Associate a user with a line of business on the Resource page. Resource can view items with no assigned Line of Business
This setting is checked and disabled if no lines of business are associated with this user, giving them access to all data in your Autotask instance within the limits of their security level.
If the user is associated with one or more lines of business, the setting is checked and enabled. You can clear the setting and prevent the user from accessing data that has no associated line of business, effectively limiting them to only the line(s) of business selected in the Associated pane right above.
Departments Resources you assign to a task can be filtered by department.
If you would like to filter primary resources by department when you create or edit a ticket, you must add a service desk role to the Department Role list, that is, the same role must be listed on both the Departments and the Service Desk Roles list.
Department Name1 Click New and select a department to add this resource to. New If the department you want does not appear in the list, you can click New to add a department. Refer to Departments. Role Name1 Select the role you want to associate the resource with for this department. If the Role does not appear in the list, you can click New to add a role. Refer to Adding billing roles.
A resource can be associated multiple times with the same department using different roles.Default Department and Role1 Click to select the Default check box for the resource's Default Department and Role. Department Lead1 Select if this resource is the department lead. Note that Department Leads have visibility of all projects any member of their department is involved in. It is possible to name multiple department leads. Active1 Clear this box to deactivate this Department/Role combination. The role will no longer be available for project work associated with this department, but existing labor entries will not be changed. Service Desk Queues Queues help to manage tickets. Resources associated with a queue monitor the queue and respond to the tickets placed into the queue. To work on tickets, resources must be assigned to at least one queue.
The My > Workspace & Queues page will display all queues resources are directly associated with.IMPORTANT Queues, however, do not limit a user's visibility of tickets. When you assign a resource to even one queue, the default setting will give them access to all tickets in your Autotask instance. To limit access, you must assign them a security level with restricted ticket object permissions. Refer to Service Desk security settings.
Queue Name1 Select a Service Desk Queue. If the queue that you want does not appear in the list, you can click the New link to add a queue. Refer to Service Desk queues. Service Desk Roles Role Name1
Select a Service Desk Role. If the role you want does not appear in the list, you can click New to add a role.
Roles that have been used on tickets cannot be edited or deleted.
Default1 If this will be the default Service Desk Role for the resource, click to select the Default check box. This is the role that will be applied when the resource accepts or is assigned a ticket. Refer to Assign or claim tickets. Active1 Clear this check box to deactivate this role. The role will no longer be available for ticket work going forward, but existing labor entries will not be changed.
Complete the Skills tab
1 Indicates the field is copied when you copy the resource.
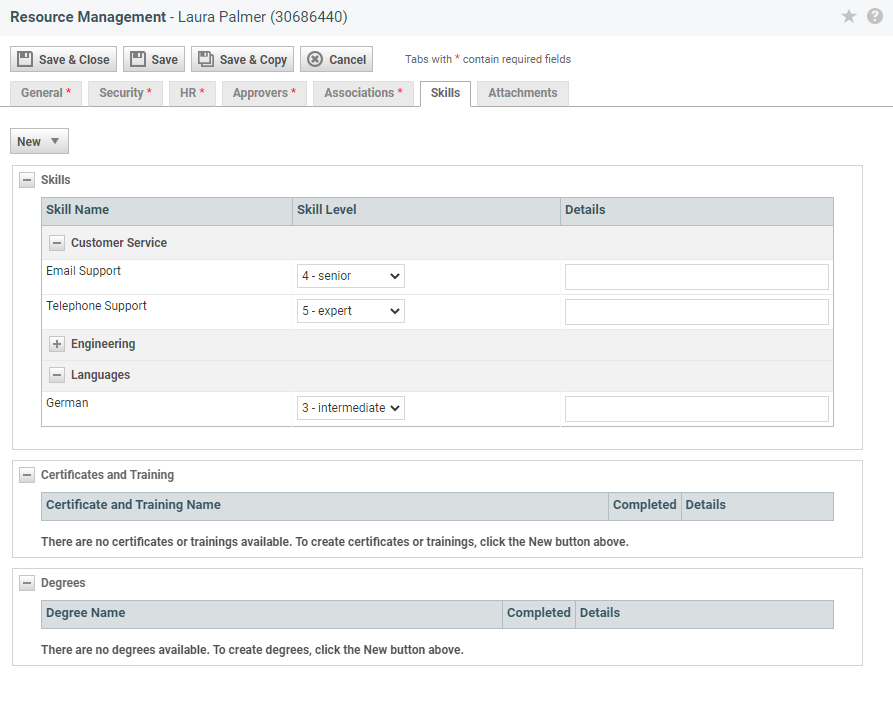
Field Description Skills, Certificates and Training, and Degrees headings Click + to expand the Skills, Certificates and Training, and Degrees headings to display the lists. Click - to collapse sections as needed. Skill Categories, Certificate and Training Categories, Degree Categories Expand the categories to review the lists of Skills, Certificates and Training, and Degrees. Skill Name1, Certificate and Training Name1, Degree Name1 Select the ones that apply to the this resource.
Administrators can go to Left Navigation Menu > Admin > Admin Categories > Organization Settings & Users > Resources/Users (HR) > Resources/Users (HR) > Resources/Users > Skills (or Certificates and Training, or Degrees) to add and manage the selection of skills and experience that are important to your business. If you are not familiar with Skills and Resource Setup > Skills, refer to Managing certificates, degrees and skills before adding options.Skill Level1 For Skills, select the skill level: 0 - None, 1 - novice, 2 - junior, 3 - intermediate, 4 - senior, 5 - expert. Completed1 If the resource has completed a listed certificate or training, or degree, select the appropriate box. Details1 Optionally, complete the Details field for the skill, certificate, or degree to provide clarification.
Complete the Attachments tab
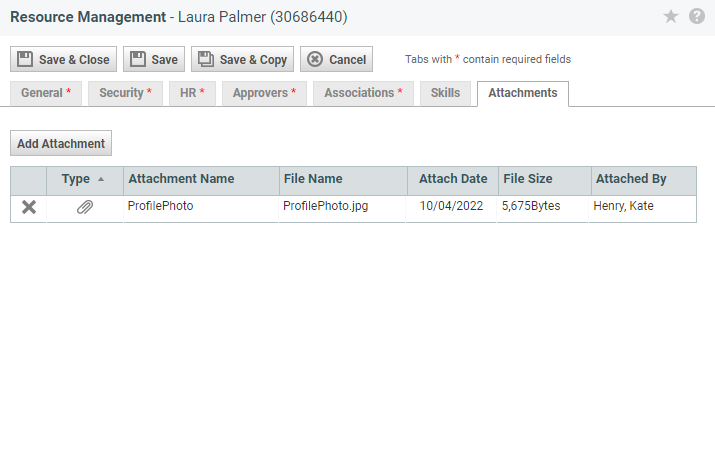
- Click Add Attachment.
- On the File Attachment page, specify the Attachment Type, browse for a file or folder, or enter a file path or URL, and enter an attachment name. For details on Attachment Types, file size limits and acceptable types, refer to Adding and managing attachments.
- Click Save & Close or Save and New.
NOTE Attachments will not be uploaded until you save the Resource page.
When you copy a Resource page, a new page is created with a number of fields on multiple tabs populated with non-personal information from the existing resource. To learn which fields are copied, review the tab descriptions above. In the descriptions, copied fields are followed by 1.
EXAMPLE When you add a resource whose non-personal settings are similar to an existing resource, you can save time by copying the existing resource's Management page.
Or, if you are adding more than one resource at the same time and they share similar information, you can complete one new Resource Management page and then copy it.
- Create a copy of the Resource Management page.
From the main list of resources ( Left Navigation Menu > Admin > Admin Categories > Organization Settings & Users > Resources/Users (HR) > Resources/Users (HR) > Resources/Users), locate the resource to copy. From the context menu, select Copy.
Or complete a Resource Management page, or edit an existing Resource Management page, and click Save & Copy.
- Complete or edit fields in the copy as necessary to personalize it for the new resource.
- Save the new resource or save and copy to create another resource.
NOTE When you copy a resource who is enabled for AuthAnvil Two-Factor Authentication, the radio button selection, server, and site ID are copied. If you use an authentication app for 2FA, settings are not copied or defaulted.
If the Disable Password Reset check box is not selected, users can unlock their own accounts by clicking the Forgot password link on the log in page.
If Disable Password Reset is selected and a user has been locked out because of repeated unsuccessful log in attempts, an administrator can unlock the account by clearing the Resource Locked check box.
