Entity Page Layout
PERMISSIONS Entity pages are governed by the permissions of the security level assigned to you.
NAVIGATION Create > Service Desk > Ticket
NAVIGATION Create > CRM > Organization (Opportunity, Device)
NAVIGATION Left Navigation Menu > Projects > Search > Projects > click Search > context menu > View Project > Schedule
About the New Entity and Edit Entity pages
The New Entity and Edit Entity pages for each entity have a similar layout that makes switching between views and locating fields easy. To open the page, use the path(s) in the Security and navigation section above. Depending on your browser settings, the entity page opens in the main workspace or on a new tab.
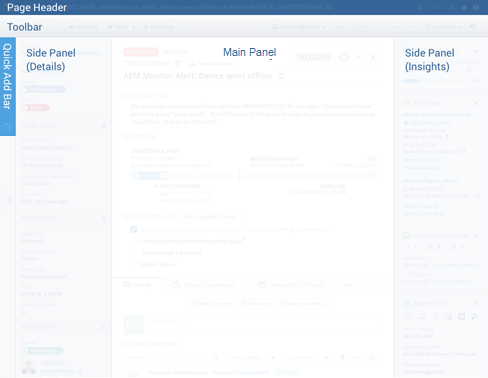
| In the standard layout, the Details panel is shown on the left and the Insights panel on the right of the Main panel. |
|
|
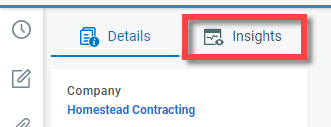
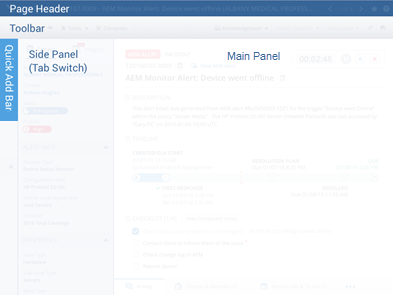
When the browser window size is smaller than 1284 pixels, the compact layout is shown. You will use a tab to switch between the Details and the Insights tab. NOTE The Organization entity does not have an Insights panel. |
|
The top of the page
The page header is the colored bar at the very top of the page. It displays any identifying information, including ID numbers, ticket numbers, organization name, etc.
The following functions are located on the page header:
| Icon | Function |
|---|---|
|
|
Click the arrow to send the ticket or task to your work list. If the ticket is already on your work list, the second icon is displayed. Click the up arrow to send the ticket to the top of your work list. Refer to Using work lists. |
| Click the forward or backward arrow to navigate through the other items on the list or table you opened the entity from. You can page through up to 25 items at a time. | |
(except Organization and Contact) |
Click to toggle between 2-panel view and tabbed panel view. When the icon is clicked, the Details and Insights panels are displayed to the left of the Main panel in a tabbed view. When the icon is not clicked, the Details panel is displayed on the left, and the Insights panel is displayed on the right. If your browser window is less than 1230 pixels wide, the ticket page is automatically displayed on the tabbed view. |
| Click this bookmark icon to add this ticket to the Bookmarks menu in the main navigation. | |
| Click this help icon to open the specific help topic for this page. Refer to About online help. |
The toolbar provides access to entity-specific management features. The following options are common to all entities:
| Action | Description |
|---|---|
| Edit | Click to put the entity into edit mode so you can make changes. |
| Tools |
The Tools menu includes a list of actions that you can perform specific to the entity. Each set of options is described in the detail page documentation for each entity: |
| LiveLinks | LiveLinks are links from Autotask that pass information to an external application or website. Click to access the active LiveLinks configured by your Autotask Administrator. Click a link to access the external application, web sites, or customized link within Autotask. Refer to LiveLinks. |
Any messages or banners associated with the entity appear above the panels. Tickets, organizations, contacts, opportunities, and devices can have banners. 
The Quick Add bar allows you to add new accessory items to the entity with a click or a keyboard shortcut. It remains in the same position when you scroll the page. Hover over an icon to display the name of the entity and the keyboard shortcut. Here, the Quick Add bar is shown in collapsed and expanded mode: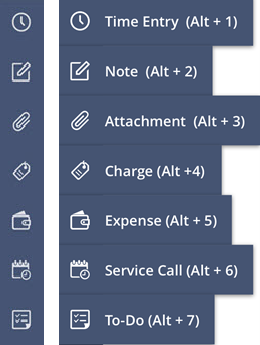
The following quick add items are available for the various entities:
| Entity | Available for | Permission |
|---|---|---|
| Note |
All entities |
Always enabled. |
| Attachment |
All entities except contact |
Always enabled. |
| Time Entry |
Task |
Enabled for all users unless the task or ticket status is equal to Complete and (for tickets) the ticket system setting Prohibit time entry on tickets whose status is Complete is enabled. |
| Expense |
Task |
Enabled unless the Expense Management feature is disabled, or the resource's security level prevents them from adding expenses. |
| Service Call |
Task Organization |
Enabled if you have permission to add a service call. Hidden if you do not have permission. |
| Charge |
Ticket |
Enabled unless the resource's security level prevents them from adding charges. |
|
Ticket |
Device Organization, and Contact |
Enabled if you have permission to add a ticket. |
| To-Do |
Ticket Opportunity Organization, and Contact |
Enabled if you have permission to add a to-do. Hidden if you do not have permission. |
|
Opportunity |
Enabled for users who have permission to add opportunities and quotes.
For a general overview of the Kaseya Quote Manager integration, refer to The Kaseya Quote Manager integration. |
|
|
Contact |
Organization |
Enabled if you have permission to add contacts. |
|
Opportunity |
Organization and Contact |
Enabled if you have permission to add opportunities and quotes. |
|
Device |
Organization and Contact |
Enabled if you have permission to add devices and subscriptions. |
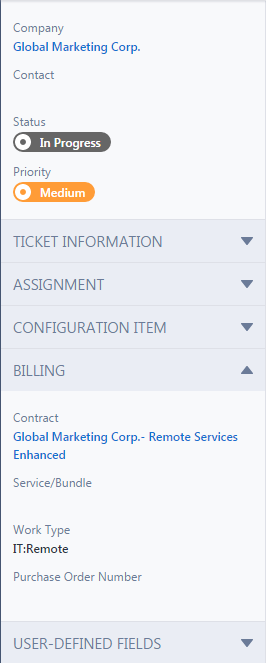
The Details panel is always located to the left of the Main panel. It includes a fixed header that cannot be collapsed or hidden from view, and a variable number of additional sections that can be expanded and collapsed.
The Details header contains the following fields for the various entities.
| Field | Appears in the following entities | Description |
|---|---|---|
|
Account Manager |
Organization |
The resource in your organization who will take overall responsibility for the account relationship. The field can be displayed on other entities but will be view-only. |
|
Classification |
Organization |
Classifications are associated with icons that provide visual identifiers used to categorize and search for organizations. They appear with the organization name throughout Autotask. Refer to Classification icons. |
| Organization |
All except Organization (where it is in the main body header) |
The name of the organization associated with the entity. For users with View permissions of the organization, the name appears as a hyperlink that, when clicked, will open the Organization page. |
| Status |
All |
The entity status, displayed on a color-coded tab. Administrators can assign a color and an icon to each status. |
| Contact |
Ticket |
The name of the contact associated with the entity, if any. For users with View permissions of the organization, the name is displayed as a hyperlink that, when clicked, will open the Contact page. The name is followed by the |
| Priority |
Ticket |
The priority, displayed on a color-coded tab. Administrators can assign a color and an icon to each priority. For tickets, the Priority is always required; for tasks, the category determines if Priority is required or hidden. Refer to The Details tab. |
|
Project |
Task |
The name of the project the task is associated with. For users with security level permission to view the project, the project name is a link that opens the Project Summary page. For information on project security, refer to Project security settings. |
|
Stage |
Opportunity |
Unlike the predefined values in the opportunity Status field, opportunity stages can be customized to reflect your local organization's sales process. For more information about stages and how to customize them, refer to Opportunity stages. |
|
Projected Close Date |
Opportunity |
This field is required to allow you to calculate projected revenue for any time frame. |
Below the Details header, there are a variable number of sections. Click a section heading to expand or collapse the list of fields contained in that section. The number of sections, section names, and fields contained in each section are determined by the entity category.
When you add, edit, or copy a category, you can configure the following:
- The sections that are displayed on the Details panel. It is possible to remove any or all sections from display in a specific category.
- The order the sections are displayed in. Sections can be arranged in any order on the Details panel.
- The section titles. You can change the section titles to match your local organization's terminology.
- The fields displayed in each section. Individual fields can be hidden or moved from one section to another.
- Field defaults and required settings. The default values, if any, and required status can be set for some fields.
- Picklist options. For List fields (including UDFs), which values will be available for selection for the field. This will result in much shorter picklists and more consistent and accurate selections.
For information on how to configure the Details panel, refer to The Details tab.
NOTE The Organization and Contact pages do not have Insights panels.
The Insights panel appears to the right of the Main panel or in a tab configuration behind the Details tab on the left.
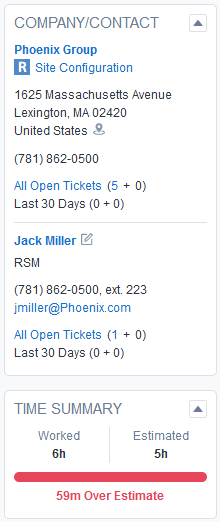
Insights summarize existing information about the entity, like related tickets, notes and attachments, and devices. Some insights will not be displayed unless there is data available to them.
All insights are created by Datto and generally are not configurable. There are some insights that will allow an administrator to add up to ten system fields or user-defined fields. These fields can be viewed by clicking the Additional Information link which will appear at the bottom of a customized insight. If you don't have permission to view the information in one of the additional fields, you will see the label, but the field value will be hidden. If you don't have access to the entity, you won't be able to open the Detail page. Refer to Customizing Insights for more information.
Insights do not contain any editable fields, although many contain hyperlinks that open the pages where you can modify the related entities.
Each category allows you to display up to 20 insights. You can expand or collapse each insight, a setting that is remembered from one session to the next. If no insights are selected, the Main panel will take up the space where the insights would normally be displayed.
For more information about Insights, refer to The Insights tab.
The Main panel
The most important information about the entity appears on the Main panel. For information about entity components and field descriptions, refer to the entity Details pages:
- The Organization page
- The Contact page
- The Device page
- The Opportunity page
- The Task page
- The Ticket page
The accessory tabs
Accessory tabs are located at the bottom of the Main panel. This is the working area of the entity. You are able to track time entries and to-dos for tickets, notes, and attachments for opportunities and devices, etc. The number next to an accessory tab name indicates the total number of tab-related items associated with the entity.
For comprehensive information about accessory tabs, refer to Accessory tabs.
The Notification panel
The New and Edit pages for each entity except Organization and Contact feature a notification panel that is accessed from a persistent handle at the bottom of the page.
For more information, refer to Notification panel.
