The Ticket page
PERMISSIONS This page is governed by the Service Desk security settings of the security level assigned to you.
NAVIGATION Left Navigation Menu > Service Desk > Search > Tickets > click Search > open a ticket
To open the page, use the path(s) in the Security and navigation section above.
For information on the general page layout and common elements on all entity pages, refer to Entity Page Layout.
For elements all entities have in common, refer to The top of the page.
The task bar provides access to a number of ticket management features.
| Action | Description |
|---|---|
| Edit | Click to put the ticket into Edit mode so you can make changes to the ticket. The stopwatch will continue to run. Refer to Adding, copying, and editing tickets. |
| Accept | Click to assign the ticket to yourself. This option is not available if the ticket is already assigned to a resource. |
| Forward | Click to assign the ticket to another user or queue and modify certain ticket settings. Refer to Forwarding and modifying tickets. |
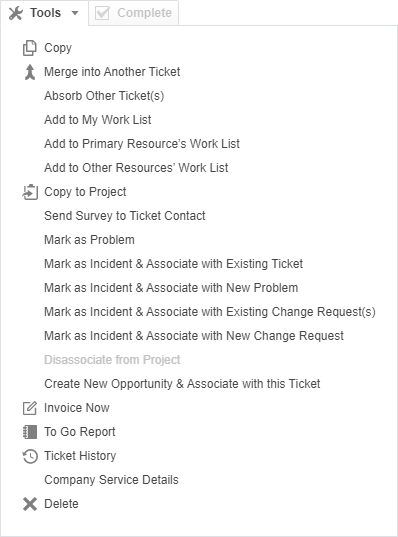
| Tools | Refer to Tools menu. |
| Complete | Click to set the ticket status to Complete. Refer to Completing tickets. |
|
(if Knowledge Base is enabled) |
This drop-down menu appears only when Knowledge Base is enabled.
|
|
Transfer to Service Provider |
This button only appears on the toolbar of resources with a co-managed security level. It passes the ticket back to the service provider and moves the Co-managing User from the Primary Resource to the Secondary Resource(s) field. It also sets the Assigned to Co-managing User field to False. |
|
Transfer to Co-managing User |
This button only appears on the toolbar of resources with a non-co-managed security level. It passes the ticket to the co-managed help desk and moves the resource from the Primary Resource to the Secondary Resource(s) field. It also sets the Assigned to Co-managing User field to True. Tickets require a queue in order to be transferred to a co-managing user. |
| Notify Taskfire (visible only if Taskfire is enabled) | If the setting Tickets appear in Client Portal is enabled for the queue the ticket belongs to, the Notify Taskfire drop-down menu is enabled with the following selections: • My work is Complete on this ticket. This sets the Autotask status to Complete. • I have a Question. Opens a window that allows you to add a note that is posted to the assigned Taskfire resource. • Assign to Taskfire. Transfers ownership of the ticket to your client's Taskfire internal helpdesk. Refer to Service Desk queues and Managing tickets created in Client Portal. |
| Outsource | This option appears only when the Outsource module is enabled or if your company has accepted an invitation to accept tickets outsourced by other Autotask users. Refer to Outsourcing and insourcing tickets in Autotask. |
| LiveLinks | Click to access the active LiveLinks configured by your Autotask Administrator. This section displays a list of the associated LiveLinks. Click a link to access the external application, web sites, or customized link within Autotask. Refer to LiveLinks. |
| Print View | Click to display a report that contains the ticket information in a printable report format. Refer to Printing a ticket for more information. |
| Menu Option | Description |
|---|---|
| All Ticket Types | |
| Copy |
Click to create a copy of the ticket. The following fields are copied to a new ticket: Organization, Contact, Source, Title, Description, Status, Priority, SLA, Ticket Type, Issue Type, Sub-Issue Type, Estimated Hours, Queue, Primary Resource and Role, Secondary Resources, Work Type, Purchase Order Number, Devices, User-Defined Fields, and Resolution. Any tags are copied to the new ticket. The insights that contain data specific to the new ticket are empty. Insights that are organization- or contact-specific remain populated. If the ticket is a problem ticket and has one or more incidents, the incidents will not be copied. Refer to Working with problem and incident tickets. |
| Merge into Another Ticket | Click to open the data selector. It includes all tickets for the current ticket's organization, excluding Problem and Change Request tickets. Select the ticket to merge into and then Save & Close. Review the message and click Merge or Do Not Merge. Refer to Merging tickets. Permission to edit tickets is required. |
| Absorb Other Ticket(s) | Click to open the data selector. It includes all tickets for the current ticket's organization, excluding Problem and Change Request tickets. Select the ticket(s) to absorb and then Save & Close. Review the message and click Absorb or Do Not Absorb. Refer to Merging tickets. Permission to edit tickets is required. |
| Add to My Work List | Allows you to add the ticket or selected tickets to your Work List. Refer to Using work lists |
| Add to Primary Resource's Work List | Allows you to add the ticket to the primary resource's Work List. Refer to Using work lists |
| Add to Other Resources' Work List | Allows you to add the ticket to the Work List of one or more additional resources. This option opens a resource selector populated with all active resources. You can select one or more resources. Refer to Using work lists |
| Copy to Project | Copies the current ticket and associates it with a project as a task. Refer to Copying a ticket to a project. |
| Send Survey to Ticket Contact | Refer to Selecting a survey to send to a task or ticket contact. |
| Disassociate from Project | Allows you to break the association between the ticket and the project. Only enabled if the ticket is associated with a project. |
|
Create New Opportunity & Associate with this Ticket |
Click to open the New Opportunity page and create a new opportunity. Once the opportunity is saved, the ticket and the opportunity will be associated with one another. The ticket will appear in the ticket table on the opportunity. The opportunity will appear on the ticket detail pane if the ticket category is configured to display the Opportunity field. Refer to Adding and editing opportunities. This option will not appear if the ticket is already associated with an opportunity. |
|
Disassociate from Opportunity |
Allows you to break the association between the ticket and the opportunity. This option will only appear if the ticket is already associated with an opportunity. When you disassociate a ticket from an opportunity, all ticket-related entries will be removed from the opportunity detail activity feed and associated tickets tab. If you associate the ticket once more, the entries will appear again on the activity feed and tickets tab. |
| Invoice Now | You can generate a single invoice for all unbilled labor and charges on this ticket that are not being billed to a parent account. Refer to Generating an invoice from a ticket. |
| To Go Report | Refer to To Go report. |
| Ticket History | Refer to Viewing the ticket history. |
|
SLA Information |
Refer to The Service Level Agreement tab. |
| Organization Service Details | View the last ten time entries against any ticket for this customer. Refer toViewing the ticket history . |
| Delete | Refer to Deleting a ticket. |
| On Service Request Tickets | |
| Mark as Problem | Changes the Ticket Type from Service Request to Problem. Refer to Working with problem and incident tickets. |
| Mark as Incident & Associate with Existing Ticket | Opens the Select Ticket data selector page that will display all ticket types except Change Requests. The selected ticket will become the Problem ticket, and the current ticket will become an Incident ticket. If the Incident and Problem tickets belong to different organizations, a message will recommend that you create a Problem ticket for your local organization. |
| Mark as Incident & Associate with New Problem | Opens the New Ticket page, populated with the current ticket's organization information. The ticket type is set to Problem. Saving the new Problem ticket will set the current ticket's ticket type to Incident and link it to the Problem ticket as an incident. |
| Mark as Incident & Associate with Existing Change Request(s) | This option is only available if the Change Management feature is enabled. Opens the Select Ticket data selector page. Only Change Requests are displayed. Selecting a ticket will add the current ticket as an incident to the selected Change Request ticket. Refer to Change management. |
| Mark as Incident & Associate with New Change Request | This option is only available if the Change Management feature is enabled. Choosing this option will open the New Ticket page. The new ticket's type will default to Change Request. Saving the new change request ticket will set the current ticket's type to Incident and link it to the new change request ticket. Refer to Change management. |
| On Problem Tickets | |
| Mark as Incident & Associate with Existing Ticket | Opens the Select Ticket data selector page that will display all ticket types except Change Requests. The selected ticket will become the new Problem ticket, and the current ticket will become an Incident ticket. All of the incidents associated with the current ticket will be disassociated and moved to the new Problem ticket. If the Incident and Problem tickets belong to different organizations, a message will recommend that you create a Problem ticket for your local organization. |
| Mark as Incident & Associate with a New Problem | Opens the New Ticket page, populated with the current ticket's organization information. The new ticket's type will be set to Problem. The current ticket is changed to an Incident ticket. All of the incidents associated with the current ticket will be disassociated and moved to the new Problem ticket. |
| On Incident Tickets | |
| Associate Incident with Existing Ticket | Opens the Select Ticket data selector page that will display all ticket types except Change Requests. The selected ticket will become the new Problem ticket for this Incident ticket and will be disassociated from its current Problem ticket. |
| Associate Incident with New Problem | Opens the New Ticket page, populated with the current ticket's organization information. The new ticket's type will be set to Problem, and the Incident ticket will be associated with the new Problem ticket and disassociated from its current Problem ticket. |
| Mark as Problem | Changes the ticket type of the current ticket to Problem. |
| Remove Ticket From Problem | Disassociates the incident from its problem without changing the ticket type. |
| On Alert Tickets | |
| Mark as Problem | Changes the ticket type of the current ticket to Problem. |
| Mark as Incident & Associate with Existing Ticket | Opens the Select Ticket data selector page that will display all ticket types except Change Requests. The selected ticket will become the new Problem ticket, and the current ticket is changed to an Incident ticket. If the Incident and Problem tickets belong to different organizations, a message will recommend that you create a Problem ticket for your local organization. |
| Mark as Incident & Associate with a New Problem | Opens the New Ticket page, populated with the current ticket's organization information. The new ticket's type will be set to Problem. The current ticket is changed to an Incident ticket. |
For more information on Problem Management, refer to Working with problem and incident tickets.
Messages associated with the ticket are displayed above the panels.
| Message Type | Description |
|---|---|
Alert Message |
If a Ticket Detail Alert has been set for the organization or contact, it is displayed above the side panels and main panel. For information on how to set up this alert on organizations and contacts, refer to The Organization and Contact Alerts tabs. |
Outsource Message |
This message appears when a ticket has been outsourced, and the outsource status is one of the following: Accepted, Assigned, In Progress, Waiting Approval, and Complete. Click the link to open the Organization page. |
Taskfire Message |
This message appears on tickets that are being worked on by a client's internal help desk in Taskfire. |
Change Management Message |
This message is displayed when you are viewing a Change Request ticket that is awaiting your approval. It only appears if the Change Management feature is enabled. Refer to Change management. |
|
Co-managed Messages Displayed when Assigned to Co-managing User is True: Displayed when Assigned to Co-managing User is False: |
These messages appear on tickets of co-managed organizations. They indicate who is responsible for working on the ticket. |
Refer to Quick Add bar.
The ticket Details panel for is located to the left of the Main panel. It contains a fixed header and additional sections that can be expanded and collapsed. Refer to The Details panel. For field descriptions of fields that can appear in Details panel sections, refer to Ticket page elements and field descriptions.
For general information about insights, refer to The Insights panel. For information about ticket insights, refer to Ticket insights.
At the top of the Main panel area, the following field information is displayed:
| Field Name | Description | ||||||||||||
|---|---|---|---|---|---|---|---|---|---|---|---|---|---|
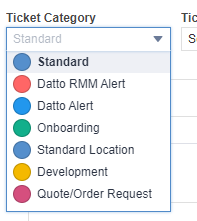
| Ticket Category |
The [Entity] Category field appears on all entity pages for which categories can be configured. They determine the layout and the options on the entity:
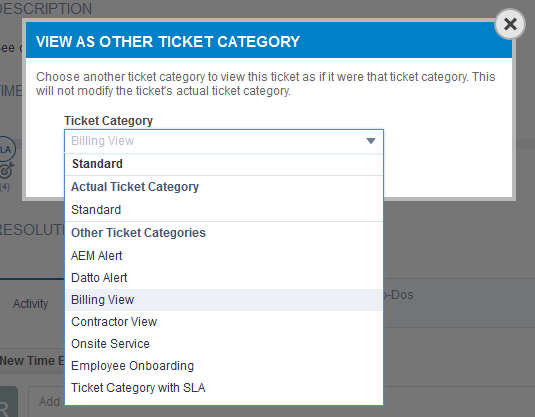
Refer to Introduction to Categories. Adding or editing a ticket Subject to security permissions, click the drop-down menu and make a selection. When you create a new ticket, the ticket category defaults to the category selected on your Profile page or the system default if you didn't choose one on the profile. If your security level allows you to choose between multiple ticket categories, click the drop-down menu and choose the appropriate category. Viewing a ticket When you are viewing the ticket, you will see the ticket in its actual ticket category. If your security level includes access to other ticket categories, you can view the ticket using a different category's layout, without modifying the ticket's actual ticket category. This will give you access to fields that may be hidden on the original category. Access to ticket categories may be limited by your security level. Refer to Available Ticket Categories when Creating or Editing Tickets. You will not be able to change the ticket category at all if one of the following applies:
Either way, you are limited to the one ticket category when creating or viewing a ticket. |
||||||||||||
| Ticket Type |
The ticket type determines which Accessory tabs are available and which Tools are enabled on the ticket. Refer to Tools menu and Selecting a ticket type. With the Ticket Type classification, Autotask supports the Information Technology Infrastructure Library (ITIL), a set of practices for IT service management (ITSM), specifically Service Management, Incident Management, Problem Management, and Change Management. But even if you don't follow ITIL guidelines for problem management, the problem/incident ticket feature of Autotask will help you group and manage tickets that have a common cause. An additional ticket type, Alert, supports the deep integration between Autotask and Datto RMM. Ticket type can be changed using a workflow rule. Refer to Adding, editing, and copying workflow rules. The following rules apply:
A note is added to the ticket indicating that a workflow rule fired or the reasons it didn't fire. |
||||||||||||
| Ticket Number |
Each ticket is identified by a system-generated unique ticket number, which incorporates the date on which it was created and an automatically incremented number. Note that tickets and tasks share the numbering system. Example: T20230919.0007 is the seventh ticket or task created on September 19, 2023. |
||||||||||||
| Quick Copy buttons |
There are four Quick Copy buttons on the Ticket page:
|
||||||||||||
| Ticket Stopwatch | The Ticket Stopwatch starts running as soon as you open the New Ticket or Edit Ticket page. For detailed information, refer to The task or ticket stopwatch. | ||||||||||||
| Create Date |
This field appears on many entities. It tracks the date and time an entity was created, or imported into, Autotask. It is system-generated and cannot be edited. For some entities, it is not exposed in the UI, but it is available in reports and in the API. Often, date/time variables calculated from the date/time stamp are available in multiple formats. Examples:
|
||||||||||||
| Created by |
This field appears on many entities. It identifies the resource who created or imported the entity into Autotask. It is system-generated and cannot be edited. For some entities, it is not exposed in the UI, but it is available in reports and in the API. The name is followed by the |
||||||||||||
| View Datto RMM Alert |
This link is only displayed on tickets of type Alert that were created by the Datto RMM integration. Clicking the link will open the original alert in Datto RMM. Refer to Access the Datto RMM alert associated with a ticket. |
||||||||||||
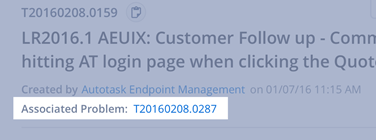
| Associated Problem |
This line only exists on Incident tickets that are associated with a Problem ticket. Clicking the ticket link will open the Problem ticket. |
||||||||||||
| Survey Rating |
This line is only displayed if a survey result is associated with this ticket. |
The middle part of the main panel is made up of up to seven components:
- Description
- Tags. Refer to Working with tags on a ticket.
- Insource Information. Refer to Insourcing features on the Ticket page.
- Timeline. Refer to The ticket timeline.
- Checklist. Refer to The checklist.
- Resolution
- Potentially Impacted Devices. Refer to Managing relationships between devices (The Related Items tab).
Each component can be collapsed or expanded, and this setting is remembered for each ticket category and user. The display order of the sections is determined by the ticket category. Refer to The General tab.
For a description of the middle part of the main panel, refer to Ticket page elements and field descriptions.
For comprehensive information about accessory tabs, refer to Accessory tabs.
The ticket accessory tabs are located at the bottom of the main panel area. The accessory tabs that appear on a specific ticket are determined by the ticket type. For more on ticket types, refer to Selecting a ticket type.
The following table provides an overview of accessory tabs by ticket type:
| Available Accessory Tabs | Service Request | Incident | Problem | Change Request, RMA | Alert |
|---|---|---|---|---|---|
|
|
|
|
|
||
|
|
|
|
|||
|
|
|
|
|||
|
|
|
|
|
||
|
|
|
|
|


